「Kernel」Linux kernel lab 浅浅跟随
在此之前
在这篇文章中,我们将跟随 Linux Kernel Teaching,进行由浅入深的内核学习,以适应未来(可能出现的)内核开发工作。
值得注意的是,这个课程也拥有 中文版本,你可以在 linux-kernel-labs-zh/docs-linux-kernel-labs-zh-cn 进行 star 以支持他们的工作。
在接下来的博客中,我可能仅对 课程 部分进行简述,重复抄写已有内容而不加自己的思考总是没有意义的。我们的重点将放在 实验 部分。
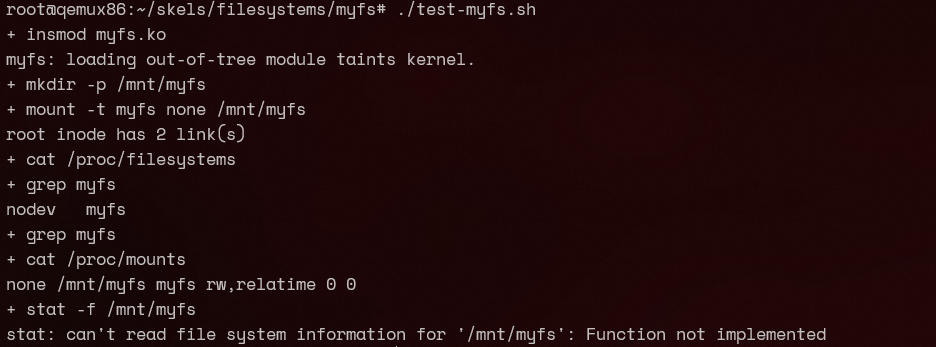
基础设施
在这一节中,我们将准备实验环境。我使用 WSL2 内的 Docker 作为实验环境,这无疑是非常方便的。
curl -LO https://raw.githubusercontent.com/linux-kernel-labs-zh/so2-labs/main/local.shchmod +x ./local.shsudo ./local.sh docker interactive之后,通过设置环境变量 LABS,使用 make skels 即可生成不同的实验骨架。例如:
root@MuelNova-Laptop:/linux/tools/labs# LABS=kernel_modules make skels -j$(nproc)mkdir -p skelscd templates && find kernel_modules -type f | xargs ./generate_skels.py --output ../skels --todo 0skel kernel_modules/5-oops-mod/oops_mod.cskel kernel_modules/5-oops-mod/Kbuildskel kernel_modules/3-error-mod/err_mod.cskel kernel_modules/3-error-mod/Kbuildskel kernel_modules/1-2-test-mod/hello_mod.cskel kernel_modules/1-2-test-mod/Kbuildskel kernel_modules/9-dyndbg/dyndbg.cskel kernel_modules/9-dyndbg/Kbuildskel kernel_modules/8-kdb/hello_kdb.cskel kernel_modules/8-kdb/Kbuildskel kernel_modules/7-list-proc/list_proc.cskel kernel_modules/7-list-proc/Kbuildskel kernel_modules/4-multi-mod/mod1.cskel kernel_modules/4-multi-mod/mod2.cskel kernel_modules/4-multi-mod/Kbuildskel kernel_modules/6-cmd-mod/cmd_mod.cskel kernel_modules/6-cmd-mod/Kbuildrm -f skels/Kbuildroot@MuelNova-Laptop:/linux/tools/labs# ls skels/kernel_modules/1-2-test-mod 3-error-mod 4-multi-mod 5-oops-mod 6-cmd-mod 7-list-proc 8-kdb 9-dyndbg具体说明可以看 https://github.com/linux-kernel-labs-zh/so2-labs
wsl2 环境
由于我的 WSL2 开启了 mirrored 模式,导致它的 console 模式进不去,我花了一些时间进行探索,可以看 #3。
简单而言就是把已使用的网段换了一个没使用的网段。
diff --git a/tools/labs/qemu/Makefile b/tools/labs/qemu/Makefileindex e9ee4ec1b..6e10ac6f0 100644--- a/tools/labs/qemu/Makefile+++ b/tools/labs/qemu/Makefile@@ -135,7 +135,7 @@ rootfs: $(YOCTO_ROOTFS)   printf '%s\n' '#!/bin/sh' '/bin/login -f root' > rootfs/sbin/rootlogin   chmod +x rootfs/sbin/rootlogin   mkdir -p rootfs/home/root/skels-  echo "//10.0.2.1/skels /home/root/skels cifs port=4450,guest,user=dummy 0 0" >> rootfs/etc/fstab+  echo "//172.31.2.1/skels /home/root/skels cifs port=4450,guest,user=dummy 0 0" >> rootfs/etc/fstab   echo "hvc0:12345:respawn:/sbin/getty 115200 hvc0" >> rootfs/etc/inittab
 $(YOCTO_ROOTFS):diff --git a/tools/labs/qemu/create_net.sh b/tools/labs/qemu/create_net.shindex c97b6fa0a..f803ed1e4 100755--- a/tools/labs/qemu/create_net.sh+++ b/tools/labs/qemu/create_net.sh@@ -18,7 +18,7 @@ case "$device" in         subnet=172.30.0         ;;     "lkt-tap-smbd")-        subnet=10.0.2+        subnet=172.31.2       ;;     *)         echo "Unknown device" 1>&2diff --git a/tools/labs/qemu/run-qemu.sh b/tools/labs/qemu/run-qemu.shindex 9938ec18e..abd245be1 100755--- a/tools/labs/qemu/run-qemu.sh+++ b/tools/labs/qemu/run-qemu.sh@@ -24,7 +24,7 @@ case "$mode" in       ;;     gui)       # QEMU_DISPLAY = sdl, gtk, ...-      qemu_display="-display ${QEMU_DISPLAY:-"sdl"}"+      qemu_display="-display ${QEMU_DISPLAY:-"gtk"}"       linux_console=""       ;;     checker)@@ -56,13 +56,13 @@ linux_loglevel=${LINUX_LOGLEVEL:-"15"} linux_term=${LINUX_TERM:-"TERM=xterm"} linux_addcmdline=${LINUX_ADD_CMDLINE:-""}
-linux_cmdline=${LINUX_CMDLINE:-"root=/dev/cifs rw ip=dhcp cifsroot=//10.0.2.1/rootfs,port=4450,guest,user=dummy $linux_console loglevel=$linux_loglevel pci=noacpi $linux_term $linux_addcmdline"}+linux_cmdline=${LINUX_CMDLINE:-"root=/dev/cifs rw ip=dhcp cifsroot=//172.31.2.1/rootfs,port=4450,guest,user=dummy $linux_console loglevel=$linux_loglevel pci=noacpi $linux_term $linux_addcmdline"}
 user=$(id -un)
 cat << EOF > "$SAMBA_DIR/smbd.conf" [global]-    interfaces = 10.0.2.1+    interfaces = 172.31.2.1     smb ports = 4450     private dir = $SAMBA_DIR     bind interfaces only = yes
VS-Code 开发环境
我建立了一个 vsc 的环境。首先 VSC 可以直接用 dev contained 连容器,然后装 clangd
Method1
在容器环境里,装 clang 和 bear
root@MuelNova-Laptop:/linux# apt install -y bear clang之后生成 compile_commands.json
root@MuelNova-Laptop:/linux# bear make CC=clang然后打开 remote 的 settings.json,加这么一句
{ "clangd.arguments": [ // highlight-next-line "--compile-commands-dir=/linux" ]}注意你需要再重新 make 一下,不然里面环境就炸了。
Method2
下起来太麻烦了,直接创一个 compile_commands.json
写入
[ { "arguments": [ "clang", "-c", "-Wp,-MMD,scripts/mod/.empty.o.d", "-nostdinc", "-isystem", "/usr/lib/llvm-10/lib/clang/10.0.0/include", "-I./arch/x86/include", "-I./arch/x86/include/generated", "-I./include", "-I./arch/x86/include/uapi", "-I./arch/x86/include/generated/uapi", "-I./include/uapi", "-I./include/generated/uapi", "-include", "./include/linux/kconfig.h", "-include", "./include/linux/compiler_types.h", "-D__KERNEL__", "-Qunused-arguments", "-fmacro-prefix-map=./=", "-Wall", "-Wundef", "-Werror=strict-prototypes", "-Wno-trigraphs", "-fno-strict-aliasing", "-fno-common", "-fshort-wchar", "-fno-PIE", "-Werror=implicit-function-declaration", "-Werror=implicit-int", "-Werror=return-type", "-Wno-format-security", "-std=gnu89", "-no-integrated-as", "-Werror=unknown-warning-option", "-mno-sse", "-mno-mmx", "-mno-sse2", "-mno-3dnow", "-mno-avx", "-m32", "-msoft-float", "-mregparm=3", "-freg-struct-return", "-fno-pic", "-mstack-alignment=4", "-march=i686", "-Wa,-mtune=generic32", "-ffreestanding", "-Wno-sign-compare", "-fno-asynchronous-unwind-tables", "-mretpoline-external-thunk", "-fno-delete-null-pointer-checks", "-Wno-address-of-packed-member", "-O2", "-Wframe-larger-than=1024", "-fstack-protector-strong", "-Wno-format-invalid-specifier", "-Wno-gnu", "-mno-global-merge", "-Wno-unused-const-variable", "-fno-omit-frame-pointer", "-fno-optimize-sibling-calls", "-g", "-gdwarf-4", "-Wdeclaration-after-statement", "-Wvla", "-Wno-pointer-sign", "-Wno-array-bounds", "-fno-strict-overflow", "-fno-stack-check", "-Werror=date-time", "-Werror=incompatible-pointer-types", "-fcf-protection=none", "-Wno-initializer-overrides", "-Wno-format", "-Wno-sign-compare", "-Wno-format-zero-length", "-Wno-tautological-constant-out-of-range-compare", "-DKBUILD_MODFILE=\"scripts/mod/empty\"", "-DKBUILD_BASENAME=\"empty\"", "-DKBUILD_MODNAME=\"empty\"", "-o", "scripts/mod/empty.o", "scripts/mod/empty.c" ], "directory": "/linux", "file": "scripts/mod/empty.c" }]然后打开 remote 的 settings.json,加这么一句
{ "clangd.arguments": [ // highlight-next-line "--compile-commands-dir=/linux/tools/lab" ]}Kernel Modules
实验目标
- 创建简单的模块
- 描述内核模块编译的过程
- 展示如何在内核中使用模块
- 简单的内核调试方法
0. 引言
使用 cscope 或 LXR 在 Linux 内核源代码中查找以下符号的定义:
module_init()和module_exit()这两个宏的作用是什么?init_module和cleanup_module是什么?ignore_loglevel这个变量用于什么?
Docker 已经配好了虚拟机,所以可以直接用 cscope 来搜。
vim -t module_init但是这样搜出来的都是引用而不是定义,所以我们还是用 Linux source code (v6.9.9) - Bootlin 搜吧
/* Each module must use one module_init(). */#define module_init(initfn)          \  static inline initcall_t __maybe_unused __inittest(void)    \  { return initfn; }          \  int init_module(void) __copy(initfn)      \    __attribute__((alias(#initfn)));    \  ___ADDRESSABLE(init_module, __initdata);
/* This is only required if you want to be unloadable. */#define module_exit(exitfn)          \  static inline exitcall_t __maybe_unused __exittest(void)    \  { return exitfn; }          \  void cleanup_module(void) __copy(exitfn)    \    __attribute__((alias(#exitfn)));    \  ___ADDRESSABLE(cleanup_module, __exitdata);
#endif
宏真是难看。这里定义了一个 **inittest 函数,返回我们传入的 initfn 指针,在模块插入后作为入口函数调用。之后,它定义了一个 int 类型的函数 init_module,这里 **copy宏设置了**copy** 属性,同时设置了别名为 #initfn,这些用于给编译器提供信息。
module_exit 也是类似,我们不再解释。
对于 ignore_loglevel,字面意义,就是忽略日志等级,全部输出。
static bool __read_mostly ignore_loglevel;
static bool suppress_message_printing(int level){  return (level >= console_loglevel && !ignore_loglevel);}
1. 内核模块
使用 make console 启动虚拟机,并执行以下任务:
- 加载内核模块。
- 列出内核模块并检查当前模块是否存在。
- 卸载内核模块。
- 使用 dmesg 命令查看加载/卸载内核模块时显示的消息。
首先我们生成骨架
LABS=kernel_modules make skels注意有一个 skels 是 error-mod,意味着它有错误,因此我们先去删除它,等到后面修复了我们再生成它。
root@MuelNova-Laptop:/linux/tools/labs# rm skels/kernel_modules/3-error-mod/ -rroot@MuelNova-Laptop:/linux/tools/labs# make buildroot@MuelNova-Laptop:/linux/tools/labs# make console按理来说 make console 就可以直接进入了,但是我按回车没用。于是我们先 make copy 将驱动复制进入虚拟机,make boot 生成虚拟机,然后再手动连接
# tmux 1make boot# tmux 2minicom -D serial.pts# <回车>Poky (Yocto Project Reference Distro) 2.3 qemux86 /dev/hvc0
qemux86 login: root
root@qemux86:~/skels/kernel_modules/1-2-test-mod# insmod hello_mod.koHello!root@qemux86:~/skels/kernel_modules/1-2-test-mod# lsmod Tainted: Ghello_mod 16384 0 - Live 0xd085f000 (O)root@qemux86:~/skels/kernel_modules/1-2-test-mod# rmmod hello_mod.koGoodbye!2. Printk
观察虚拟机控制台。为什么消息直接显示在虚拟机控制台上?
配置系统,使消息不直接显示在串行控制台上,只能使用 dmesg 命令来查看。
观察代码,可以看到它是 pr_debug,也就是 loglevel=7,我们可以查看 /proc/sys/kernel/printk 的等级
root@qemux86:~# cat /proc/sys/kernel/printk15 4 1 7可以看到当前等级是 14,默认输出的日志等级是 4,最低等级是 1,默认控制台日志等级为 7
我们直接把他改成 4 就好
root@qemux86:~# insmod skels/kernel_modules/1-2-test-mod/hello_mod.koHello!root@qemux86:~# rmmod skels/kernel_modules/1-2-test-mod/hello_mod.koGoodbye!root@qemux86:~# echo 4 > /proc/sys/kernel/printkroot@qemux86:~# insmod skels/kernel_modules/1-2-test-mod/hello_mod.koroot@qemux86:~# rmmod skels/kernel_modules/1-2-test-mod/hello_mod.koroot@qemux86:~#3. 错误
生成名为 3-error-mod 的任务的框架。编译源代码并得到相应的内核模块。
为什么会出现编译错误? 提示: 这个模块与前一个模块有什么不同?
修改该模块以解决这些错误的原因,然后编译和测试该模块。
生成它的代码
LABS=kernel_modules/3-error-mod make skels首先我们对它进行编译,看看报错是什么
/linux/tools/labs/skels/./kernel_modules/3-error-mod/err_mod.c:5:20: error: expected declaration specifiers or '...' before string constant 5 | MODULE_DESCRIPTION("Error module"); | ^~~~~~~~~~~~~~/linux/tools/labs/skels/./kernel_modules/3-error-mod/err_mod.c:6:15: error: expected declaration specifiers or '...' before string constant 6 | MODULE_AUTHOR("Kernel Hacker"); | ^~~~~~~~~~~~~~~/linux/tools/labs/skels/./kernel_modules/3-error-mod/err_mod.c:7:16: error: expected declaration specifiers or '...' before string constant 7 | MODULE_LICENSE("GPL");可以看到,似乎是这些函数的入参出了问题,那么很有可能是没引入头。
在 1 的里面是
#include <linux/module.h>#include <linux/init.h>#include <linux/kernel.h>在 3 的里面少了一个 <linux/module.h>
#include <linux/init.h>#include <linux/kernel.h>查询这些宏定义,可以发现都是来自于 include/linux/module.h,因此我们加入这个头就好
// highlight-next-line#include <linux/module.h>#include <linux/init.h>#include <linux/kernel.h>root@qemux86:~/skels/kernel_modules/3-error-mod# ls err_mod.koroot@qemux86:~/skels/kernel_modules/3-error-mod# insmod err_mod.koerr_mod: loading out-of-tree module taints kernel.n1 is 1, n2 is 24. 子模块
查看 4-multi-mod/ 目录中的 C 源代码文件 mod1.c 和 mod2.c。模块 2 仅包含模块 1 使用的函数的定义。
修改 Kbuild 文件,从这两个 C 源文件创建 multi_mod.ko 模块。
我们可以发现 4 里面没有 obj-m 规则。
root@MuelNova-Laptop:/linux/tools/labs/skels/kernel_modules/4-multi-mod# cat Kbuildccflags-y = -Wno-unused-function -Wno-unused-label -Wno-unused-variable
# TODO: add rules to create a multi object moduleroot@MuelNova-Laptop:/linux/tools/labs/skels/kernel_modules/4-multi-mod# cat ../1-2-test-mod/Kbuildccflags-y = -Wno-unused-function -Wno-unused-label -Wno-unused-variable -DDEBUG
obj-m = hello_mod.o
既然我们想要模块 2 和模块 1 一起编译,那么我们首先要将它们链接到一起 ($(module_name)-y),然后再编译 obj-m
ccflags-y = -Wno-unused-function -Wno-unused-label -Wno-unused-variable
# TODO: add rules to create a multi object module# highlight-startmulti-y = mod1.o mod2.oobj-m = multi.o# highlight-end
再编译,可以看到 4 已经成功编译,并且运行正常。
root@qemux86:~/skels/kernel_modules/4-multi-mod# insmod multi.komulti: loading out-of-tree module taints kernel.n1 is 1, n2 is 2root@qemux86:~/skels/kernel_modules/4-multi-mod# rmmod multi.kosum is 35. 内核 oops
内核 oops 是内核检测到的无效操作,只可能由内核生成。对于稳定的内核版本,这几乎可以肯定意味着模块含有错误。在 oops 出现后,内核仍将继续工作。
进入任务目录 5-oops-mod 并检查 C 源代码文件。注意问题将在哪里发生。在 Kbuild 文件中添加编译标记 -g。
看它的源代码,看着就有一个空指针。
static int my_oops_init(void){        char *p = 0;
        pr_info("before init\n");        *p = 'a';        pr_info("after init\n");
        return 0;}
我们 ins 一下看看 dmsg
Oops: 0002 [#1] SMPCPU: 0 PID: 238 Comm: insmod Tainted: G O 5.10.14+ #1Hardware name: QEMU Standard PC (i440FX + PIIX, 1996), BIOS 1.13.0-1ubuntu1.1 04/01/2014EIP: my_oops_init+0xd/0x22 [oops_mod]Code: Unable to access opcode bytes at RIP 0xd0865fe3.EAX: 0000000b EBX: 00000000 ECX: cfdc9d6c EDX: 0133efa3ESI: d0866000 EDI: 00000002 EBP: c2a81dd8 ESP: c2a81dd4DS: 007b ES: 007b FS: 00d8 GS: 00e0 SS: 0068 EFLAGS: 00000282CR0: 80050033 CR2: d0865fe3 CR3: 04362000 CR4: 00000690Call Trace: do_one_initcall+0x57/0x2d0 ? rcu_read_lock_sched_held+0x47/0x80 ? kmem_cache_alloc_trace+0x2ed/0x370 ? do_init_module+0x1f/0x210 do_init_module+0x4e/0x210 load_module+0x20a4/0x2580 __ia32_sys_init_module+0xed/0x130 do_int80_syscall_32+0x2c/0x40 entry_INT80_32+0xf7/0xf7EIP: 0x44902cc2Code: 06 89 8a 84 01 00 00 c3 55 57 56 53 8b 6c 24 2c 8b 7c 24 28 8b 74 24 24 8b 54 24 20 8b 4c 24 1c 8b 5c 24 18 8b 44 24 14 cd 80 <5b> 5e 5f 5d 3d 01 f0 ff ff 0f 83 bf 76 f4 ff c3 66 90 66 90 66 90EAX: ffffffda EBX: 09a8b050 ECX: 0001cfd8 EDX: 09a8b008ESI: 00000000 EDI: bfcc3dec EBP: 00000000 ESP: bfcc3c4cDS: 007b ES: 007b FS: 0000 GS: 0033 SS: 007b EFLAGS: 00000206Modules linked in: oops_mod(O+)CR2: 0000000000000000---[ end trace a8efa95c8be6f1d2 ]---EIP: my_oops_init+0xd/0x22 [oops_mod]Code: Unable to access opcode bytes at RIP 0xd0865fe3.EAX: 0000000b EBX: 00000000 ECX: cfdc9d6c EDX: 0133efa3ESI: d0866000 EDI: 00000002 EBP: c2a81dd8 ESP: c2a81dd4DS: 007b ES: 007b FS: 00d8 GS: 00e0 SS: 0068 EFLAGS: 00000282CR0: 80050033 CR2: d0865fe3 CR3: 04362000 CR4: 00000690可以看出是无效内存写入(OOPS 代码为 2,即第一位是 1,是写入,第 2 位是 0,是内核模式,第 0 位是 0,代表找不到页面)
:::info
想要看 oops 代码,可以看 arch/x86/include/asm/trap_pf.h
/* * Page fault error code bits: * * bit 0 == 0: no page found 1: protection fault * bit 1 == 0: read access 1: write access * bit 2 == 0: kernel-mode access 1: user-mode access * bit 3 == 1: use of reserved bit detected * bit 4 == 1: fault was an instruction fetch * bit 5 == 1: protection keys block access * bit 6 == 1: shadow stack access fault * bit 15 == 1: SGX MMU page-fault * bit 31 == 1: fault was due to RMP violation */enum x86_pf_error_code { X86_PF_PROT = BIT(0), X86_PF_WRITE = BIT(1), X86_PF_USER = BIT(2), X86_PF_RSVD = BIT(3), X86_PF_INSTR = BIT(4), X86_PF_PK = BIT(5), X86_PF_SHSTK = BIT(6), X86_PF_SGX = BIT(15), X86_PF_RMP = BIT(31),};:::
我们使用 addr2line 看它哪里有问题 EIP: my_oops_init+0xd/0x22 [oops_mod]
root@MuelNova-Laptop:/linux/tools/labs# addr2line -e skels/kernel_modules/5-oops-mod/oops_mod.o 0xd/linux/tools/labs/skels/./kernel_modules/5-oops-mod/oops_mod.c:15看到是 15 行,我们看看是哪个
#include <linux/module.h>#include <linux/init.h>#include <linux/kernel.h>#include <linux/slab.h>
MODULE_DESCRIPTION("Oops generating module");MODULE_AUTHOR("So2rul Esforever");MODULE_LICENSE("GPL");
static int my_oops_init(void){        char *p = 0;
        pr_info("before init\n");        *p = 'a';        pr_info("after init\n");
        return 0;}
static void my_oops_exit(void){        pr_info("module goes all out\n");}
和我们想的一样。更进一步,我们看看具体是哪条指令。
我们添加 -g 标志
# TODO: add flags to generate debug informationEXTRA_CFLAGS = -g
obj-m = oops_mod.o
:::note
不知道为什么,我这里加了之后还是不会出现 DEBUG-INFORMATION :::
但是我们可以直接来看这个汇编,一眼有问题。
root@MuelNova-Laptop:/linux/tools/labs# objdump -dS --adjust-vma=0xd0866000 skels/kernel_modules/5-oops-mod/oops_mod.kod086600d: c6 05 00 00 00 00 61 movb $0x61,0x06. 模块参数
进入任务目录 6-cmd-mod 并检查 C 源代码文件 cmd_mod.c。编译并复制相关的模块,然后加载内核模块以查看 printk 消息。然后从内核中卸载该模块。
在不修改源代码的情况下,加载内核模块以显示消息 Early bird gets tired。
static char *str = "the worm";
module_param(str, charp, 0000);MODULE_PARM_DESC(str, "A simple string");
static int __init cmd_init(void){    pr_info("Early bird gets %s\n", str);    return 0;}
显然我们需要更换 str,那么查询 module_param 这个宏。
/** * module_param - typesafe helper for a module/cmdline parameter * @name: the variable to alter, and exposed parameter name. * @type: the type of the parameter * @perm: visibility in sysfs. * * @name becomes the module parameter, or (prefixed by KBUILD_MODNAME and a * ".") the kernel commandline parameter. Note that - is changed to _, so * the user can use "foo-bar=1" even for variable "foo_bar". * * @perm is 0 if the variable is not to appear in sysfs, or 0444 * for world-readable, 0644 for root-writable, etc. Note that if it * is writable, you may need to use kernel_param_lock() around * accesses (esp. charp, which can be kfreed when it changes). * * The @type is simply pasted to refer to a param_ops_##type and a * param_check_##type: for convenience many standard types are provided but * you can create your own by defining those variables. * * Standard types are: * byte, hexint, short, ushort, int, uint, long, ulong * charp: a character pointer * bool: a bool, values 0/1, y/n, Y/N. * invbool: the above, only sense-reversed (N = true). */#define module_param(name, type, perm) \ module_param_named(name, name, type, perm)显然它需要传入一个 str=“tired” 的参数。
root@qemux86:~/skels/kernel_modules/6-cmd-mod# insmod cmd_mod.ko str="tired"cmd_mod: loading out-of-tree module taints kernel.Early bird gets tired7. 进程信息
检查名为 7-list-proc 的任务的框架。添加代码来显示当前进程的进程 ID( PID )和可执行文件名。
按照标记为 TODO 的命令进行操作。在加载和卸载模块时,必须显示这些信息。
#include <linux/init.h>#include <linux/kernel.h>#include <linux/module.h>/* TODO: add missing headers */
MODULE_DESCRIPTION("List current processes");MODULE_AUTHOR("Kernel Hacker");MODULE_LICENSE("GPL");
static int my_proc_init(void){        struct task_struct *p;
        /* TODO: print current process pid and its name */
        /* TODO: print the pid and name of all processes */
        return 0;}
static void my_proc_exit(void){        /* TODO: print current process pid and name */}
module_init(my_proc_init);module_exit(my_proc_exit);
我们一个 TODO TODO 来做
第一个就是要加缺少的头,我们可以查一下 task_struct 是哪里定义的,来自 include/linux/sched.h (CSCOPE 不好用,查不懂)
第二个要 print current process pid 和 name,查询资料后我们知道 sched.h 里有一个宏 current 会返回一个当前进程的 task_struct 指针。
pid 是一个 pid_t 的成员,其实就是 signed int 的别名,所以我们可以直接输出
name 则是 comm 这个字符数组
我们于是可以写出这样的代码
static int my_proc_init(void){    // hightlight-start        struct task_struct *p;        p = current;        pr_info("[I] Current PID: %d\n", p->pid);        pr_info("            Name: %s\n", p->comm);        /* TODO: print current process pid and its name */    // highlight-end
        /* TODO: print the pid and name of all processes */
return 0;}root@qemux86:~/skels/kernel_modules/7-list-proc# insmod list_proc.kolist_proc: loading out-of-tree module taints kernel.[I] Current PID: 240 Name: insmod测试,证明是可以用的。
第三个 TODO,我们要打印所有进程的,那么我们推测应该是有一个链表之类的保存了所有的进程的 task_struct,我们只需要找到他,然后遍历他就好了。得益于大模型,我们信息搜集到了一个 for_each_process 的宏,它可以遍历所有的进程。
:::info
它在 include/linux/sched/signal.h 里,见 这里
:::
因此,我们利用这个宏,即可遍历完成。
最终代码:
#include <linux/init.h>#include <linux/kernel.h>#include <linux/module.h>#include <linux/sched.h>#include <linux/sched/signal.h>/* TODO: add missing headers */
MODULE_DESCRIPTION("List current processes");MODULE_AUTHOR("Kernel Hacker");MODULE_LICENSE("GPL");
static int my_proc_init(void){        struct task_struct *p;        p = current;        pr_info("[I] Current PID: %d\n", p->pid);        pr_info("            Name: %s\n", p->comm);        /* TODO: print current process pid and its name */
        for_each_process(p) {            pr_info("[I] Current PID: %d\n", p->pid);            pr_info("            Name: %s\n", p->comm);        }        /* TODO: print the pid and name of all processes */
        return 0;}
static void my_proc_exit(void){        struct task_struct* p = current;        pr_info("[I] Current PID: %d\n", p->pid);        pr_info("            Name: %s\n", p->comm);}
module_init(my_proc_init);module_exit(my_proc_exit); Name: kswapd0[I] Current PID: 42 Name: cifsiod[I] Current PID: 43 Name: smb3decryptd[I] Current PID: 44 Name: cifsfileinfoput[I] Current PID: 45 Name: cifsoplockd[I] Current PID: 47 Name: acpi_thermal_pm[I] Current PID: 48 Name: kworker/u2:1[I] Current PID: 49 Name: khvcd[I] Current PID: 50 Name: kworker/0:2[I] Current PID: 51 Name: ipv6_addrconf[I] Current PID: 52 Name: kmemleak[I] Current PID: 53 Name: jbd2/vda-8[I] Current PID: 54 Name: ext4-rsv-conver[I] Current PID: 192 Name: udhcpc[I] Current PID: 203 Name: syslogd[I] Current PID: 206 Name: klogd[I] Current PID: 212 Name: getty[I] Current PID: 213 Name: sh[I] Current PID: 214 Name: getty[I] Current PID: 215 Name: getty[I] Current PID: 216 Name: getty[I] Current PID: 217 Name: getty[I] Current PID: 238 Name: insmod[I] Current PID: 242 Name: rmmod很有精神!
Ex1. KDB
echo hvc0 > /sys/module/kgdboc/parameters/kgdbocecho g > /proc/sysrq-trigger# 或者用 Ctrl+O g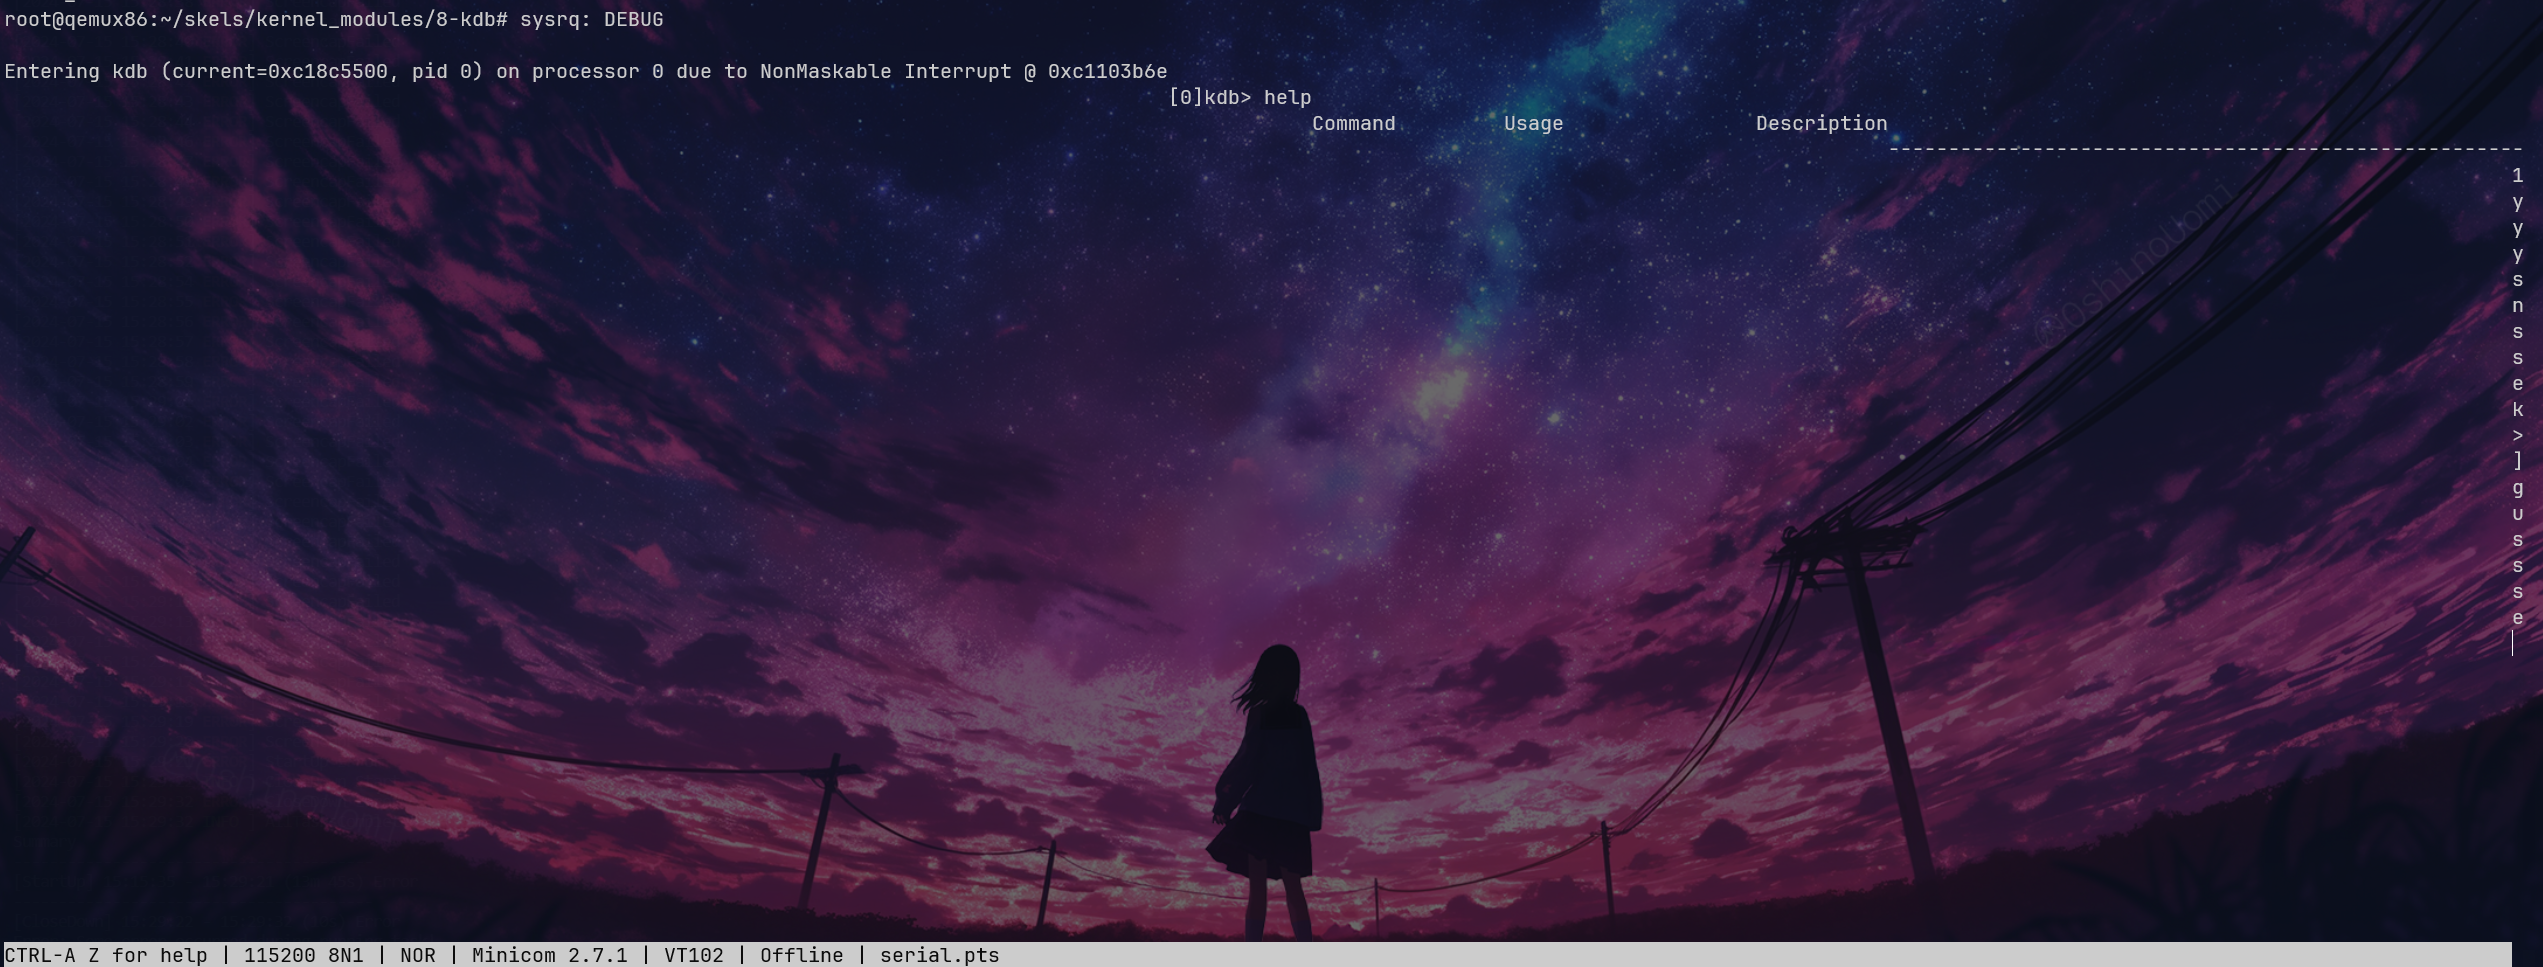
我这里有 BUG,显示不全,就这样吧。
利用 echo 写入就会直接进入 KDB 里

看堆栈 bt 就可以知道是 dummy_func1+0x8 的地方出了问题。还可以看到 current=0xc42b2b40,我们用 lsmod 可以看到基地址 0xd0880000。但是我们 bt 的时候看不到回溯栈,所以就搁置了。
接下来就是 gdb add-symbol-file 把它导入,然后设置基地址,看看指令是什么了,也是比较简单就不看了
Ex2. PS 模块
前面 7. proc-info 写完了
Ex3. 内存信息
创建一个内核模块,显示当前进程的虚拟内存区域;对于每个内存区域,它将显示起始地址和结束地址。
内存区域由类型为 struct vm_area_struct 的结构表示,那么我们就可以开始写内核模块了。
#include <linux/module.h>#include <linux/init.h>#include <linux/kernel.h>
MODULE_AUTHOR("Muel Nova");MODULE_DESCRIPTION("SHOW MEM");MODULE_LICENSE("GPL");
static int mem_init(void) {        return 0;}
static void mem_exit(void) {}
module_init(mem_init);module_exit(mem_exit);ccflags-y = -Wno-unused-function -Wno-unused-label -Wno-unused-variable -DDEBUG
obj-m = proc.o框架大概就是这样,接下来,我们查询 vm_area_struct 的用法。它被定义在 include/linux/mm_types.h 里,那么我们可以直接利用 vm_start 和 vm_end 来表示大小,它也是一个链表,用 vm_next 就可以找到下一个。
那么我们就需要知道如何找到当前进程的所有 vm_area_struct 结构体了。我们可以想到用 current 去找,翻一下可以看到 task_struct->mm 是一个 mm_struct 的结构体指针,那么我们继续去翻 mm_struct,第一个就是 struct vm_area_struct 的字段 mmap
:::info
内核版本 v5.10.14,在最新的内核里,我们已经看不到这个 mmap 字段了。在 mm: remove the vma linked list · torvalds/linux@763ecb0 (github.com) 中被删除了。
在新版本中,我们应该使用 mapleTree 来拿,也就是从 mm->mm_mt 里拿。
根据 diff 找到的新的用法
:::
因此最终的代码:
#include <linux/module.h>#include <linux/init.h>#include <linux/kernel.h>#include <linux/sched.h>#include <linux/mm_types.h>
MODULE_AUTHOR("Muel Nova");MODULE_DESCRIPTION("SHOW MEM");MODULE_LICENSE("GPL");
static int mem_init(void) { struct task_struct* p = current; struct mm_struct* mm = p->mm; struct vm_area_struct* vma = mm->mmap; while (vma) { printk("0x%lx - 0x%lx\n", vma->vm_start, vma->vm_end); vma = vma->vm_next; } return 0;}root@qemux86:~/skels/kernel_modules/10-proc# insmod proc.koproc: loading out-of-tree module taints kernel.0x8048000 - 0x80c20000x80c2000 - 0x80c30000x80c3000 - 0x80c40000x80c4000 - 0x80c60000x84c9000 - 0x84ea0000x4480c000 - 0x4482e0000x4482e000 - 0x4482f0000x4482f000 - 0x448300000x44832000 - 0x449a90000x449a9000 - 0x449ab0000x449ab000 - 0x449ac0000x449ac000 - 0x449af0000x449b1000 - 0x44a090000x44a09000 - 0x44a0a0000x44a0a000 - 0x44a0b0000xb7f28000 - 0xb7f4d0000xb7f4d000 - 0xb7f510000xb7f51000 - 0xb7f530000xbffcc000 - 0xbffed000Ex4. 动态调试
首先先 mount debugfs
mkdir /debugmount -t debugfs none /debug然后没找到 /debug/dynamic_debug,估计是内核没开吧,跑路
Kernel API
0. 简介
在 Linux 内核中查找以下符号的定义:
-
struct list_head:感觉大概看上去就是一个双向链表struct list_head {struct list_head *next, *prev;}; -
INIT_LIST_HEAD():初始化链表头。
static inline void INIT_LIST_HEAD(struct list_head *list){WRITE_ONCE(list->next, list);WRITE_ONCE(list->prev, list);} -
list_add():就是把 new 插入到 prev 和 next 中间 这里用 WRITE_ONCE 好像是为了进程安全并且保证顺序性
static inline void __list_add(struct list_head *new,struct list_head *prev,struct list_head *next){if (!__list_add_valid(new, prev, next))return;next->prev = new;new->next = next;new->prev = prev;WRITE_ONCE(prev->next, new);} -
list_for_each:就是一个循环的包装。
/*** list_for_each - iterate over a list* @pos: the &struct list_head to use as a loop cursor.* @head: the head for your list.*/#define list_for_each(pos, head) \for (pos = (head)->next; !list_is_head(pos, (head)); pos = pos->next) -
list_entry
-
/*** list_entry - get the struct for this entry* @ptr: the &struct list_head pointer.* @type: the type of the struct this is embedded in.* @member: the name of the list_head within the struct.*/#define list_entry(ptr, type, member) \container_of(ptr, type, member)
-
container_of比较复杂,但是简单来说就是把一个已知是 member 类型的 ptr,也知道它属于某个 type 结构体,反查 type 结构体的指针。
/*** container_of - cast a member of a structure out to the containing structure* @ptr: the pointer to the member.* @type: the type of the container struct this is embedded in.* @member: the name of the member within the struct.** WARNING: any const qualifier of @ptr is lost.*/#define container_of(ptr, type, member) ({ \void *__mptr = (void *)(ptr); \static_assert(__same_type(*(ptr), ((type *)0)->member) || \__same_type(*(ptr), void), \"pointer type mismatch in container_of()"); \((type *)(__mptr - offsetof(type, member))); }) -
offsetof
-
字面意思。看这个是一个包装。
#undef offsetof#define offsetof(TYPE, MEMBER) __builtin_offsetof(TYPE, MEMBER)
1. Linux 内核中的内存分配
生成名为 1-mem 的任务骨架,并浏览 mem.c 文件的内容。观察使用 kmalloc() 函数进行内存分配的情况。
- 编译源代码并使用 insmod 加载
mem.ko模块。- 使用 dmesg 命令查看内核消息。
- 使用 rmmod mem 命令卸载内核模块。
mem = kmalloc(4096 * sizeof(*mem), GFP_KERNEL);搞了 4K 个字符的 buf。
打印出来都是 Z,就是 90,也就是 0x5a,神秘。
2. 在原子上下文中睡眠
生成名为 2-sched-spin 的任务骨架,并浏览 sched-spin.c 文件的内容。
- 根据上述信息编译源代码并加载模块(使用命令 make build 和 make copy )。
- 注意:插入顺序完成之前需要等待 5 秒时间。
- 卸载内核模块。
- 查找标记为:
TODO 0的行以创建原子段(atomic section)。重新编译源代码并将模块重新加载到内核。
现在你应该会遇到一个错误。查看堆栈跟踪。错误的原因是什么?
一开始的显然是可抢占的内核。我们要做的操作就是把 schedule_timeout 改成 atomic 的
  spin_lock(&lock);
  set_current_state(TASK_INTERRUPTIBLE);  /* Try to sleep for 5 seconds. */  schedule_timeout(5 * HZ);
  spin_unlock(&lock);
毫无疑问的会报错:
root@qemux86:~/skels/kernel_api/2-sched-spin# insmod sched-spin.kosched_spin: loading out-of-tree module taints kernel.BUG: scheduling while atomic: insmod/322/0x00000002 1 lock held by insmod/322:因为我们 schedule 了,这在原子段里肯定是不允许的
3. 使用内核内存
为名为 3-memory 的任务生成骨架,并浏览 memory.c 文件的内容。请注意带有 TODO 标记的注释。你需要分配 4 个类型为 struct task_info 的结构体并将其初始化(在 memory_init() 中),然后打印并释放它们(在 memory_exit() 中)。
-
(TODO 1)为
struct task_info结构体分配内存并初始化其字段:- 将
pid字段设置为作为参数传递的 PID 值; - 将
timestamp字段设置为jiffies变量的值,该变量存储了自系统启动以来发生的滴答数(tick)。
- 将
-
(TODO 2)为当前进程、父进程、下一个进程和下一个进程的下一个进程分别分配
struct task_info,并获取以下信息:- 当前进程的 PID,其可以从
struct task_struct结构体中检索到,该结构体由current宏返回。
:::tip
在
task_struct中搜索pid。- 当前进程的父进程的 PID。
:::
在
struct task_struct结构体中搜索相关字段。查找“parent”。- 相对于当前进程,进程列表中的下一个进程的 PID。
:::tip
使用
next_task宏,该宏返回指向下一个进程的指针(即struct task_struct结构体)。- 相对于当前进程,下一个进程的下一个进程的 PID。
:::
调用
next_task宏 2 次。 - 当前进程的 PID,其可以从
-
(TODO 3)显示这四个结构体。
- 使用
printk()显示它们的两个字段:pid和timestamp。
- 使用
-
(TODO 4)释放结构体占用的内存(使用
kfree())。
:::tip
- 你可以使用
current宏访问当前进程。 - 在
struct task_struct结构体中查找相关字段(pid、parent)。 - 使用
next_task宏。该宏返回指向下一个进程的指针(即struct task_struct*结构体)。
:::
TODO1
#include <linux/jiffies.h>
static struct task_info *task_info_alloc(int pid){  struct task_info *ti;
  /* TODO 1: allocated and initialize a task_info struct */  ti = kmalloc(sizeof(struct task_info), GFP_KERNEL);    if (ti == NULL)    return NULL;  ti->pid = pid;  ti->timestamp = jiffies;
  return ti;}
TODO2
static int memory_init(void){  struct task_struct* cur = get_current();  ti1 = task_info_alloc(cur->pid);  ti2 = task_info_alloc(cur->parent->pid);  ti3 = task_info_alloc(next_task(cur)->pid);  ti4 = task_info_alloc(next_task(next_task(cur))->pid);
  /* TODO 2: call task_info_alloc for current pid */
  /* TODO 2: call task_info_alloc for parent PID */
  /* TODO 2: call task_info alloc for next process PID */
  /* TODO 2: call task_info_alloc for next process of the next process */
  return 0;}
TODO3、4
static void memory_exit(void){
  /* TODO 3: print ti* field values */  printk("[task_info] Current:\n\tPID:%d\n\ttimestamp:%lu\n\n", ti1->pid, ti1->timestamp);  printk("[task_info] Parent:\n\tPID:%d\n\ttimestamp:%lu\n\n", ti2->pid, ti2->timestamp);  printk("[task_info] Next:\n\tPID:%d\n\ttimestamp:%lu\n\n", ti3->pid, ti3->timestamp);  printk("[task_info] Next(Next):\n\tPID:%d\n\ttimestamp:%lu\n", ti4->pid, ti4->timestamp);
/* TODO 4: free ti* structures */ kfree(ti1); kfree(ti2); kfree(ti3); kfree(ti4);}root@qemux86:~/skels/kernel_api/3-memory# rmmod memory.ko[task_info] Current: PID:241 timestamp:4294910496 [task_info] Parent: PID:213 timestamp:4294910496 [task_info] Next: PID:0 timestamp:4294910496 [task_info] Next(Next): PID:1 timestamp:4294910496root@qemux86:~/skels/kernel_api/3-memory# insmod memory.koroot@qemux86:~/skels/kernel_api/3-memory# rmmod memory.ko[task_info] Current: PID:245 timestamp:4294912218 [task_info] Parent: PID:213 timestamp:4294912218 [task_info] Next: PID:0 timestamp:4294912218 [task_info] Next(Next): PID:1 timestamp:4294912218对的对的
4. 使用内核列表
生成名为 4-list 的任务骨架。浏览 list.c 文件的内容,并注意标有 TODO 的注释。当前的进程将在列表中添加前面练习中的四个结构体。列表将在加载模块时在 task_info_add_for_current() 函数中构建。列表将在 list_exit() 函数和 task_info_purge_list() 函数中打印和删除。
- (TODO 1) 补全
task_info_add_to_list()函数,此函数会分配struct task_info结构体,并将其添加到列表中。- (TODO 2) 补全
task_info_purge_list()函数,此函数会删除列表中的所有元素。- 编译内核模块。按照内核显示的消息加载和卸载模块。
就是前面那个变成一个 list,随便写写
TODO1
static void task_info_add_to_list(int pid){  struct task_info *ti;
  /* TODO 1: Allocate task_info and add it to list */  ti = task_info_alloc(pid);  if (ti == NULL)    return;  list_add(&ti->list, &head);}
TODO2
注意这里是要删除,所以得要一个 nxt 存下一个
static void task_info_purge_list(void){  struct list_head *p, *q;  struct task_info *ti;
  /* TODO 2: Iterate over the list and delete all elements */  list_for_each_safe(p, q, &head) {    ti = list_entry(p, struct task_info, list);    list_del(p);    kfree(ti);  }}
没毛病哦
root@qemux86:~/skels/kernel_api/4-list# rmmod list.kobefore exiting: [(1, 66185)(0, 66185)(213, 66185)(296, 66185)]5. 使用内核列表进行进程处理
生成名为 5-list-full 的任务骨架。浏览 list-full.c 文件的内容,并注意标有 TODO 的注释。除了 4-list 的功能外,我们还添加了以下内容:
-
一个
count字段,显示一个进程被“添加”到列表中的次数。 -
如果一个进程被“添加”了多次,则不会在列表中创建新的条目,而是:
- 更新
timestamp字段。 - 增加
count。
- 更新
-
为了实现计数器功能,请添加一个
task_info_find_pid()函数,用于在现有列表中搜索 pid。 -
如果找到,则返回对
task_info结构的引用。如果没有找到,则返回NULL。 -
过期处理功能。如果一个进程从被添加到现在已超过 3 秒,并且它的
count不大于 5,则被视为过期并从列表中删除。 -
过期处理功能已经在
task_info_remove_expired()函数中实现。
-
(TODO 1) 实现
task_info_find_pid()函数。 -
(TODO 2) 更改列表中的一个项目的字段,使其不会过期。它不应满足
task_info_remove_expired()中的任何过期条件。:::tip
要想完成
TODO 2,可以从列表中提取第一个元素(由head.next引用),并将其count字段设置为足够大的值。使用atomic_set()函数。:::
-
编译、复制、加载和卸载内核模块,这个过程中请遵从显示的消息来操作。加载内核模块需要一些时间,因为
schedule_timeout()函数会调用sleep()。
这个遍历也是很简单,扫一遍链表就可以。第二个也是给了提示了,count 设置成 5 就可以。
TODO1
static struct task_info *task_info_find_pid(int pid){  struct list_head *p;  struct task_info *ti;
  /* TODO 1: Look for pid and return task_info or NULL if not found */  list_for_each(p, &head) {    ti = list_entry(p, struct task_info, list);    if (ti->pid == pid)      return ti;  }
  return NULL;}
TODO2
static void list_full_exit(void){  struct task_info *ti;
  /* TODO 2: Ensure that at least one task is not deleted */
  ti = list_entry(head.next, struct task_info, list);
  atomic_set(&ti->count, 5);  task_info_print_list("after removing expired");  task_info_remove_expired();  task_info_print_list("after removing expired");  task_info_purge_list();}
我们保了一个存活,也就是 next next。
root@qemux86:~/skels/kernel_api/5-list-full# insmod list-full.kolist_full: loading out-of-tree module taints kernel.after first add: [(1, 4294915575)(0, 4294915575)(214, 4294915575)(243, 4294915575)]
root@qemux86:~/skels/kernel_api/5-list-full# rmmod list-full.koafter removing expired: [(1, 4294915575)]
6. 同步列表工作
为名为 6-list-sync 的任务生成骨架。
- 浏览代码并查找
TODO 1字符串。- 使用自旋锁或读写锁来同步对列表的访问。
- 编译、加载和卸载内核模块。
:::tip 重要
始终锁定数据,而不是代码!
:::
又到了我最喜欢的并发编程环节
/* * Linux API lab * * list-sync.c - Synchronize access to a list */
#include <linux/spinlock.h>#include <linux/module.h>#include <linux/init.h>#include <linux/kernel.h>#include <linux/slab.h>#include <linux/list.h>#include <linux/sched/signal.h>
MODULE_DESCRIPTION("Full list processing with synchronization");MODULE_AUTHOR("SO2");MODULE_LICENSE("GPL");
struct task_info {  pid_t pid;  unsigned long timestamp;  atomic_t count;  struct list_head list;};
static struct list_head head;
/* TODO 1: you can use either a spinlock or rwlock, define it here */// 写互斥,读并行,没毛病哦老铁们。DEFINE_RWLOCK(lock);
static struct task_info *task_info_alloc(int pid){  struct task_info *ti;
  ti = kmalloc(sizeof(*ti), GFP_KERNEL);  if (ti == NULL)    return NULL;  ti->pid = pid;  ti->timestamp = jiffies;  atomic_set(&ti->count, 0);
  return ti;}
static struct task_info *task_info_find_pid(int pid){  struct list_head *p;  struct task_info *ti;
  list_for_each(p, &head) {    ti = list_entry(p, struct task_info, list);    if (ti->pid == pid) {      return ti;    }  }
  return NULL;}
static void task_info_add_to_list(int pid){  struct task_info *ti;
  /* TODO 1: Protect list, is this read or write access? */    // find_pid 会读,那肯定拿读锁  read_lock(&lock);  ti = task_info_find_pid(pid);  if (ti != NULL) {         // 注意这里,如果找到了那就先释放读锁,准备写。等所有读都解锁了在写。    read_unlock(&lock);         write_lock(&lock);    ti->timestamp = jiffies;    atomic_inc(&ti->count);         write_unlock(&lock);    /* TODO: Guess why this comment was added  here */
    return;  }  read_unlock(&lock);
  /* TODO 1: critical section ends here */
  ti = task_info_alloc(pid);  // 这里注意,alloc 因为有 GFP_KERNEL FLAG,因此是可抢占的,我们不能在上一句里面拿锁!!  write_lock(&lock);  /* TODO 1: protect list access, is this read or write access? */  list_add(&ti->list, &head);  write_unlock(&lock);  /* TODO 1: critical section ends here */}
void task_info_add_for_current(void){  task_info_add_to_list(current->pid);  task_info_add_to_list(current->parent->pid);  task_info_add_to_list(next_task(current)->pid);  task_info_add_to_list(next_task(next_task(current))->pid);}/* TODO 2: Export the kernel symbol */EXPORT_SYMBOL(task_info_add_for_current);
void task_info_print_list(const char *msg){  struct list_head *p;  struct task_info *ti;
  pr_info("%s: [ ", msg);
  /* TODO 1: Protect list, is this read or write access? */    // 这个没必要写在循环里,拿锁贵的  read_lock(&lock);  list_for_each(p, &head) {
    ti = list_entry(p, struct task_info, list);    pr_info("(%d, %lu) ", ti->pid, ti->timestamp);
  }    read_unlock(&lock);
  /* TODO 1: Critical section ends here */  pr_info("]\n");}/* TODO 2: Export the kernel symbol */EXPORT_SYMBOL(task_info_print_list);
void task_info_remove_expired(void){  struct list_head *p, *q;  struct task_info *ti;
  /* TODO 1: Protect list, is this read or write access? */    // 这里 list_del 是写操作,我们可以直接拿写锁,不需要再拿读锁读完再拿写锁了  write_lock(&lock);  list_for_each_safe(p, q, &head) {    ti = list_entry(p, struct task_info, list);    if (jiffies - ti->timestamp > 3 * HZ && atomic_read(&ti->count) < 5) {      list_del(p);      kfree(ti);    }  }  write_unlock(&lock);  /* TODO 1: Critical section ends here */}/* TODO 2: Export the kernel symbol */EXPORT_SYMBOL(task_info_remove_expired);
static void task_info_purge_list(void){  struct list_head *p, *q;  struct task_info *ti;
  /* TODO 1: Protect list, is this read or write access? */    // 写操作  write_lock(&lock);  list_for_each_safe(p, q, &head) {    ti = list_entry(p, struct task_info, list);    list_del(p);    kfree(ti);  }  write_unlock(&lock);  /* TODO 1: Critical sections ends here */}
static int list_sync_init(void){  INIT_LIST_HEAD(&head);
  task_info_add_for_current();  task_info_print_list("after first add");
  set_current_state(TASK_INTERRUPTIBLE);  schedule_timeout(5 * HZ);
  return 0;}
static void list_sync_exit(void){  struct task_info *ti;
  ti = list_entry(head.prev, struct task_info, list);  atomic_set(&ti->count, 10);
  task_info_remove_expired();  task_info_print_list("after removing expired");  task_info_purge_list();}
module_init(list_sync_init);module_exit(list_sync_exit);
7. 在我们的列表模块中测试模块调用
为名为 7-list-test 的任务生成骨架,并浏览 list-test.c 文件的内容。我们将使用它作为测试模块。它将调用由 6-list-sync 任务导出的函数。在 list-test.c 文件中,已经用 extern 标记出了导出的函数。
取消注释 7-list-test.c 中的注释代码。查找 TODO 1。
要从位于 6-list-sync/ 目录中的模块导出上述函数,需要执行以下步骤:
- 函数不能是静态的。
- 使用
EXPORT_SYMBOL宏导出内核符号。例如:EXPORT_SYMBOL(task_info_remove_expired);。该宏必须在函数定义后使用。浏览代码并查找list-sync.c中的TODO 2字符串。- 从 6-list-sync 模块中删除避免列表项过期的代码(它与我们的练习相矛盾)。
- 编译并加载
6-list-sync/中的模块。一旦加载,它会公开导出的函数,使其可以被测试模块使用。你可以通过分别在加载模块之前和之后在/proc/kallsyms中搜索函数名称来检查这一点。- 编译测试模块,然后加载它。
- 使用 lsmod 命令检查这两个模块是否已加载。你注意到了什么?
- 卸载内核测试模块。
两个模块(来自 6-list-sync 的模块和测试模块)的卸载顺序应该是什么?如果使用其他顺序会发生什么?
这个没啥好说的,就是一个测试。
-
list_test 16384 0 - Live 0xd0896000 (O)list_sync 16384 1 list_test, Live 0xd086c000 (O)
肯定是先 sync 再 test,然后卸载反过来。不然就 undefined 啦
结束,Kernel API
字符设备驱动程序
到了我最爱的设备,在这里就可以写一些笔记了。我们都知道 linux 使用特殊的设备文件访问硬件设备,操作系统会对针对这些文件的系统调用重定向到关联的设备驱动程序上。
分类与鉴别
按照速率、容量和数据的组织方式,我们可以把设备分为块设备和字符设备两类。
- 对于字符设备而言,它仅处理少量的数据,并且不需要频繁的搜索这些数据。例如说键盘、鼠标等等,通常来说,这些设备的读取写入也是按字节顺序逐个执行的。
- 对于块设备而言,它处理大量的数据,例如说硬盘、RAM 等等,还是比较明确的。
Linux 对两种设备提供了不同的 API。如果是字符设备,那么系统调用就会直接传递给设备驱动程序;如果是块设备,那么就要通过文件管理子系统和块设备子系统进行交互。(猜测是为了性能,譬如说 DMA 之类的?)
设备一般用 <主设备号><次设备号> 的形式标识,其中主设备号一般用于标识设备类型,次设备号就是本身。一个例子就是 hda1、hda2、ttyS0、ttyS1
❯ ls -la /dev/tty?crw--w---- 1 root tty 4, 0 Jul 24 18:25 /dev/tty0crw--w---- 1 root tty 4, 1 Jul 24 18:25 /dev/tty1crw--w---- 1 root tty 4, 2 Jul 24 18:25 /dev/tty2crw--w---- 1 root tty 4, 3 Jul 24 18:25 /dev/tty3crw--w---- 1 root tty 4, 4 Jul 24 18:25 /dev/tty4crw--w---- 1 root tty 4, 5 Jul 24 18:25 /dev/tty5crw--w---- 1 root tty 4, 6 Jul 24 18:25 /dev/tty6crw--w---- 1 root tty 4, 7 Jul 24 18:25 /dev/tty7crw--w---- 1 root tty 4, 8 Jul 24 18:25 /dev/tty8crw--w---- 1 root tty 4, 9 Jul 24 18:25 /dev/tty9可以看到第一位就是 c 代表 char dev,而自然块设备第一位就是 b。其中,主设备号是 4,次设备号依次递增。
创建设备
我们可以使用 mknod 命令创建一个新设备,他也需要提供一些参数,例如名字、类型、主设备号、次设备号等等。一个简单的例子如下,它创建了一个名为 muelnova 的字符设备,主设备号为 114,次设备号为 514
[root@MuelNova-Laptop nova]# mknod /dev/muelnova c 114 514[root@MuelNova-Laptop nova]# ls -la /dev/muelnovacrw-r--r-- 1 root root 114, 514 Jul 24 19:03 /dev/muelnova内核使用 struct cdev 来注册字符设备。一般而言,驱动程序还会利用以下几个结构:
-
struct file_operations:实现特定于文件的系统调用,例如open、close、read、mmap等。struct file_operations {struct module *owner;loff_t (*llseek) (struct file *, loff_t, int);ssize_t (*read) (struct file *, char __user *, size_t, loff_t *);ssize_t (*write) (struct file *, const char __user *, size_t, loff_t *);[...]long (*unlocked_ioctl) (struct file *, unsigned int, unsigned long);[...]int (*open) (struct inode *, struct file *);int (*flush) (struct file *, fl_owner_t id);int (*release) (struct inode *, struct file *);[...]你可以注意到,这些函数的入参和原本是不一样的,多了两个用户态下不常见的
struct file和struct inode。简单来说,file 和 inode 有点像进程和程序的区别。file 具有状态,而 inode 只包括有一些静态映像。
-
struct file:包含了打开标记、关联操作 等struct file {union {/* fput() uses task work when closing and freeing file (default). */struct callback_head f_task_work;/* fput() must use workqueue (most kernel threads). */struct llist_node f_llist;unsigned int f_iocb_flags;};/** Protects f_ep, f_flags.* Must not be taken from IRQ context.*/spinlock_t f_lock;fmode_t f_mode;atomic_long_t f_count;struct mutex f_pos_lock;loff_t f_pos;unsigned int f_flags;struct fown_struct f_owner;const struct cred *f_cred;struct file_ra_state f_ra;struct path f_path;struct inode *f_inode; /* cached value */const struct file_operations *f_op;u64 f_version;#ifdef CONFIG_SECURITYvoid *f_security;#endif/* needed for tty driver, and maybe others */void *private_data;#ifdef CONFIG_EPOLL/* Used by fs/eventpoll.c to link all the hooks to this file */struct hlist_head *f_ep;#endif /* #ifdef CONFIG_EPOLL */struct address_space *f_mapping;errseq_t f_wb_err;errseq_t f_sb_err; /* for syncfs */} __randomize_layout__attribute__((aligned(4))); /* lest something weird decides that 2 is OK */ -
struct inode:包含了许多字段,例如i_cdev,它就指向一个定义字符设备结构的指针。struct inode {umode_t i_mode;unsigned short i_opflags;kuid_t i_uid;kgid_t i_gid;unsigned int i_flags;#ifdef CONFIG_FS_POSIX_ACLstruct posix_acl *i_acl;struct posix_acl *i_default_acl;#endifconst struct inode_operations *i_op;struct super_block *i_sb;struct address_space *i_mapping;#ifdef CONFIG_SECURITYvoid *i_security;#endif/* Stat data, not accessed from path walking */unsigned long i_ino;/** Filesystems may only read i_nlink directly. They shall use the* following functions for modification:** (set|clear|inc|drop)_nlink* inode_(inc|dec)_link_count*/union {const unsigned int i_nlink;unsigned int __i_nlink;};dev_t i_rdev;loff_t i_size;struct timespec64 __i_atime;struct timespec64 __i_mtime;struct timespec64 __i_ctime; /* use inode_*_ctime accessors! */spinlock_t i_lock; /* i_blocks, i_bytes, maybe i_size */unsigned short i_bytes;u8 i_blkbits;enum rw_hint i_write_hint;blkcnt_t i_blocks;#ifdef __NEED_I_SIZE_ORDEREDseqcount_t i_size_seqcount;#endif/* Misc */unsigned long i_state;struct rw_semaphore i_rwsem;unsigned long dirtied_when; /* jiffies of first dirtying */unsigned long dirtied_time_when;struct hlist_node i_hash;struct list_head i_io_list; /* backing dev IO list */#ifdef CONFIG_CGROUP_WRITEBACKstruct bdi_writeback *i_wb; /* the associated cgroup wb *//* foreign inode detection, see wbc_detach_inode() */int i_wb_frn_winner;u16 i_wb_frn_avg_time;u16 i_wb_frn_history;#endifstruct list_head i_lru; /* inode LRU list */struct list_head i_sb_list;struct list_head i_wb_list; /* backing dev writeback list */union {struct hlist_head i_dentry;struct rcu_head i_rcu;};atomic64_t i_version;atomic64_t i_sequence; /* see futex */atomic_t i_count;atomic_t i_dio_count;atomic_t i_writecount;#if defined(CONFIG_IMA) || defined(CONFIG_FILE_LOCKING)atomic_t i_readcount; /* struct files open RO */#endifunion {const struct file_operations *i_fop; /* former ->i_op->default_file_ops */void (*free_inode)(struct inode *);};struct file_lock_context *i_flctx;struct address_space i_data;struct list_head i_devices;union {struct pipe_inode_info *i_pipe;struct cdev *i_cdev;char *i_link;unsigned i_dir_seq;};__u32 i_generation;#ifdef CONFIG_FSNOTIFY__u32 i_fsnotify_mask; /* all events this inode cares about */struct fsnotify_mark_connector __rcu *i_fsnotify_marks;#endif#ifdef CONFIG_FS_ENCRYPTIONstruct fscrypt_inode_info *i_crypt_info;#endif#ifdef CONFIG_FS_VERITYstruct fsverity_info *i_verity_info;#endifvoid *i_private; /* fs or device private pointer */} __randomize_layout;
0. 简介
使用 LXR 查找 Linux 内核中以下符号的定义:
struct filestruct file_operationsgeneric_ro_fopsvfs_read()
前两个看过了,现在就看看 generic_ro_fops 和 vfs_read 吧
const struct file_operations generic_ro_fops = { .llseek = generic_file_llseek, .read_iter = generic_file_read_iter, .mmap = generic_file_readonly_mmap, .splice_read = filemap_splice_read,};这显然定义了一个通用的 readonly file operations。
ssize_t vfs_read(struct file *file, char __user *buf, size_t count, loff_t *pos){  ssize_t ret;
  if (!(file->f_mode & FMODE_READ))    return -EBADF;  if (!(file->f_mode & FMODE_CAN_READ))    return -EINVAL;  if (unlikely(!access_ok(buf, count)))    return -EFAULT;
  ret = rw_verify_area(READ, file, pos, count);  if (ret)    return ret;  if (count > MAX_RW_COUNT)    count =  MAX_RW_COUNT;
  if (file->f_op->read)    ret = file->f_op->read(file, buf, count, pos);  else if (file->f_op->read_iter)    ret = new_sync_read(file, buf, count, pos);  else    ret = -EINVAL;  if (ret > 0) {    fsnotify_access(file);    add_rchar(current, ret);  }  inc_syscr(current);  return ret;}
这个首先确认我们有权限读,然后就去检查从 file 的 pos 开始,是不是能读 count 个。之后它就去尝试用不同的方法去读。读完之后,就去通知访问过,更新计数(current + ret),然后增加系统调用的计数。
1. 注册/注销
驱动程序控制一个具有 MY_MAJOR 主设备号和 MY_MINOR 次设备号的设备(这些宏定义在 kernel/so2_cdev.c 文件中)。
-
使用 mknod 创建 /dev/so2_cdev 字符设备节点。
-
在 init 和 exit 模块函数中实现设备的注册和注销,设备名称应为
so2_cdev。实现 TODO 1。 -
通过
pr_info函数使得在注册和注销操作后显示一条消息,以确认它们是否成功。然后将模块加载到内核中:
$ insmod so2_cdev.ko并查看 /proc/devices 中的字符设备:
$ cat /proc/devices | less确定使用主设备号 42 注册的设备类型。请注意,/proc/devices 仅包含设备类型(主设备号),而不包含实际设备(即次设备号)。
:::info
/dev 中的条目不会通过加载模块来创建。可以通过两种方式创建:
-
手动使用
mknod命令,就像我们上面所做的那样。 -
使用 udev 守护进程自动创建
:::
- 卸载内核模块
rmmod so2_cdev观察 so2_cdev.c 文件,我们可以看到它是 42,0,那我们就创一个
root@qemux86:~/.ash_history/kernel# mknod /dev/so2_cdev c 42 0TODO 1
static int so2_cdev_init(void){  int err;  int i;
  /* TODO 1: register char device region for MY_MAJOR and NUM_MINORS starting at MY_MINOR */  register_chrdev_region(MKDEV(MY_MAJOR, MY_MINOR), NUM_MINORS, MODULE_NAME);
  for (i = 0; i < NUM_MINORS; i++) {#ifdef EXTRA    /* TODO 7: extra tasks, for home */#else    /*TODO 4: initialize buffer with MESSAGE string */    /* TODO 3: set access variable to 0, use atomic_set */#endif    /* TODO 7: extra tasks for home */    /* TODO 2: init and add cdev to kernel core */  }
  return 0;}
static void so2_cdev_exit(void){  int i;
  for (i = 0; i < NUM_MINORS; i++) {    /* TODO 2: delete cdev from kernel core */  }
  /* TODO 1: unregister char device region, for MY_MAJOR and NUM_MINORS starting at MY_MINOR */  unregister_chrdev_region(MKDEV(MY_MAJOR, MY_MINOR), NUM_MINORS);}
要加 info 也是很简单,就不说了。但是不知道为什么我这写反了么还是什么,第一次 ins 的时候没有东西,第一次 rm 的时候提示 Register,后面 ins 则提示 unRegister,神秘。
pr_info("WHOW, YOU unREGISTERED %d DEVICES!!!!", NUM_MINORS);root@qemux86:~/.ash_history/kernel# insmod so2_cdev.koWHOW, YOU unREGISTERED 1 DEVICES!!!!root@qemux86:~/.ash_history/kernel# rmmod so2_cdev.koWHOW, YOU REGISTERED 1 DEVICES!!!!2. 注册一个已注册的主设备号
修改 MY_MAJOR,使其指向已经使用的主设备号。
提示
查看 /proc/devices 来获取一个已分配的主设备号。
参考 errno-base.h 并找出错误码的含义。恢复模块的初始配置。
root@qemux86:~/.ash_history/kernel# cat /proc/devicesCharacter devices: 1 mem 2 pty 3 ttyp 4 /dev/vc/0 4 tty 5 /dev/tty 5 /dev/console 5 /dev/ptmx 7 vcs 10 misc 13 input128 ptm136 pts229 hvc253 virtio-portsdev254 bsg我们把它改成 4 试试看,咋没报错呢。哈哈,原来是我们没有处理报错。改成这样
err = register_chrdev_region(MKDEV(MY_MAJOR, MY_MINOR), NUM_MINORS, MODULE_NAME); if (err < 0) { pr_err("Failed to register char device: %d", err); return err; } pr_info("WHOW, YOU REGISTERED %d DEVICES!!!!", NUM_MINORS);有报错了:insmod: can’t insert ‘so2_cdev.ko’: Device or resource busy
3. 打开和关闭
运行 cat /dev/so2_cdev ,从我们的字符设备中读取数据。由于驱动程序没有实现打开函数,因此读取操作无法正常工作。按照标记为 TODO 2 的注释进行操作并实现以下内容。
- 初始化设备
- 在
so2_device_data结构体中添加一个 cdev 字段。- 阅读实验中的 字符设备的注册和注销 部分。
- 在驱动程序中实现打开和释放函数。
- 在打开和释放函数中显示一条消息。
- 再次读取
/dev/so2_cdev文件。按照内核显示的消息进行操作。由于尚未实现read函数,因此仍会出现错误。
cdev 是 struct cdev 类型,不是指针。
struct so2_device_data {  /* TODO 2: add cdev member */  struct cdev cdev;  /* TODO 4: add buffer with BUFSIZ elements */  /* TODO 7: extra members for home */  /* TODO 3: add atomic_t access variable to keep track if file is opened */};
static int so2_cdev_open(struct inode *inode, struct file *file){  struct so2_device_data *data;
  /* TODO 2: print message when the device file is open. */  pr_info("Whow, the device file is open!!!!");
static intso2_cdev_release(struct inode *inode, struct file *file){  /* TODO 2: print message when the device file is closed. */  pr_info("No!!! You closed the device, you evil!");
static const struct file_operations so2_fops = {  .owner = THIS_MODULE,/* TODO 2: add open and release functions */  .open = so2_cdev_open,  .release = so2_cdev_release,

static int so2_cdev_init(void){  int err;  int i;
  /* TODO 1: register char device region for MY_MAJOR and NUM_MINORS starting at MY_MINOR */  err = register_chrdev_region(MKDEV(MY_MAJOR, MY_MINOR), NUM_MINORS, MODULE_NAME);  if (err < 0) {    pr_err("Failed to register char device: %d", err);    return err;  }  pr_info("WHOW, YOU REGISTERED %d DEVICES!!!!", NUM_MINORS);
  for (i = 0; i < NUM_MINORS; i++) {#ifdef EXTRA    /* TODO 7: extra tasks, for home */#else    /*TODO 4: initialize buffer with MESSAGE string */    /* TODO 3: set access variable to 0, use atomic_set */#endif    /* TODO 7: extra tasks for home */    /* TODO 2: init and add cdev to kernel core */    cdev_init(&devs[i].cdev, &so2_fops);    cdev_add(&devs[i].cdev, MKDEV(MY_MAJOR, i), 1);  }

static void so2_cdev_exit(void){  int i;
for (i = 0; i < NUM_MINORS; i++) { /* TODO 2: delete cdev from kernel core */ cdev_del(&devs[i].cdev); }root@qemux86:~/.ash_history/kernel# cat /dev/so2_cdevWHOW, YOU REGISTERED 1 DEVICES!!!!cat: read error: Invalid argumentWhow, the device file is open!!!!root@qemux86:~/.ash_history/kernel# cat /dev/so2_cdevNo!!! You closed the device, you evil!cat: read error: Invalid argumentWhow, the device file is open!!!!非常好!
4. 访问限制
使用原子变量限制设备访问,以便一次只能有一个进程打开该设备。其他进程将收到“设备忙”错误 (-EBUSY)。限制访问将在驱动程序中的打开函数中完成。按照标记为 TODO 3 的注释进行操作并实现以下内容。
- 在设备结构体中添加
atomic_t变量。- 在模块初始化时对该变量进行初始化。
- 在打开函数中使用该变量限制对设备的访问。我们建议使用
atomic_cmpxchg()。- 在释放函数中重置该变量以恢复对设备的访问权限。
- 要测试你的部署,你需要模拟对设备的长期使用。要模拟休眠,请在设备打开操作的末尾调用调度器:
set_current_state(TASK_INTERRUPTIBLE);schedule_timeout(1000);注解
atomic_cmpxchg 函数的优点在于它可以在一个原子操作中检查变量的旧值并将其设置为新值。详细了解 atomic_cmpxchg。这里有一个使用示例 http://elixir.free-electrons.com/linux/v4.9/source/lib/dump_stack.c#L24 。
练练手
/* * Character device drivers lab * * All tasks */
#include <asm/atomic.h>#include <linux/module.h>#include <linux/init.h>#include <linux/kernel.h>#include <linux/fs.h>#include <linux/cdev.h>#include <linux/uaccess.h>#include <linux/sched.h>#include <linux/wait.h>
#include "../include/so2_cdev.h"
MODULE_DESCRIPTION("SO2 character device");MODULE_AUTHOR("SO2");MODULE_LICENSE("GPL");
#define LOG_LEVEL  KERN_INFO
#define MY_MAJOR    42#define MY_MINOR    0#define NUM_MINORS    1#define MODULE_NAME    "so2_cdev"#define MESSAGE      "hello\n"#define IOCTL_MESSAGE    "Hello ioctl"
#ifndef BUFSIZ#define BUFSIZ    4096#endif

struct so2_device_data {  /* TODO 2: add cdev member */  struct cdev cdev;  /* TODO 4: add buffer with BUFSIZ elements */  /* TODO 7: extra members for home */  /* TODO 3: add atomic_t access variable to keep track if file is opened */  atomic_t access;};
struct so2_device_data devs[NUM_MINORS];
static int so2_cdev_open(struct inode *inode, struct file *file){  struct so2_device_data *data;
  /* TODO 2: print message when the device file is open. */  pr_info("Whow, the device file is open!!!!");
  /* TODO 3: inode->i_cdev contains our cdev struct, use container_of to obtain a pointer to so2_device_data */  data = container_of(inode->i_cdev, struct so2_device_data, cdev);
  file->private_data = data;
#ifndef EXTRA  /* TODO 3: return immediately if access is != 0, use atomic_cmpxchg */  if (atomic_cmpxchg(&data->access, 0, 1) != 0) {    pr_info("I'm using the device!!!!");    return -EBUSY;  }#endif
  set_current_state(TASK_INTERRUPTIBLE);  schedule_timeout(10 * HZ);
  return 0;}
static intso2_cdev_release(struct inode *inode, struct file *file){  /* TODO 2: print message when the device file is closed. */  pr_info("No!!! You closed the device, you evil!");
#ifndef EXTRA  struct so2_device_data *data =    (struct so2_device_data *) file->private_data;
  /* TODO 3: reset access variable to 0, use atomic_set */  atomic_set(&data->access, 0);#endif  return 0;}
static ssize_tso2_cdev_read(struct file *file,    char __user *user_buffer,    size_t size, loff_t *offset){  struct so2_device_data *data =    (struct so2_device_data *) file->private_data;  size_t to_read;
#ifdef EXTRA  /* TODO 7: extra tasks for home */#endif
  /* TODO 4: Copy data->buffer to user_buffer, use copy_to_user */
  return to_read;}
static ssize_tso2_cdev_write(struct file *file,    const char __user *user_buffer,    size_t size, loff_t *offset){  struct so2_device_data *data =    (struct so2_device_data *) file->private_data;

  /* TODO 5: copy user_buffer to data->buffer, use copy_from_user */  /* TODO 7: extra tasks for home */
  return size;}
static longso2_cdev_ioctl(struct file *file, unsigned int cmd, unsigned long arg){  struct so2_device_data *data =    (struct so2_device_data *) file->private_data;  int ret = 0;  int remains;
  switch (cmd) {  /* TODO 6: if cmd = MY_IOCTL_PRINT, display IOCTL_MESSAGE */  /* TODO 7: extra tasks, for home */  default:    ret = -EINVAL;  }
  return ret;}
static const struct file_operations so2_fops = {  .owner = THIS_MODULE,/* TODO 2: add open and release functions */  .open = so2_cdev_open,  .release = so2_cdev_release,/* TODO 4: add read function *//* TODO 5: add write function *//* TODO 6: add ioctl function */};
static int so2_cdev_init(void){  int err;  int i;
  /* TODO 1: register char device region for MY_MAJOR and NUM_MINORS starting at MY_MINOR */  err = register_chrdev_region(MKDEV(MY_MAJOR, MY_MINOR), NUM_MINORS, MODULE_NAME);  if (err < 0) {    pr_err("Failed to register char device: %d", err);    return err;  }  pr_info("WHOW, YOU REGISTERED %d DEVICES!!!!", NUM_MINORS);
  for (i = 0; i < NUM_MINORS; i++) {#ifdef EXTRA    /* TODO 7: extra tasks, for home */#else    /*TODO 4: initialize buffer with MESSAGE string */    /* TODO 3: set access variable to 0, use atomic_set */    atomic_set(&devs[i].access, 0);#endif    /* TODO 7: extra tasks for home */    /* TODO 2: init and add cdev to kernel core */    cdev_init(&devs[i].cdev, &so2_fops);    cdev_add(&devs[i].cdev, MKDEV(MY_MAJOR, i), 1);  }
  return 0;}
static void so2_cdev_exit(void){  int i;
  for (i = 0; i < NUM_MINORS; i++) {    /* TODO 2: delete cdev from kernel core */    cdev_del(&devs[i].cdev);  }
  /* TODO 1: unregister char device region, for MY_MAJOR and NUM_MINORS starting at MY_MINOR */
  unregister_chrdev_region(MKDEV(MY_MAJOR, MY_MINOR), NUM_MINORS);  pr_info("WHOW, YOU REGISTERED %d DEVICES!!!!", NUM_MINORS);}
module_init(so2_cdev_init);module_exit(so2_cdev_exit);
虽然输出和我们想的不一样,但是还是能跑的,哈哈
root@qemux86:~/.ash_history/kernel# cat /dev/so2_cdev & cat /dev/so2_cdev &root@qemux86:~/.ash_history/kernel# Whow, the device file is open!!!!Whow, the device file is open!!!!cat: can't open '/dev/so2_cdev': Device or resource busy
[2]+  Done(1)                    cat /dev/so2_cdevroot@qemux86:~/.ash_history/kernel# cat: read error: Invalid argumentI'm using the device!!!!
[1]+  Done(1)                    cat /dev/so2_cdev
5. 读操作
在驱动程序中实现读取函数。按照标有 TODO 4 的注释并实现以下步骤:
- 在
so2_device_data结构中保持一个缓冲区,并用MESSAGE宏的值进行初始化。缓冲区的初始化在模块的init函数中完成。- 在读取调用时,将内核空间缓冲区的内容复制到用户空间缓冲区。
- 使用
copy_to_user()函数将信息从内核空间复制到用户空间。- 暂时忽略大小和偏移参数。可以假设用户空间的缓冲区足够大,不需要检查读取函数的大小参数的有效性。
- 读取调用返回的值是从内核空间缓冲区传输到用户空间缓冲区的字节数。
- 实现完成后,使用
cat /dev/so2_cdev进行测试。
:::info
命令 cat /dev/so2_cdev 不会结束(使用 Ctrl+C)。请阅读 读取和写入 和 访问进程地址空间 部分。如果要显示偏移值,请使用以下形式的构造: pr_info("Offset: %lld \n", *offset);偏移值的数据类型 loff_t 是 long long int 的 typedef。
:::
cat 命令一直读取到文件的末尾,文件通过读取返回值为 0 来表示读到末尾了。因此,为了正确实现,你需要更新并使用读函数中接收的偏移参数,并在用户达到缓冲区末尾时返回 0。
修改驱动程序以使 cat 命令结束:
- 使用大小参数。
- 对于每次读取,相应地更新偏移参数。
- 确保读取函数返回已复制到用户缓冲区的字节数。
:::info
通过解引用偏移参数,可以读取并移动在文件中的当前位置。每次成功进行读取后都需要更新其值。
:::
我们首先测试第一个,忽略 Offset 的
/* * Character device drivers lab * * All tasks */
#include <asm/atomic.h>#include <linux/module.h>#include <linux/init.h>#include <linux/kernel.h>#include <linux/fs.h>#include <linux/cdev.h>#include <linux/uaccess.h>#include <linux/sched.h>#include <linux/wait.h>
#include "../include/so2_cdev.h"
MODULE_DESCRIPTION("SO2 character device");MODULE_AUTHOR("SO2");MODULE_LICENSE("GPL");
#define LOG_LEVEL  KERN_INFO
#define MY_MAJOR    42#define MY_MINOR    0#define NUM_MINORS    1#define MODULE_NAME    "so2_cdev"#define MESSAGE      "hello\n"#define IOCTL_MESSAGE    "Hello ioctl"
#ifndef BUFSIZ#define BUFSIZ    4096#endif

struct so2_device_data {  /* TODO 2: add cdev member */  struct cdev cdev;  /* TODO 4: add buffer with BUFSIZ elements */  char buffer[BUFSIZ];  /* TODO 7: extra members for home */  /* TODO 3: add atomic_t access variable to keep track if file is opened */  atomic_t access;};
struct so2_device_data devs[NUM_MINORS];
static int so2_cdev_open(struct inode *inode, struct file *file){  struct so2_device_data *data;
  /* TODO 2: print message when the device file is open. */  pr_info("Whow, the device file is open!!!!");
  /* TODO 3: inode->i_cdev contains our cdev struct, use container_of to obtain a pointer to so2_device_data */  data = container_of(inode->i_cdev, struct so2_device_data, cdev);
  file->private_data = data;
#ifndef EXTRA  /* TODO 3: return immediately if access is != 0, use atomic_cmpxchg */  if (atomic_cmpxchg(&data->access, 0, 1) != 0) {    pr_info("I'm using the device!!!!");    return -EBUSY;  }#endif
  // set_current_state(TASK_INTERRUPTIBLE);  // schedule_timeout(10 * HZ);
  return 0;}
static intso2_cdev_release(struct inode *inode, struct file *file){  /* TODO 2: print message when the device file is closed. */  pr_info("No!!! You closed the device, you evil!");
#ifndef EXTRA  struct so2_device_data *data =
    (struct so2_device_data *) file->private_data;
  /* TODO 3: reset access variable to 0, use atomic_set */  atomic_set(&data->access, 0);#endif  return 0;}
static ssize_tso2_cdev_read(struct file *file,    char __user *user_buffer,    size_t size, loff_t *offset){  struct so2_device_data *data =    (struct so2_device_data *) file->private_data;  size_t to_read;
#ifdef EXTRA  /* TODO 7: extra tasks for home */#endif
  /* TODO 4: Copy data->buffer to user_buffer, use copy_to_user */  int err = copy_to_user(user_buffer, data->buffer, strlen(data->buffer));  if (err) {    pr_err("Failed to copy data to user space\n");    return -EFAULT;  }  to_read = strlen(data->buffer);  pr_info("size: %d, to_read: %d", size, to_read);  pr_info("Content: %s", data->buffer);
  return to_read;}
static ssize_tso2_cdev_write(struct file *file,    const char __user *user_buffer,    size_t size, loff_t *offset){  struct so2_device_data *data =    (struct so2_device_data *) file->private_data;

  /* TODO 5: copy user_buffer to data->buffer, use copy_from_user */  /* TODO 7: extra tasks for home */
  return size;}
static longso2_cdev_ioctl(struct file *file, unsigned int cmd, unsigned long arg){  struct so2_device_data *data =    (struct so2_device_data *) file->private_data;  int ret = 0;  int remains;
  switch (cmd) {  /* TODO 6: if cmd = MY_IOCTL_PRINT, display IOCTL_MESSAGE */  /* TODO 7: extra tasks, for home */  default:    ret = -EINVAL;  }
  return ret;}
static const struct file_operations so2_fops = {  .owner = THIS_MODULE,/* TODO 2: add open and release functions */  .open = so2_cdev_open,  .release = so2_cdev_release,/* TODO 4: add read function */  .read = so2_cdev_read,/* TODO 5: add write function *//* TODO 6: add ioctl function */};
static int so2_cdev_init(void){  int err;  int i;
  /* TODO 1: register char device region for MY_MAJOR and NUM_MINORS starting at MY_MINOR */  err = register_chrdev_region(MKDEV(MY_MAJOR, MY_MINOR), NUM_MINORS, MODULE_NAME);  if (err < 0) {    pr_err("Failed to register char device: %d", err);    return err;  }  pr_info("WHOW, YOU REGISTERED %d DEVICES!!!!", NUM_MINORS);
  for (i = 0; i < NUM_MINORS; i++) {#ifdef EXTRA    /* TODO 7: extra tasks, for home */#else    /*TODO 4: initialize buffer with MESSAGE string */    strncpy(devs[i].buffer, MESSAGE, strlen(MESSAGE));    /* TODO 3: set access variable to 0, use atomic_set */    atomic_set(&devs[i].access, 0);#endif    /* TODO 7: extra tasks for home */    /* TODO 2: init and add cdev to kernel core */    cdev_init(&devs[i].cdev, &so2_fops);    cdev_add(&devs[i].cdev, MKDEV(MY_MAJOR, i), 1);  }
  return 0;}
static void so2_cdev_exit(void){  int i;
  for (i = 0; i < NUM_MINORS; i++) {    /* TODO 2: delete cdev from kernel core */    cdev_del(&devs[i].cdev);  }
  /* TODO 1: unregister char device region, for MY_MAJOR and NUM_MINORS starting at MY_MINOR */
  unregister_chrdev_region(MKDEV(MY_MAJOR, MY_MINOR), NUM_MINORS);  pr_info("WHOW, YOU REGISTERED %d DEVICES!!!!", NUM_MINORS);}
module_init(so2_cdev_init);module_exit(so2_cdev_exit);
在这里,我们就读取一点点 :P 然后它就一直在传
然后我们继续改一下,让他没问题
static ssize_tso2_cdev_read(struct file *file,    char __user *user_buffer,    size_t size, loff_t *offset){  struct so2_device_data *data =    (struct so2_device_data *) file->private_data;  size_t to_read;
#ifdef EXTRA  /* TODO 7: extra tasks for home */#endif
/* TODO 4: Copy data->buffer to user_buffer, use copy_to_user */ to_read = min(size, (unsigned int)(strlen(data->buffer) - *offset)); if (to_read <= 0) return 0; if (copy_to_user(user_buffer, data->buffer + *offset, to_read)) { pr_err("Failed to copy data to user space\n"); return -EFAULT; } *offset += to_read; return to_read;}root@qemux86:~/.ash_history/kernel# cat /dev/so2_cdevWHOW, YOU REGISTERED 1 DEVICES!!!!helloWhow, the device file is open!!!!6. 写操作
添加将消息写入内核缓冲区以替换预定义消息的功能。在驱动程序中实现写函数。按照标有 TODO 5 的注释进行操作。
此时忽略偏移参数。你可以假设驱动程序缓冲区足够大。你无需检查写函数大小参数的有效性。
注意
设备驱动程序操作的原型位于 file_operations 结构中。使用以下命令进行测试:
echo "arpeggio"> /dev/so2_cdevcat /dev/so2_cdev简单简单
static const struct file_operations so2_fops = {  .owner = THIS_MODULE,/* TODO 2: add open and release functions */  .open = so2_cdev_open,  .release = so2_cdev_release,/* TODO 4: add read function */  .read = so2_cdev_read,/* TODO 5: add write function */  .write = so2_cdev_write,/* TODO 6: add ioctl function */};
static ssize_tso2_cdev_write(struct file *file,    const char __user *user_buffer,    size_t size, loff_t *offset){  struct so2_device_data *data =    (struct so2_device_data *) file->private_data;

  /* TODO 5: copy user_buffer to data->buffer, use copy_from_user */  copy_from_user(data->buffer, user_buffer, size);  data->buffer[size] = '\0';  /* TODO 7: extra tasks for home */
  return size;}
7. ioctl 操作
对于这个练习,我们希望在驱动程序中添加 ioctl MY_IOCTL_PRINT 来显示来自宏 IOCTL_MESSAGE 的消息。按照标有 TODO 6 的注释进行操作。
为此:
- 在驱动程序中实现 ioctl 函数。
- 我们需要使用
user/so2_cdev_test.c调用 ioctl 函数,并传递适当的参数。- 为了进行测试,我们将使用一个用户空间程序 (
user/so2_cdev_test.c) 来调用具有所需参数的ioctl函数。
:::tip
宏 MY_IOCTL_PRINT 在文件 include/so2_cdev.h 中定义,该文件在内核模块和用户空间程序之间共享。
请阅读实验中的 ioctl 章节。 :::
:::tip
用户空间代码在 make build 时会自动编译,并在 make copy 时被复制。
由于我们需要为 32 位的 qemu 机器编译程序,如果你的主机是 64 位的,那么你需要安装 gcc-multilib 软件包。
:::
static longso2_cdev_ioctl(struct file *file, unsigned int cmd, unsigned long arg){  struct so2_device_data *data =    (struct so2_device_data *) file->private_data;  int ret = 0;  int remains;
  switch (cmd) {  /* TODO 6: if cmd = MY_IOCTL_PRINT, display IOCTL_MESSAGE */  case MY_IOCTL_PRINT:    pr_info("%s\n", IOCTL_MESSAGE);    break;  /* TODO 7: extra tasks, for home */  default:    ret = -EINVAL;  }
  return ret;}
static const struct file_operations so2_fops = { .owner = THIS_MODULE,/* TODO 2: add open and release functions */ .open = so2_cdev_open, .release = so2_cdev_release,/* TODO 4: add read function */ .read = so2_cdev_read,/* TODO 5: add write function */ .write = so2_cdev_write,/* TODO 6: add ioctl function */ .unlocked_ioctl = so2_cdev_ioctl};root@qemux86:~/skels/device_drivers/user# ./so2_cdev_test pWHOW, YOU REGISTERED 1 DEVICES!!!!Whow, the device file is open!!!!Hello ioctlEx1. 带消息的 ioctl
为驱动程序添加两个 ioctl 操作,用于修改与驱动程序关联的消息。应使用固定长度的缓冲区(BUFFER_SIZE)。
- 在驱动程序的 ioctl 函数中添加以下操作:
MY_IOCTL_SET_BUFFER:用于向设备写入消息;MY_IOCTL_GET_BUFFER:用于从设备读取消息。
- 为进行测试,将所需的命令行参数传递给用户空间程序。
以 SET_BUFFER 为例,我们可以看到它会 ioctl 传一个 char[] 过去
差不多就这个样子吧,我虚拟机打不开了。
static longso2_cdev_ioctl(struct file *file, unsigned int cmd, unsigned long arg){  struct so2_device_data *data =    (struct so2_device_data *) file->private_data;  int ret = 0;  int remains;
  switch (cmd) {  /* TODO 6: if cmd = MY_IOCTL_PRINT, display IOCTL_MESSAGE */  case MY_IOCTL_PRINT:    pr_info("%s\n", IOCTL_MESSAGE);    break;  /* TODO 7: extra tasks, for home */  case MY_IOCTL_SET_BUFFER:    if (copy_to_user(data->buffer, (char __user *)arg, BUFSIZ)) {      pr_err("ERR!!!");      return -EFAULT;    }    data->buffer[BUFSIZ - 1] = '\0';    pr_info("I set %s", data->buffer);    break;  case MY_IOCTL_GET_BUFFER:    if(copy_to_user((char __user *) arg, data->buffer, strlen(data->buffer))) {      pr_err("ERR!!!");      return -EFAULT;    }    pr_info("I put %s to 0x%lx", data->buffer, arg);    break;  default:    ret = -EINVAL;  }
  return ret;}
I/O 访问与中断
0. 简介
使用 LXR,在 Linux 内核中查找以下符号的定义:
struct resourcerequest_region()和__request_region()request_irq()和request_threaded_irq()- :c:func:[
](https://linux-kernel-labs-zh.xyz/labs/interrupts.html#system-message-2)inb(适用于 x86 架构)
分析以下 Linux 代码:
-
键盘初始化函数
i8042_setup_kbd() -
AT 或 PS/2 键盘中断函数
atkbd_interrupt() -
struct resource: 看得出来是一个树?对双亲、兄弟、孩子都有标记。然后包含了一些 flags 之类的。struct resource {resource_size_t start;resource_size_t end;const char *name;unsigned long flags;unsigned long desc;struct resource *parent, *sibling, *child;}; -
request_region():一个对__request_region的包装。那么它以 GFP_KERNEL 分配了一个资源,并且标记了 parent, start, n, name, flags 等信息 i。#define request_region(start,n,name) __request_region(&ioport_resource, (start), (n), (name), 0)struct resource *__request_region(struct resource *parent,resource_size_t start, resource_size_t n,const char *name, int flags){struct resource *res = alloc_resource(GFP_KERNEL);int ret;if (!res)return NULL;write_lock(&resource_lock);ret = __request_region_locked(res, parent, start, n, name, flags);write_unlock(&resource_lock);if (ret) {free_resource(res);return NULL;}if (parent == &iomem_resource)revoke_iomem(res);return res;} -
request_irq:也是 request_threaded_irq 的一个包装,说白了就是一个没有 thread_fn 作为 thread context 的包装。它用于注册中断,如果 irqflags 有 SHARED 标记,那么必须要有一个唯一的标识符 dev_id。之后就会通过 GFP_KERNEL 去分配一个 irqaction 结构体,然后在芯片上添加终端。static inline int __must_checkrequest_irq(unsigned int irq, irq_handler_t handler, unsigned long flags,const char *name, void *dev){return request_threaded_irq(irq, handler, NULL, flags, name, dev);}int request_threaded_irq(unsigned int irq, irq_handler_t handler,irq_handler_t thread_fn, unsigned long irqflags,const char *devname, void *dev_id){struct irqaction *action;struct irq_desc *desc;int retval;if (irq == IRQ_NOTCONNECTED)return -ENOTCONN;/** Sanity-check: shared interrupts must pass in a real dev-ID,* otherwise we'll have trouble later trying to figure out* which interrupt is which (messes up the interrupt freeing* logic etc).** Also shared interrupts do not go well with disabling auto enable.* The sharing interrupt might request it while it's still disabled* and then wait for interrupts forever.** Also IRQF_COND_SUSPEND only makes sense for shared interrupts and* it cannot be set along with IRQF_NO_SUSPEND.*/if (((irqflags & IRQF_SHARED) && !dev_id) ||((irqflags & IRQF_SHARED) && (irqflags & IRQF_NO_AUTOEN)) ||(!(irqflags & IRQF_SHARED) && (irqflags & IRQF_COND_SUSPEND)) ||((irqflags & IRQF_NO_SUSPEND) && (irqflags & IRQF_COND_SUSPEND)))return -EINVAL;desc = irq_to_desc(irq);if (!desc)return -EINVAL;if (!irq_settings_can_request(desc) ||WARN_ON(irq_settings_is_per_cpu_devid(desc)))return -EINVAL;if (!handler) {if (!thread_fn)return -EINVAL;handler = irq_default_primary_handler;}action = kzalloc(sizeof(struct irqaction), GFP_KERNEL);if (!action)return -ENOMEM;action->handler = handler;action->thread_fn = thread_fn;action->flags = irqflags;action->name = devname;action->dev_id = dev_id;retval = irq_chip_pm_get(&desc->irq_data);if (retval < 0) {kfree(action);return retval;}retval = __setup_irq(irq, desc, action);if (retval) {irq_chip_pm_put(&desc->irq_data);kfree(action->secondary);kfree(action);}#ifdef CONFIG_DEBUG_SHIRQ_FIXMEif (!retval && (irqflags & IRQF_SHARED)) {/** It's a shared IRQ -- the driver ought to be prepared for it* to happen immediately, so let's make sure....* We disable the irq to make sure that a 'real' IRQ doesn't* run in parallel with our fake.*/unsigned long flags;disable_irq(irq);local_irq_save(flags);handler(irq, dev_id);local_irq_restore(flags);enable_irq(irq);}#endifreturn retval;} -
inb: 我真没找到这个符号的具体实现,这个应该是和架构有关的。但是 x86 下面都是 wrap。但是简单来说他有这么一个实现,读取一个端口一个字节的数据。u8 inb(unsigned long port){return ioread8(ioport_map(port, 1));}
分析代码
i8042_setup_kbd():
static int i8042_setup_kbd(void){  int error;
  error = i8042_create_kbd_port();  if (error)    return error;
  error = request_irq(I8042_KBD_IRQ, i8042_interrupt, IRQF_SHARED,          "i8042", i8042_platform_device);  if (error)    goto err_free_port;
  error = i8042_enable_kbd_port();  if (error)    goto err_free_irq;
  i8042_kbd_irq_registered = true;  return 0;
 err_free_irq:  free_irq(I8042_KBD_IRQ, i8042_platform_device); err_free_port:  i8042_free_kbd_port();  return error;}
代码比较容易理解,它申请了一个中断,然后对错误进行了处理。我们可以看一下里面的几个函数。
i8042_create_kbd_port 大体上创建了一个 struct serio 结构体,并且对值进行了设置。
static int i8042_create_kbd_port(void){  struct serio *serio;  struct i8042_port *port = &i8042_ports[I8042_KBD_PORT_NO];
  serio = kzalloc(sizeof(struct serio), GFP_KERNEL);  if (!serio)    return -ENOMEM;
  serio->id.type    = i8042_direct ? SERIO_8042 : SERIO_8042_XL;  serio->write    = i8042_dumbkbd ? NULL : i8042_kbd_write;  serio->start    = i8042_start;  serio->stop    = i8042_stop;  serio->close    = i8042_port_close;  serio->ps2_cmd_mutex  = &i8042_mutex;  serio->port_data  = port;  serio->dev.parent  = &i8042_platform_device->dev;  strscpy(serio->name, "i8042 KBD port", sizeof(serio->name));  strscpy(serio->phys, I8042_KBD_PHYS_DESC, sizeof(serio->phys));  strscpy(serio->firmware_id, i8042_kbd_firmware_id,    sizeof(serio->firmware_id));  set_primary_fwnode(&serio->dev, i8042_kbd_fwnode);
  port->serio = serio;  port->irq = I8042_KBD_IRQ;
  return 0;}
i8042_enable_kbd_port 则通过设置控制寄存器来启用整个 port。具体而言,它禁用了 DISABLE 位,打开了 Intterupt 位,然后发送给 WriteConTrolRegister 指令。
static int i8042_enable_kbd_port(void){  i8042_ctr &= ~I8042_CTR_KBDDIS;  i8042_ctr |= I8042_CTR_KBDINT;
  if (i8042_command(&i8042_ctr, I8042_CMD_CTL_WCTR)) {    i8042_ctr &= ~I8042_CTR_KBDINT;    i8042_ctr |= I8042_CTR_KBDDIS;    pr_err("Failed to enable KBD port\n");    return -EIO;  }
  return 0;}
中断函数稍微有些复杂,但具体来说,它拿了自旋锁之后去读数据,然后处理多路复用器的错误和数据,调用 serio_interrupt 去真正的处理数据。
static irqreturn_t i8042_interrupt(int irq, void *dev_id){  struct i8042_port *port;  struct serio *serio;  unsigned long flags;  unsigned char str, data;  unsigned int dfl;  unsigned int port_no;  bool filtered;  int ret = 1;
  spin_lock_irqsave(&i8042_lock, flags);
  str = i8042_read_status();  if (unlikely(~str & I8042_STR_OBF)) {    spin_unlock_irqrestore(&i8042_lock, flags);    if (irq)      dbg("Interrupt %d, without any data\n", irq);    ret = 0;    goto out;  }
  data = i8042_read_data();
  if (i8042_mux_present && (str & I8042_STR_AUXDATA)) {    static unsigned long last_transmit;    static unsigned char last_str;
    dfl = 0;    if (str & I8042_STR_MUXERR) {      dbg("MUX error, status is %02x, data is %02x\n",          str, data);/* * When MUXERR condition is signalled the data register can only contain * 0xfd, 0xfe or 0xff if implementation follows the spec. Unfortunately * it is not always the case. Some KBCs also report 0xfc when there is * nothing connected to the port while others sometimes get confused which * port the data came from and signal error leaving the data intact. They * _do not_ revert to legacy mode (actually I've never seen KBC reverting * to legacy mode yet, when we see one we'll add proper handling). * Anyway, we process 0xfc, 0xfd, 0xfe and 0xff as timeouts, and for the * rest assume that the data came from the same serio last byte * was transmitted (if transmission happened not too long ago). */
      switch (data) {        default:          if (time_before(jiffies, last_transmit + HZ/10)) {            str = last_str;            break;          }          fallthrough;  /* report timeout */        case 0xfc:        case 0xfd:        case 0xfe: dfl = SERIO_TIMEOUT; data = 0xfe; break;        case 0xff: dfl = SERIO_PARITY;  data = 0xfe; break;      }    }
    port_no = I8042_MUX_PORT_NO + ((str >> 6) & 3);    last_str = str;    last_transmit = jiffies;  } else {
    dfl = ((str & I8042_STR_PARITY) ? SERIO_PARITY : 0) |          ((str & I8042_STR_TIMEOUT && !i8042_notimeout) ? SERIO_TIMEOUT : 0);
    port_no = (str & I8042_STR_AUXDATA) ?        I8042_AUX_PORT_NO : I8042_KBD_PORT_NO;  }
  port = &i8042_ports[port_no];  serio = port->exists ? port->serio : NULL;
  filter_dbg(port->driver_bound, data, "<- i8042 (interrupt, %d, %d%s%s)\n",       port_no, irq,       dfl & SERIO_PARITY ? ", bad parity" : "",       dfl & SERIO_TIMEOUT ? ", timeout" : "");
  filtered = i8042_filter(data, str, serio);
  spin_unlock_irqrestore(&i8042_lock, flags);
  if (likely(serio && !filtered))    serio_interrupt(serio, data, dfl);
 out:  return IRQ_RETVAL(ret);}
atkbd_interrupt()
我没找到这个函数,但是通过翻 at 的 driver 的代码,看得到它的 interrupt 是 ps2_interrupt,那就分析这个。
static struct serio_driver atkbd_drv = { .driver = { .name = "atkbd", .dev_groups = atkbd_attribute_groups, }, .description = DRIVER_DESC, .id_table = atkbd_serio_ids, .interrupt = ps2_interrupt, .connect = atkbd_connect, .reconnect = atkbd_reconnect, .disconnect = atkbd_disconnect, .cleanup = atkbd_cleanup,};这个倒是简洁不少,它从 serio 拿到 dev 之后,取出 receive_handler,然后针对不同类型进行处理。
irqreturn_t ps2_interrupt(struct serio *serio, u8 data, unsigned int flags) {  struct ps2dev *ps2dev = serio_get_drvdata(serio);  enum ps2_disposition rc;
  rc = ps2dev->pre_receive_handler(ps2dev, data, flags);  switch (rc) {  case PS2_ERROR:    ps2_cleanup(ps2dev);    break;
  case PS2_IGNORE:    break;
  case PS2_PROCESS:    if (ps2dev->flags & PS2_FLAG_ACK)      ps2_handle_ack(ps2dev, data);    else if (ps2dev->flags & PS2_FLAG_CMD)      ps2_handle_response(ps2dev, data);    else      ps2dev->receive_handler(ps2dev, data);    break;  }
  return IRQ_HANDLED;}
1. 请求 I/O 端口
首先,我们的目标是在 I/O 空间中为硬件设备分配内存。我们看到,我们无法为键盘分配空间,因为指定的区域已经被分配。然后,我们将为未使用的端口分配 I/O 空间。
kbd.c 文件中包含了键盘驱动程序的框架。浏览源代码并检查 kbd_init() 函数。注意我们需要的 I/O 端口是 I8042_STATUS_REG 和 I8042_DATA_REG。
按照骨架中标有 TODO 1 的部分进行操作。在 kbd_init() 函数中请求 I/O 端口,并确保检查错误并在出现错误时进行适当的清理。在请求时,使用 MODULE_NAME 宏设置调用者的 ID 字符串(name)设置为该宏的值。此外,在 kbd_exit() 函数中添加代码以释放 I/O 端口。
static int kbd_init(void){  int err;
  err = register_chrdev_region(MKDEV(KBD_MAJOR, KBD_MINOR),             KBD_NR_MINORS, MODULE_NAME);  if (err != 0) {    pr_err("register_region failed: %d\n", err);    goto out;  }
  /* TODO 1: request the keyboard I/O ports */  if (!request_region(0x65, 1, MODULE_NAME) ||    !request_region(0x61, 1, MODULE_NAME)) {    goto out_unregister;  }
  /* TODO 3: initialize spinlock */
  /* TODO 2: Register IRQ handler for keyboard IRQ (IRQ 1). */
  cdev_init(&devs[0].cdev, &kbd_fops);  cdev_add(&devs[0].cdev, MKDEV(KBD_MAJOR, KBD_MINOR), 1);
  pr_notice("Driver %s loaded\n", MODULE_NAME);  return 0;
  /*TODO 2: release regions in case of error */
out_unregister:  unregister_chrdev_region(MKDEV(KBD_MAJOR, KBD_MINOR),         KBD_NR_MINORS);out:  return err;}
static void kbd_exit(void){  cdev_del(&devs[0].cdev);
  /* TODO 2: Free IRQ. */
  /* TODO 1: release keyboard I/O ports */
  release_region(I8042_STATUS_REG, 1);  release_region(I8042_DATA_REG, 1);

unregister_chrdev_region(MKDEV(KBD_MAJOR, KBD_MINOR), KBD_NR_MINORS); pr_notice("Driver %s unloaded\n", MODULE_NAME);}root@qemux86:~/skels/interrupts# cat /proc/ioports0000-0cf7 : PNP0A03:000000-001f : dma10020-0021 : pic10040-0043 : timer00050-0053 : timer10060-0060 : keyboard0061-0061 : kbd0064-0064 : keyboard0065-0065 : kbd可以看到进去了。
2. 中断处理例程
对于这个任务,我们将实现并注册一个键盘中断的中断处理例程。在继续之前,你可以先回顾一下 请求中断 一节。
请按照骨架中标有 TODO 2 的部分进行操作。
首先,定义一个名为 kbd_interrupt_handler() 的空中断处理例程。
:::info
由于我们已经有一个使用该中断的驱动程序,我们应该将中断报告为未处理(即返回 IRQ_NONE),以便原始驱动程序仍有机会进行处理。
然后,使用 request_irq 注册中断处理例程。中断号由 I8042_KBD_IRQ 宏定义。中断处理例程必须使用 IRQF_SHARED 进行请求,以与键盘驱动程序(i8042)共享中断线。
:::
:::info
对于共享中断, dev_id 不能为 NULL。请使用 &devs[0],即 struct kbd 的指针。此结构包含了设备管理所需的所有信息。为了在 /proc/interrupts 中看到该中断,请不要使用 NULL 作为 dev_name 。你可以使用 MODULE_NAME 宏。
如果中断请求失败,请确保通过跳转到正确的标签(label)来进行适当的清理,即释放 I/O 端口并注销字符设备驱动程序。
:::
编译、复制并加载模块到内核中。通过查看 /proc/interrupts,检查中断线是否已注册。从源代码中确定 IRQ 号码(参见 I8042_KBD_IRQ)并验证该中断线上有两个注册的驱动程序(这表示我们有一个共享中断线):i8042 初始驱动程序和我们的驱动程序。
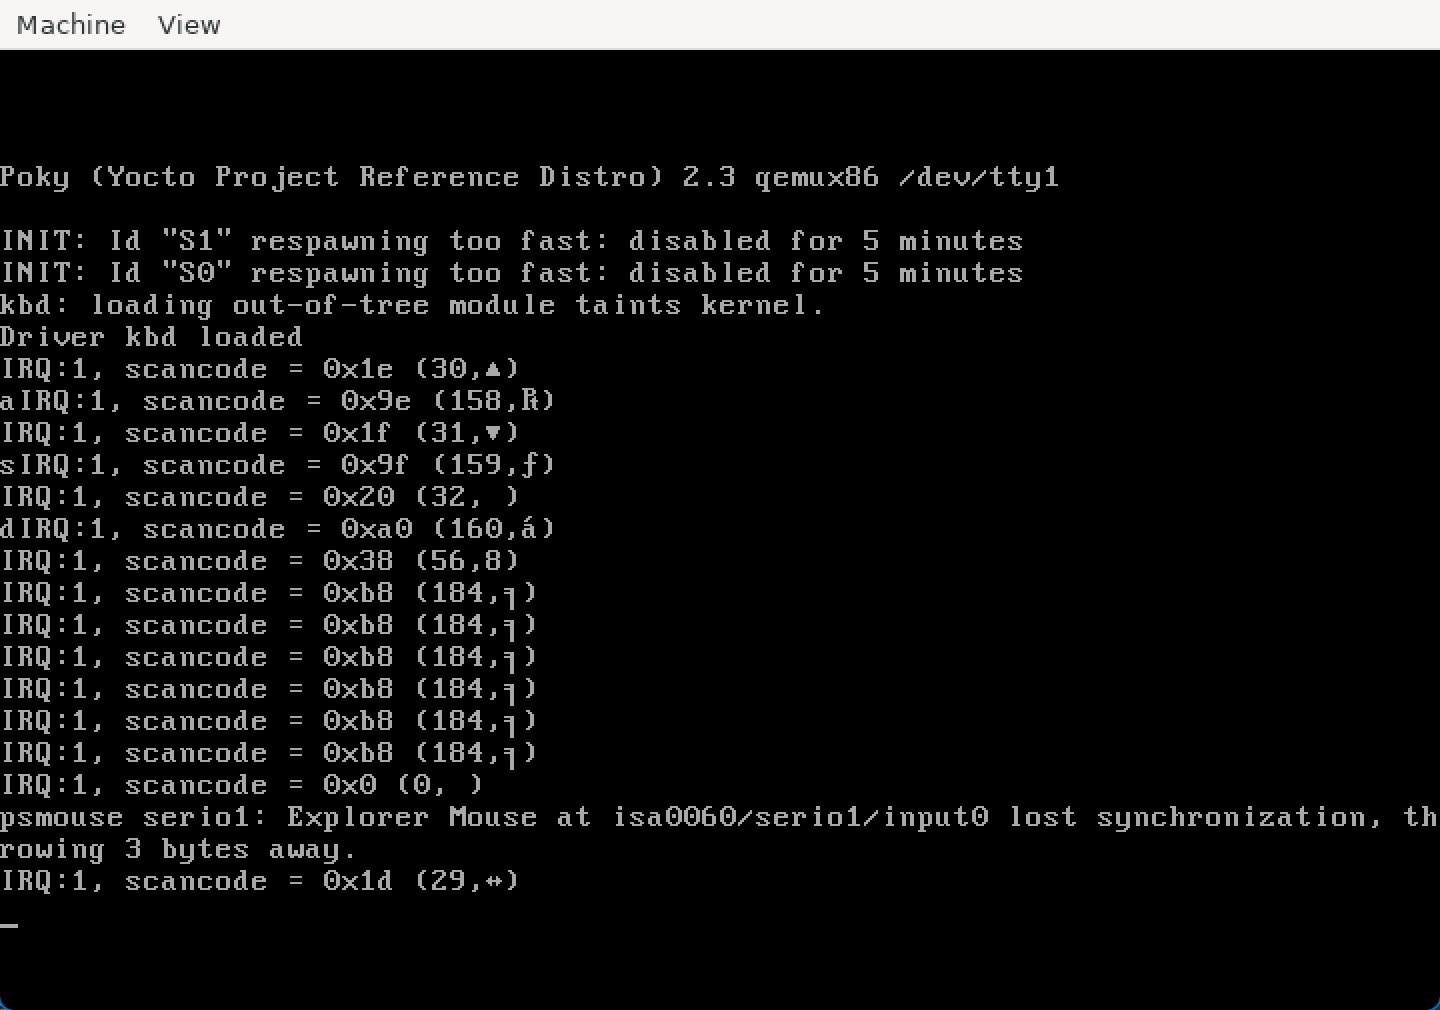
在例程内部打印一条消息,以确保它被调用。将模块编译并重新加载到内核中。使用 dmesg 检查在虚拟机上按键时是否调用了中断处理例程。还要注意,当使用串口时不会触发键盘中断。
那么也就是糊代码的一个过程,我们需要在 init 的时候注册中断,然后在中断处理程序中法案回一个 IRQ_NONE 以移交其它键盘处理。
/* TODO 2: implement interrupt handler */irqreturn_t kbd_interrupt_handler(int irq_no, void *dev_id) {  /* TODO 3: read the scancode */  /* TODO 3: interpret the scancode */  /* TODO 3: display information about the keystrokes */  /* TODO 3: store ASCII key to buffer */  return IRQ_NONE;
}
...    /* TODO 2: Register IRQ handler for keyboard IRQ (IRQ 1). */  if (request_irq(I8042_KBD_IRQ, kbd_interrupt_handler, IRQF_SHARED, MODULE_NAME, &devs[0])) {    pr_err("request_irq failed\n");    err = -EBUSY;    goto out_unregister;  }
static void kbd_exit(void){  cdev_del(&devs[0].cdev);
/* TODO 2: Free IRQ. */ free_irq(I8042_KBD_IRQ, &devs[0]);root@qemux86:~/skels/interrupts# cat /proc/interrupts CPU0 1: 9 IO-APIC 1-edge i8042, kbd可以看到我们的 kbd 已经在上面了。
3. 将 ASCII 键存储到缓冲区
接下来,我们希望收集按键的输入到缓冲区里,并将其内容发送到用户空间。为此,我们将在中断处理中添加以下内容:
- 捕获按下的键(只捕获按下的键,忽略释放的键)
- 识别 ASCII 字符
- 将与按键对应的 ASCII 字符复制并存储在设备的缓冲区中
请按照骨架中标记为 TODO 3 的部分进行操作。
读取数据寄存器
首先,填写 i8042_read_data() 函数,以读取键盘控制器的 I8042_DATA_REG 寄存器。该函数只需要返回寄存器的值。寄存器的值也称为扫描码(scancode),它在每次按键时生成。
:::tip
使用 inb() 读取 I8042_DATA_REG 寄存器,并将值存储在局部变量 val 中。请参阅 访问 I/O 端口 部分。
:::
在 kbd_interrupt_handler() 中调用 i8042_read_data() 并打印读取的值。
按以下格式打印有关按键的信息:
pr_info("IRQ:% d, scancode = 0x%x (%u,%c)\n", irq_no, scancode, scancode, scancode);其中,scancode,即扫描码,是使用 i8042_read_data() 函数读取的寄存器的值。
请注意,扫描码(读取的寄存器的值)不是按下键的 ASCII 字符。我们需要理解扫描码。
与之前不同的,我们打开 XLaunch,然后使用 —allow-gui 运行。编译后,我们也使用 make gui 来打开,因为串口不会触发中断。
/* * Return the value of the DATA register. */static inline u8 i8042_read_data(void){  u8 val;  /* TODO 3: Read DATA register (8 bits). */  val = inb(I8042_DATA_REG);  return val;}
/* TODO 2: implement interrupt handler */irqreturn_t kbd_interrupt_handler(int irq_no, void *dev_id) {  /* TODO 3: read the scancode */  u8 scancode = i8042_read_data();  pr_info("IRQ:%d, scancode = 0x%x (%u,%c)\n",    irq_no, scancode, scancode, scancode);  /* TODO 3: interpret the scancode */  /* TODO 3: display information about the keystrokes */  /* TODO 3: store ASCII key to buffer */  return IRQ_NONE;
}
可以看到,此时按下就有响应了,666
解释扫描码
请注意,寄存器值是扫描码,而不是按下的字符的 ASCII 值。还要注意,中断在按键按下和释放时都会发送。我们只需要在按键按下时获取扫描码,然后解码 ASCII 字符。
:::info
要检查扫描码,可以使用 showkey 命令(showkey -s)。
命令将在按下键后显示 10 秒钟的键扫描码,然后停止。如果按下并释放一个键,你将获得两个扫描码:一个对应按下的键,一个对应释放的键。例如:
-
如果按下回车键,你将获得 0x1c(0x1c)和 0x9c(释放键)。
-
如果按下键 a,你将获得 0x1e(按下的键)和 0x9e(释放键)。
-
如果按下键 b,你将获得 0x30(按下的键)和 0xb0(释放键)。
-
如果按下键 c,你将获得 0x2e(按下的键)和 0xae(释放键)。
-
如果按下 Shift 键,你将获得 0x2a(按下的键)和 0xaa(释放键)。
-
如果按下 Ctrl 键,你将获得 0x1d(按下的键)和 0x9d(释放键)。
正如在 这篇文章 中所指出的,释放键的扫描码比按下键的扫描码高 128(0x80)。这是我们区分按下键的扫描码和释放键的扫描码的方法。
扫描码被转换为与键匹配的键码(keycode)。按下的扫描码和释放的扫描码具有相同的键码。对于上面显示的键,我们有以下表格:
键 按下的扫描码 释放的扫描码 键码 回车 0x1c 0x9c 0x1c(28) a 0x1e 0x9e 0x1e(30) b 0x30 0xb0 0x30(48) c 0x2e 0xae 0x2e(46) Shift 0x2a 0xaa 0x2a(42) Ctrl 0x1d 0x9d 0x1d(29) 按键按下/释放操作在 is_key_press() 函数中执行,获取扫描码的 ASCII 字符在 get_ascii() 函数中进行。
:::
在中断处理程序中,先检查扫描码以确定按键是按下还是释放,然后确定相应的 ASCII 字符。
:::tip
要检查按下/释放,请使用 is_key_press() 函数。使用 get_ascii() 函数获取相应的 ASCII 码。这两个函数都以扫描码作为参数。
:::
:::tip
要显示接收到的信息,请使用以下格式。
pr_info("IRQ %d: scancode=0x%x (%u) pressed=%d ch=%c\n", irq_no, scancode, scancode, pressed, ch);其中,scancode 是数据寄存器的值,ch 是 get_ascii() 函数返回的值。
:::
简单加两句就好
/* TODO 3: display information about the keystrokes */ if (is_key_press(scancode)) { const char ch = (const char) get_ascii(scancode); pr_info("IRQ %d: scancode=0x%x (%u) pressed=1 ch=%c\n", irq_no, scancode, scancode, ch); }将字符存储到缓冲区
我们希望将按下的字符(而不是其他键)收集到一个循环缓冲区(circular buffer)中,以便可以从用户空间中使用。
更新中断处理程序,将按下的 ASCII 字符添加到设备缓冲区的末尾。如果缓冲区已满,则将丢弃该字符。
:::info
设备缓冲区是设备的 struct kbd 中的字段 buf。要从中断处理程序中获取设备数据,请使用以下结构:
struct kbd *data = (struct kbd *) dev_id;缓冲区的大小位于 struct kbd 的字段 count 中。put_idx 和 get_idx 字段指定下一个写入和读取的索引。查看 put_char() 函数的实现,了解数据是如何添加到循环缓冲区中的。
:::
:::tip
使用自旋锁对缓冲区和辅助索引进行同步访问。在设备结构体 struct kbd 中定义自旋锁,并在 kbd_init() 中进行初始化。
使用 spin_lock() 和 spin_unlock() 函数来保护中断处理程序中的缓冲区。
请参阅 锁定 小节。
:::
需要加一个自旋锁,大概是这样的
struct kbd {  struct cdev cdev;  /* TODO 3: add spinlock */  spinlock_t lock;  char buf[BUFFER_SIZE];  size_t put_idx, get_idx, count;} devs[1];
/* TODO 2: implement interrupt handler */irqreturn_t kbd_interrupt_handler(int irq_no, void *dev_id) {  /* TODO 3: read the scancode */  u8 scancode = i8042_read_data();  /* TODO 3: interpret the scancode */  pr_info("IRQ:%d, scancode = 0x%x (%u,%c)\n",    irq_no, scancode, scancode, scancode);  /* TODO 3: display information about the keystrokes */  if (is_key_press(scancode)) {    const char ch = (const char) get_ascii(scancode);    pr_info("IRQ %d: scancode=0x%x (%u) pressed=1 ch=%c\n",        irq_no, scancode, scancode, ch);    /* TODO 3: store ASCII key to buffer */    spin_lock(&((struct kbd *) dev_id)->lock);    put_char((struct kbd *) dev_id, ch);    spin_unlock(&((struct kbd *) dev_id)->lock);  }
  return IRQ_NONE;
}
static int kbd_init(void){  int err;
  err = register_chrdev_region(MKDEV(KBD_MAJOR, KBD_MINOR),             KBD_NR_MINORS, MODULE_NAME);  if (err != 0) {    pr_err("register_region failed: %d\n", err);    goto out;  }
  /* TODO 1: request the keyboard I/O ports */  if (!request_region(0x65, 1, MODULE_NAME) ||    !request_region(0x61, 1, MODULE_NAME)) {    pr_err("request_region failed\n");    err = -EBUSY;    goto out_unregister;  }
  /* TODO 3: initialize spinlock */  spin_lock_init(&devs[0].lock);
4. 读取缓冲区
为了访问键盘记录器的数据,我们需要将其发送到用户空间。我们将使用 /dev/kbd 字符设备来实现这一点。当从该设备读取数据时,我们将从内核空间的缓冲区中获取按键数据。
在这一步中,请按照 kbd_read() 函数中标有 TODO 4 的部分进行操作。
get_char() 的实现类似于 put_char() 。在实现循环缓冲区时要小心。
在 kbd_read() 函数中,将数据从缓冲区复制到用户空间缓冲区。
:::tip
使用 get_char() 从缓冲区中读取一个字符,并使用 put_user() 将其存储到用户缓冲区中。
:::
:::info
在读取函数中,使用 spin_lock_irqsave() 和 spin_unlock_irqrestore() 进行加锁。
请参阅 锁定 部分。
:::
:::info
我们不能在持有锁的情况下使用 put_user() 或 copy_to_user(),因为在原子上下文中不允许访问用户空间。
有关更多信息,请阅读前面实验中的 访问进程地址空间。
:::
要进行测试,你需要在读取之前使用 mknod 创建 /dev/kbd 字符设备驱动程序。设备的主设备号和次设备号定义为 KBD_MAJOR 和 KBD_MINOR:
mknod /dev/kbd c 42 0构建、复制和启动虚拟机,并加载该模块。使用以下命令进行测试:
cat /dev/kbd读取的时候我们需要关中断说是。
static bool get_char(char *c, struct kbd *data){  /* TODO 4: get char from buffer; update count and get_idx */  if (data->count > 0) {    *c = data->buf[data->get_idx];    data->get_idx = (data->get_idx + 1) % BUFFER_SIZE;    data->count--;    return true;  }  return false;}
static ssize_t kbd_read(struct file *file,  char __user *user_buffer,      size_t size, loff_t *offset){  struct kbd *data = (struct kbd *) file->private_data;  size_t read = 0;  /* TODO 4: read data from buffer */  unsigned long flags;

  while (read < size) {    char c;    spin_lock_irqsave(&data->lock, flags);    if (!get_char(&c, data)) {      spin_unlock_irqrestore(&data->lock, flags);      break;        }    spin_unlock_irqrestore(&data->lock, flags);    if (copy_to_user(user_buffer + read, &c, 1)) {      spin_unlock_irqrestore(&data->lock, flags);      return -EFAULT;    }    read++;  }  return read;}
修修补补,谈笑风生间写了一堆有问题的(例如没有错误检查,没有 kfree 等等,还写出了 off-by-null 的),最后留下一个每次都 copy_to_user 的,至少可以用嘛。
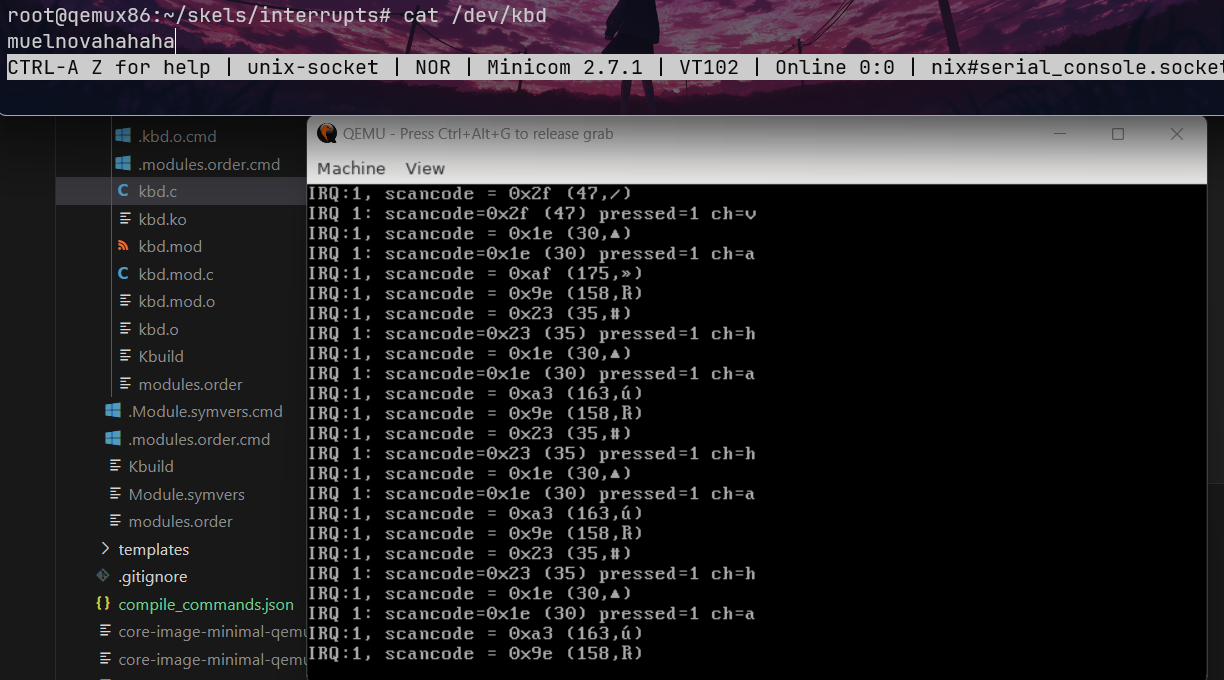
5. 重置缓冲区
如果对设备进行写操作,则重置缓冲区。在这一步中,请按照骨架中标有 TODO 5 的部分进行操作。
实现 reset_buffer() 并将写操作添加到 kbd_fops 中。
:::info
在写函数中,当重置缓冲区时,请使用 spin_lock_irqsave() 和 spin_unlock_irqrestore() 进行加锁。
请参阅 锁定 部分。
:::
没懂,这个。
static void reset_buffer(struct kbd *data){  /* TODO 5: reset count, put_idx, get_idx */  data->count = 0;  data->put_idx = 0;  data->get_idx = 0;}
/* TODO 5: add write operation and reset the buffer */
static ssize_t kdb_write(struct file *file, const char __user *user_buffer, size_t size, loff_t *offset) {  struct kbd *data = (struct kbd *) file->private_data;  unsigned long flags;
  spin_lock_irqsave(&data->lock, flags);  reset_buffer(data);  spin_unlock_irqrestore(&data->lock, flags);
    return 0;
}
static const struct file_operations kbd_fops = {  .owner = THIS_MODULE,  .open = kbd_open,  .release = kbd_release,  .read = kbd_read,  /* TODO 5: add write operation */  .write = kdb_write};
延迟工作
眨眼之间三个月就过去了,原本有点弃坑那个感觉了,然后发现 @hanqing 在看,就想着继续做做呢,正好不知道最近干啥,想学做游戏和前端去。
0. 简介
使用 LXR,找到以下符号的定义:
jiffiesstruct timer_listspin_lock_bh function()
jiffies 类似于一个计数器,它记录的是 “内核 ticks”,在每一次系统时钟中断时就会加 1
找定义有点复杂,它是一个 extern 的,但是都在用。
extern unsigned long volatile __cacheline_aligned_in_smp __jiffy_arch_data jiffies;/* * Periodic tick */static void tick_periodic(int cpu){ if (tick_do_timer_cpu == cpu) { raw_spin_lock(&jiffies_lock); write_seqcount_begin(&jiffies_seq);
/* Keep track of the next tick event */ tick_next_period = ktime_add_ns(tick_next_period, TICK_NSEC);
do_timer(1); write_seqcount_end(&jiffies_seq); raw_spin_unlock(&jiffies_lock); update_wall_time(); }
update_process_times(user_mode(get_irq_regs())); profile_tick(CPU_PROFILING);}在 do_timer 里,我们能看到它给 jiffies_64 做了更新。
/* * Must hold jiffies_lock */void do_timer(unsigned long ticks){ jiffies_64 += ticks; calc_global_load();}所以在 x86_64 里,我们实际拿 jiffies 拿到的应该就是 jiffies_64(所以是在哪里切换的?我真没找到相关代码)
__visible u64 jiffies_64 __cacheline_aligned_in_smp = INITIAL_JIFFIES;
EXPORT_SYMBOL(jiffies_64);
struct timer_list
struct timer_list {  /*   * All fields that change during normal runtime grouped to the   * same cacheline   */  struct hlist_node  entry;  unsigned long    expires;  void      (*function)(struct timer_list *);  u32      flags;
#ifdef CONFIG_LOCKDEP struct lockdep_map lockdep_map;#endif};- spin_lock_bh
static __always_inline void spin_lock_bh(spinlock_t *lock){ raw_spin_lock_bh(&lock->rlock);}1. 定时器
我们将创建一个简单的内核模块,在模块的内核加载后的第 TIMER_TIMEOUT 秒显示一条消息。
生成名为 1-2-timer 的任务骨架,并按照标有 TODO 1 的部分来完成任务。
:::info
使用 pr_info(…)。消息将显示在控制台上,并且还可以使用 dmesg 查看。在调度定时器时,我们需要使用系统的(未来)绝对时间并且以滴答数表示。系统的当前时间(以滴答数表示)由 jiffies 给出。因此,我们需要将 jiffies + TIMER_TIMEOUT * HZ 作为绝对时间传递给定时器。
:::
有关更多信息,请查阅 定时器(Timer) 部分。
基本上就是抄 Timer 部分的东西
/* * Deferred Work * * Exercise #1, #2: simple timer */
#include "linux/timer.h"#include <linux/kernel.h>#include <linux/init.h>#include <linux/module.h>#include <linux/sched.h>
MODULE_DESCRIPTION("Simple kernel timer");MODULE_AUTHOR("SO2");MODULE_LICENSE("GPL");
#define TIMER_TIMEOUT  1
static struct timer_list timer;
static void timer_handler(struct timer_list *tl){  /* TODO 1: print a message */  pr_info("No Timer Executed!\n");
  /* TODO 2: rechedule timer */}
static int __init timer_init(void){  pr_info("[timer_init] Init module\n");
  /* TODO 1: initialize timer */  timer_setup(&timer, timer_handler, 0);

  /* TODO 1: schedule timer for the first time */  mod_timer(&timer, jiffies + HZ * TIMER_TIMEOUT);
  return 0;}
static void __exit timer_exit(void){  pr_info("[timer_exit] Exit module\n");
  /* TODO 1: cleanup; make sure the timer is not running after we exit */  del_timer_sync(&timer);}
module_init(timer_init);module_exit(timer_exit);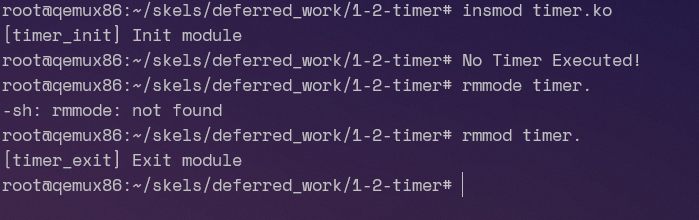
没问题,所以我们这个就是 1S 后执行。
2. 周期性定时器
修改前面的模块,使消息每隔 TIMER_TIMEOUT 秒显示一次。按照骨架中标有 TODO 2 的部分进行修改。
想法就是每次 handle 的时候再设置下一次调用
static void timer_handler(struct timer_list *tl){  /* TODO 1: print a message */  pr_info("No Timer Executed!\n");
  /* TODO 2: rechedule timer */  mod_timer(tl, jiffies + HZ * TIMER_TIMEOUT);}
3. 使用 ioctl 控制定时器
我们计划在从用户空间接收到 ioctl 调用后的第 N 秒显示有关当前进程的信息。N 作为 ioctl 参数传递。
生成名为 3-4-5-deferred 的任务骨架,并按照骨架中标有 TODO 1 的部分进行修改。
你需要实现以下 ioctl 操作。
- MY_IOCTL_TIMER_SET:安排定时器在接收到的秒数之后运行,该秒数作为 ioctl 的参数。该定时器并不周期运行。 * 此命令直接接收一个值,而不是指针。
- MY_IOCTL_TIMER_CANCEL:停用定时器。
:::info
请查阅 ioctl 了解如何访问 ioctl 参数。
请查阅 定时器(Timer) 部分,了解如何启用/禁用定时器。在定时器处理程序中,显示当前进程标识符(PID)和进程执行镜像名称。
你可以使用当前进程的 pid 和 comm 字段来查找当前进程标识符。有关详细信息,请查阅 proc-info。
要从用户空间使用设备驱动程序,你必须使用 mknod 程序创建设备字符文件 /dev/deferred。或者,你可以运行 3-4-5-deferred/kernel/makenode 脚本来执行此操作。
通过调用用户空间的 ioctl 操作来启用和禁用定时器。使用 3-4-5-deferred/user/test 程序来测试定时器的计划和取消。该程序在命令行上接收 ioctl 类型操作及其参数(如果有)。
运行测试可执行文件时不带参数,以观察它接受的命令行选项。
要在 3 秒后启用定时器,请使用:
./test s 3要停用定时器,请使用:
./test c注意,定时器运行所基于的当前进程每次都是 PID 为 0 的 swapper/0。这个进程是空闲进程,当没有其他任务可运行时,它会一直运行。由于虚拟机非常轻量级且没有太多操作,大部分时间都会看到这个进程。
:::
这个任务比较有意思。让我们先来看 user 部分。
好吧 user 已经写好了,那没意思。
那就跟着它的 kernel 部分来做吧,第一部分几乎和 1 是一样的,在 init 里 init,然后等 ioctl 去 mod 它。
/* * SO2 - Lab 6 - Deferred Work * * Exercises #3, #4, #5: deferred work * * Code skeleton. */
#include "linux/timer.h"#include <linux/kernel.h>#include <linux/init.h>#include <linux/module.h>#include <linux/fs.h>#include <linux/cdev.h>#include <linux/sched.h>#include <linux/slab.h>#include <linux/uaccess.h>#include <linux/sched/task.h>#include "../include/deferred.h"
#define MY_MAJOR    42#define MY_MINOR    0#define MODULE_NAME    "deferred"
#define TIMER_TYPE_NONE    -1#define TIMER_TYPE_SET    0#define TIMER_TYPE_ALLOC  1#define TIMER_TYPE_MON    2
MODULE_DESCRIPTION("Deferred work character device");MODULE_AUTHOR("SO2");MODULE_LICENSE("GPL");
struct mon_proc {  struct task_struct *task;  struct list_head list;};
static struct my_device_data {  struct cdev cdev;  /* TODO 1: add timer */  struct timer_list tl;  /* TODO 2: add flag */  /* TODO 3: add work */  /* TODO 4: add list for monitored processes */  /* TODO 4: add spinlock to protect list */} dev;
static void alloc_io(void){  set_current_state(TASK_INTERRUPTIBLE);  schedule_timeout(5 * HZ);  pr_info("Yawn! I've been sleeping for 5 seconds.\n");}
static struct mon_proc *get_proc(pid_t pid){  struct task_struct *task;  struct mon_proc *p;
  rcu_read_lock();  task = pid_task(find_vpid(pid), PIDTYPE_PID);  rcu_read_unlock();  if (!task)    return ERR_PTR(-ESRCH);
  p = kmalloc(sizeof(*p), GFP_ATOMIC);  if (!p)    return ERR_PTR(-ENOMEM);
  get_task_struct(task);  p->task = task;
  return p;}

/* TODO 3: define work handler */
#define ALLOC_IO_DIRECT/* TODO 3: undef ALLOC_IO_DIRECT*/
static void timer_handler(struct timer_list *tl){  /* TODO 1: implement timer handler */  pr_info("TIMER Executing...\n");  /* TODO 2: check flags: TIMER_TYPE_SET or TIMER_TYPE_ALLOC */    /* TODO 3: schedule work */    /* TODO 4: iterate the list and check the proccess state */      /* TODO 4: if task is dead print info ... */      /* TODO 4: ... decrement task usage counter ... */      /* TODO 4: ... remove it from the list ... */      /* TODO 4: ... free the struct mon_proc */}
static int deferred_open(struct inode *inode, struct file *file){  struct my_device_data *my_data =    container_of(inode->i_cdev, struct my_device_data, cdev);  file->private_data = my_data;  pr_info("[deferred_open] Device opened\n");  return 0;}
static int deferred_release(struct inode *inode, struct file *file){  pr_info("[deferred_release] Device released\n");  return 0;}
static long deferred_ioctl(struct file *file, unsigned int cmd, unsigned long arg){  struct my_device_data *my_data = (struct my_device_data*) file->private_data;
  pr_info("[deferred_ioctl] Command: %s\n", ioctl_command_to_string(cmd));
  switch (cmd) {    case MY_IOCTL_TIMER_SET:      /* TODO 2: set flag */      /* TODO 1: schedule timer */      mod_timer(&dev.tl, jiffies + HZ * arg);      break;    case MY_IOCTL_TIMER_CANCEL:      /* TODO 1: cancel timer */      del_timer(&dev.tl);      break;    case MY_IOCTL_TIMER_ALLOC:      /* TODO 2: set flag and schedule timer */      break;    case MY_IOCTL_TIMER_MON:    {      /* TODO 4: use get_proc() and add task to list */      /* TODO 4: protect access to list */
      /* TODO 4: set flag and schedule timer */      break;    }    default:      return -ENOTTY;  }  return 0;}
struct file_operations my_fops = {  .owner = THIS_MODULE,  .open = deferred_open,  .release = deferred_release,  .unlocked_ioctl = deferred_ioctl,};
static int deferred_init(void){  int err;
  pr_info("[deferred_init] Init module\n");  err = register_chrdev_region(MKDEV(MY_MAJOR, MY_MINOR), 1, MODULE_NAME);  if (err) {    pr_info("[deffered_init] register_chrdev_region: %d\n", err);    return err;  }
  /* TODO 2: Initialize flag. */  /* TODO 3: Initialize work. */
  /* TODO 4: Initialize lock and list. */
  cdev_init(&dev.cdev, &my_fops);  cdev_add(&dev.cdev, MKDEV(MY_MAJOR, MY_MINOR), 1);
  /* TODO 1: Initialize timer. */  timer_setup(&dev.tl, timer_handler, 0);
  return 0;}
static void deferred_exit(void){  struct mon_proc *p, *n;
  pr_info("[deferred_exit] Exit module\n" );
  cdev_del(&dev.cdev);  unregister_chrdev_region(MKDEV(MY_MAJOR, MY_MINOR), 1);
  /* TODO 1: Cleanup: make sure the timer is not running after exiting. */  del_timer_sync(&dev.tl);  /* TODO 3: Cleanup: make sure the work handler is not scheduled. */
  /* TODO 4: Cleanup the monitered process list */    /* TODO 4: ... decrement task usage counter ... */    /* TODO 4: ... remove it from the list ... */    /* TODO 4: ... free the struct mon_proc */}
module_init(deferred_init);module_exit(deferred_exit);
我们可以尝试一下:
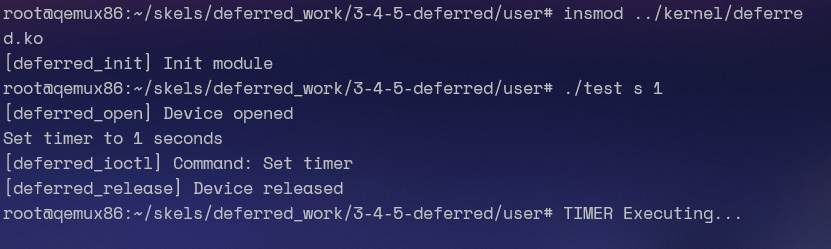
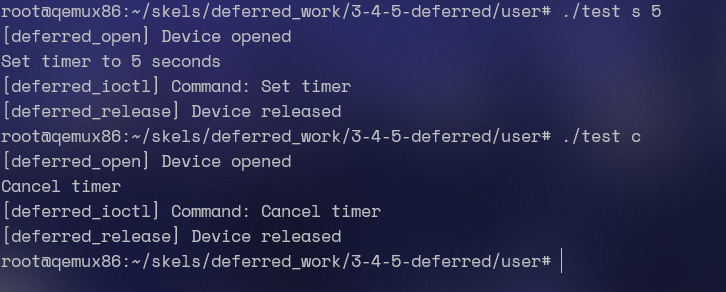
没有问题,那么我们就继续来完成 pid 相关的内容。引用 linux/sched.h,我们就可以使用 current 宏拿到当前进程的 struct task_struct*
static void timer_handler(struct timer_list *tl){ /* TODO 1: implement timer handler */ pr_info("PID: %d, name: %s\n", current->pid, current->comm);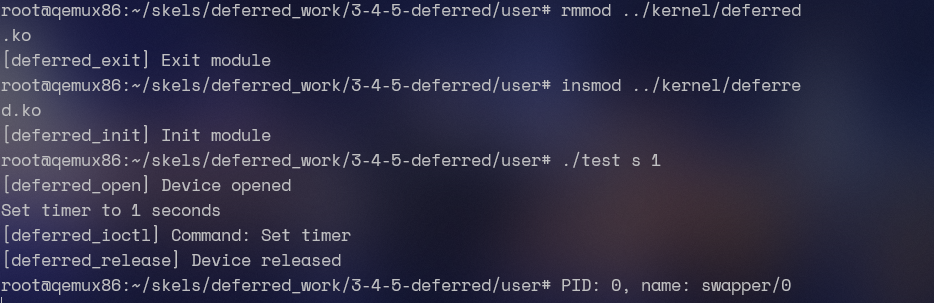
可以看到,其实定时器运行基于的都是 swapper/0 这个进程。
4. 阻塞操作
接下来,我们将尝试在定时器例程中执行阻塞操作,以查看会发生什么情况。为此,我们尝试在定时器处理例程中调用一个名为 alloc_io() 的模拟阻塞操作的函数。
修改模块,使得当接收到 MY_IOCTL_TIMER_ALLOC 命令时,定时器处理程序将调用 alloc_io()。按照骨架中标有 TODO 2 的部分进行修改。
使用相同的定时器。为了区分定时器处理程序中的功能,可以在设备结构中使用一个标志。使用代码骨架中定义的 TIMER_TYPE_ALLOC 和 TIMER_TYPE_SET 宏。对于初始化,请使用 TIMER_TYPE_NONE。
运行测试程序以验证任务 3 的功能。再次运行测试程序以调用 alloc_io()。
:::info
该驱动程序会导致错误,因为在原子上下文(定时器处理程序运行在中断上下文中)中调用了阻塞函数。
:::
这个显然是不行的,因为我们在 TIMER 运行的时候位于中断上下文中(或者说就是在时钟的软中断处理函数中运行)
我们添加一个 int 类型的 flag,然后在 handler 里面判断 flag
/* * SO2 - Lab 6 - Deferred Work * * Exercises #3, #4, #5: deferred work * * Code skeleton. */
#include "linux/timer.h"#include <linux/kernel.h>#include <linux/init.h>#include <linux/module.h>#include <linux/fs.h>#include <linux/cdev.h>#include <linux/sched.h>#include <linux/slab.h>#include <linux/uaccess.h>#include <linux/sched/task.h>#include "../include/deferred.h"
#define MY_MAJOR    42#define MY_MINOR    0#define MODULE_NAME    "deferred"
#define TIMER_TYPE_NONE    -1#define TIMER_TYPE_SET    0#define TIMER_TYPE_ALLOC  1#define TIMER_TYPE_MON    2
MODULE_DESCRIPTION("Deferred work character device");MODULE_AUTHOR("SO2");MODULE_LICENSE("GPL");
struct mon_proc {  struct task_struct *task;  struct list_head list;};
static struct my_device_data {  struct cdev cdev;  /* TODO 1: add timer */  struct timer_list tl;  /* TODO 2: add flag */  int flag;  /* TODO 3: add work */  /* TODO 4: add list for monitored processes */  /* TODO 4: add spinlock to protect list */} dev;
static void alloc_io(void){  set_current_state(TASK_INTERRUPTIBLE);  schedule_timeout(5 * HZ);  pr_info("Yawn! I've been sleeping for 5 seconds.\n");}
static struct mon_proc *get_proc(pid_t pid){  struct task_struct *task;  struct mon_proc *p;
  rcu_read_lock();  task = pid_task(find_vpid(pid), PIDTYPE_PID);  rcu_read_unlock();  if (!task)    return ERR_PTR(-ESRCH);
  p = kmalloc(sizeof(*p), GFP_ATOMIC);  if (!p)    return ERR_PTR(-ENOMEM);
  get_task_struct(task);  p->task = task;
  return p;}

/* TODO 3: define work handler */
#define ALLOC_IO_DIRECT/* TODO 3: undef ALLOC_IO_DIRECT*/
static void timer_handler(struct timer_list *tl){  /* TODO 1: implement timer handler */  /* TODO 2: check flags: TIMER_TYPE_SET or TIMER_TYPE_ALLOC */  switch (dev.flag) {    case TIMER_TYPE_SET:      pr_info("PID: %d, name: %s\n", current->pid, current->comm);      break;    case TIMER_TYPE_ALLOC:      alloc_io();      break;  }    /* TODO 3: schedule work */    /* TODO 4: iterate the list and check the proccess state */      /* TODO 4: if task is dead print info ... */      /* TODO 4: ... decrement task usage counter ... */      /* TODO 4: ... remove it from the list ... */      /* TODO 4: ... free the struct mon_proc */}
static int deferred_open(struct inode *inode, struct file *file){  struct my_device_data *my_data =    container_of(inode->i_cdev, struct my_device_data, cdev);  file->private_data = my_data;  pr_info("[deferred_open] Device opened\n");  return 0;}
static int deferred_release(struct inode *inode, struct file *file){  pr_info("[deferred_release] Device released\n");  return 0;}
static long deferred_ioctl(struct file *file, unsigned int cmd, unsigned long arg){  struct my_device_data *my_data = (struct my_device_data*) file->private_data;
  pr_info("[deferred_ioctl] Command: %s\n", ioctl_command_to_string(cmd));
  switch (cmd) {    case MY_IOCTL_TIMER_SET:      /* TODO 2: set flag */      dev.flag = TIMER_TYPE_SET;      /* TODO 1: schedule timer */      mod_timer(&dev.tl, jiffies + HZ * arg);      break;    case MY_IOCTL_TIMER_CANCEL:      /* TODO 1: cancel timer */      del_timer(&dev.tl);      break;    case MY_IOCTL_TIMER_ALLOC:      /* TODO 2: set flag and schedule timer */      dev.flag = TIMER_TYPE_ALLOC;      mod_timer(&dev.tl, jiffies + HZ * arg);      break;    case MY_IOCTL_TIMER_MON:    {      /* TODO 4: use get_proc() and add task to list */      /* TODO 4: protect access to list */
      /* TODO 4: set flag and schedule timer */      break;    }    default:      return -ENOTTY;  }  return 0;}
struct file_operations my_fops = {  .owner = THIS_MODULE,  .open = deferred_open,  .release = deferred_release,  .unlocked_ioctl = deferred_ioctl,};
static int deferred_init(void){  int err;
  pr_info("[deferred_init] Init module\n");  err = register_chrdev_region(MKDEV(MY_MAJOR, MY_MINOR), 1, MODULE_NAME);  if (err) {    pr_info("[deffered_init] register_chrdev_region: %d\n", err);    return err;  }
  /* TODO 2: Initialize flag. */  dev.flag = TIMER_TYPE_NONE;  /* TODO 3: Initialize work. */
  /* TODO 4: Initialize lock and list. */
  cdev_init(&dev.cdev, &my_fops);  cdev_add(&dev.cdev, MKDEV(MY_MAJOR, MY_MINOR), 1);
  /* TODO 1: Initialize timer. */  timer_setup(&dev.tl, timer_handler, 0);
  return 0;}
static void deferred_exit(void){  struct mon_proc *p, *n;
  pr_info("[deferred_exit] Exit module\n" );
  cdev_del(&dev.cdev);  unregister_chrdev_region(MKDEV(MY_MAJOR, MY_MINOR), 1);
  /* TODO 1: Cleanup: make sure the timer is not running after exiting. */  del_timer_sync(&dev.tl);  /* TODO 3: Cleanup: make sure the work handler is not scheduled. */
  /* TODO 4: Cleanup the monitered process list */    /* TODO 4: ... decrement task usage counter ... */    /* TODO 4: ... remove it from the list ... */    /* TODO 4: ... free the struct mon_proc */}
module_init(deferred_init);module_exit(deferred_exit);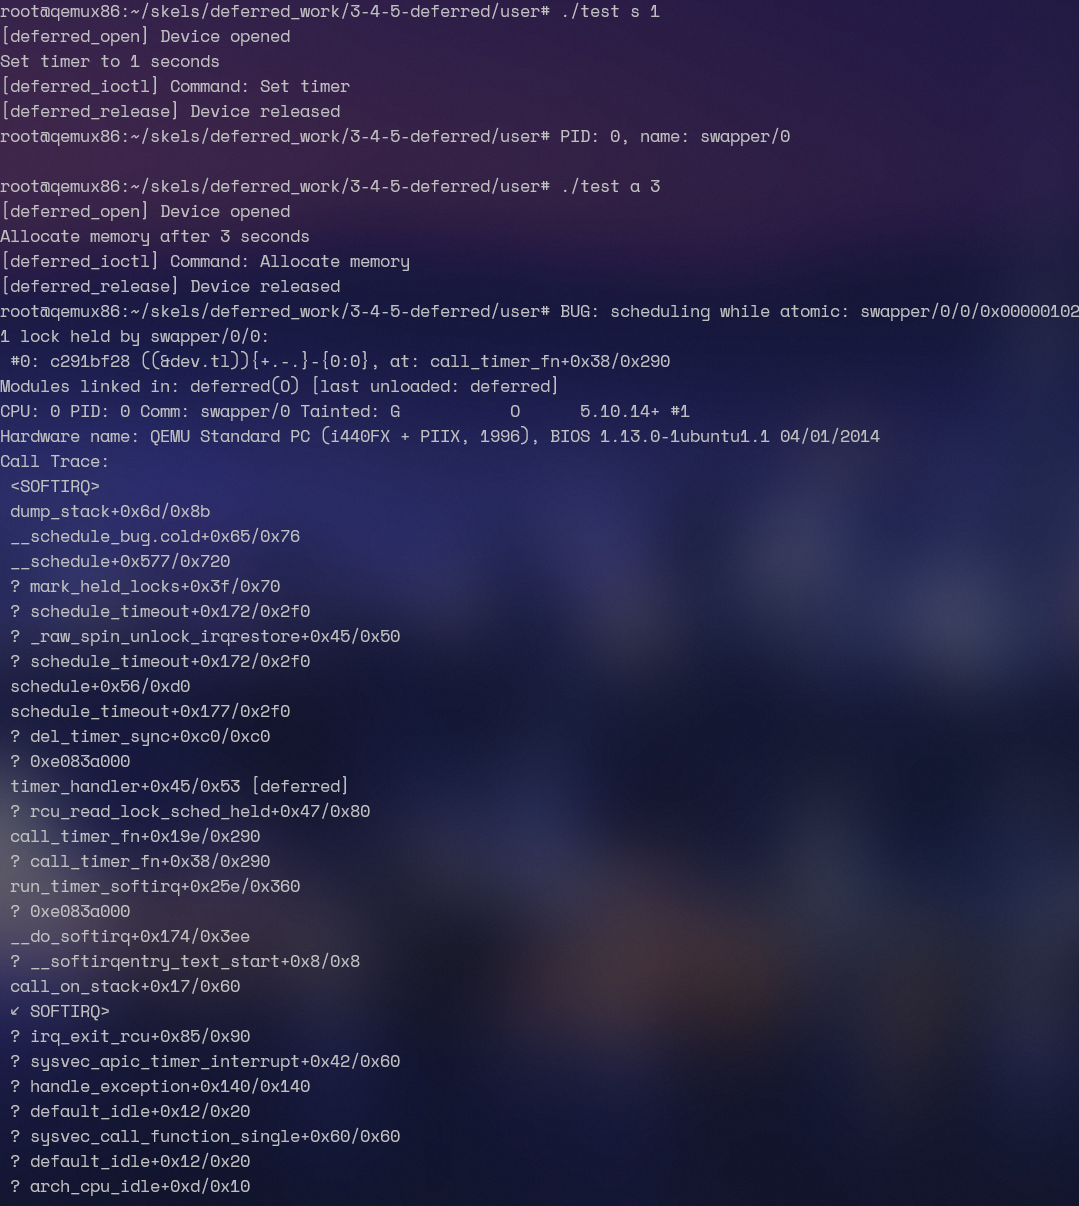
5. 工作队列
我们将修改模块,以解决上一个任务中观察到的错误。
为此,让我们使用工作队列调用 alloc_io()。从定时器处理程序中安排一个工作项。在工作项处理程序中(在进程上下文中运行),调用 alloc_io()。按照骨架中标有 TODO 3 的部分进行修改,并在需要时查阅 工作队列 部分。
:::info
在设备结构中添加一个类型为 struct work_struct 的新字段。初始化此字段。使用 schedule_work() 从定时器处理程序中调度工作项。从 ioctl 后的 N 秒开始调度定时器处理程序。
:::
相比于 4,我们使用一个 work_struct 来处理这些需要阻塞的东西。
/* * SO2 - Lab 6 - Deferred Work * * Exercises #3, #4, #5: deferred work * * Code skeleton. */
#include "linux/timer.h"#include "linux/workqueue.h"#include <linux/kernel.h>#include <linux/init.h>#include <linux/module.h>#include <linux/fs.h>#include <linux/cdev.h>#include <linux/sched.h>#include <linux/slab.h>#include <linux/uaccess.h>#include <linux/sched/task.h>#include "../include/deferred.h"
#define MY_MAJOR    42#define MY_MINOR    0#define MODULE_NAME    "deferred"
#define TIMER_TYPE_NONE    -1#define TIMER_TYPE_SET    0#define TIMER_TYPE_ALLOC  1#define TIMER_TYPE_MON    2
MODULE_DESCRIPTION("Deferred work character device");MODULE_AUTHOR("SO2");MODULE_LICENSE("GPL");
struct mon_proc {  struct task_struct *task;  struct list_head list;};
static struct my_device_data {  struct cdev cdev;  /* TODO 1: add timer */  struct timer_list tl;  /* TODO 2: add flag */  int flag;  /* TODO 3: add work */  struct work_struct wk;  /* TODO 4: add list for monitored processes */  /* TODO 4: add spinlock to protect list */} dev;
static void alloc_io(void){  set_current_state(TASK_INTERRUPTIBLE);  schedule_timeout(5 * HZ);  pr_info("Yawn! I've been sleeping for 5 seconds.\n");}
static struct mon_proc *get_proc(pid_t pid){  struct task_struct *task;  struct mon_proc *p;
  rcu_read_lock();  task = pid_task(find_vpid(pid), PIDTYPE_PID);  rcu_read_unlock();  if (!task)    return ERR_PTR(-ESRCH);
  p = kmalloc(sizeof(*p), GFP_ATOMIC);  if (!p)    return ERR_PTR(-ENOMEM);
  get_task_struct(task);  p->task = task;
  return p;}

/* TODO 3: define work handler */
void work_handler(struct work_struct* work){  alloc_io();}#define ALLOC_IO_DIRECT/* TODO 3: undef ALLOC_IO_DIRECT*/#undef ALLOC_IO_DIRECT
static void timer_handler(struct timer_list *tl){  /* TODO 1: implement timer handler */  /* TODO 2: check flags: TIMER_TYPE_SET or TIMER_TYPE_ALLOC */  switch (dev.flag) {    case TIMER_TYPE_SET:      pr_info("PID: %d, name: %s\n", current->pid, current->comm);      break;    case TIMER_TYPE_ALLOC:      /* TODO 3: schedule work */      schedule_work(&dev.wk);      break;  }
    /* TODO 4: iterate the list and check the proccess state */      /* TODO 4: if task is dead print info ... */      /* TODO 4: ... decrement task usage counter ... */      /* TODO 4: ... remove it from the list ... */      /* TODO 4: ... free the struct mon_proc */}
static int deferred_open(struct inode *inode, struct file *file){  struct my_device_data *my_data =    container_of(inode->i_cdev, struct my_device_data, cdev);  file->private_data = my_data;  pr_info("[deferred_open] Device opened\n");  return 0;}
static int deferred_release(struct inode *inode, struct file *file){  pr_info("[deferred_release] Device released\n");  return 0;}
static long deferred_ioctl(struct file *file, unsigned int cmd, unsigned long arg){  struct my_device_data *my_data = (struct my_device_data*) file->private_data;
  pr_info("[deferred_ioctl] Command: %s\n", ioctl_command_to_string(cmd));
  switch (cmd) {    case MY_IOCTL_TIMER_SET:      /* TODO 2: set flag */      dev.flag = TIMER_TYPE_SET;      /* TODO 1: schedule timer */      mod_timer(&dev.tl, jiffies + HZ * arg);      break;    case MY_IOCTL_TIMER_CANCEL:      /* TODO 1: cancel timer */      del_timer(&dev.tl);      break;    case MY_IOCTL_TIMER_ALLOC:      /* TODO 2: set flag and schedule timer */      dev.flag = TIMER_TYPE_ALLOC;      mod_timer(&dev.tl, jiffies + HZ * arg);      break;    case MY_IOCTL_TIMER_MON:    {      /* TODO 4: use get_proc() and add task to list */      /* TODO 4: protect access to list */
      /* TODO 4: set flag and schedule timer */      break;    }    default:      return -ENOTTY;  }  return 0;}
struct file_operations my_fops = {  .owner = THIS_MODULE,  .open = deferred_open,  .release = deferred_release,  .unlocked_ioctl = deferred_ioctl,};
static int deferred_init(void){  int err;
  pr_info("[deferred_init] Init module\n");  err = register_chrdev_region(MKDEV(MY_MAJOR, MY_MINOR), 1, MODULE_NAME);  if (err) {    pr_info("[deffered_init] register_chrdev_region: %d\n", err);    return err;  }
  /* TODO 2: Initialize flag. */  dev.flag = TIMER_TYPE_NONE;  /* TODO 3: Initialize work. */  INIT_WORK(&dev.wk, work_handler);
  /* TODO 4: Initialize lock and list. */
  cdev_init(&dev.cdev, &my_fops);  cdev_add(&dev.cdev, MKDEV(MY_MAJOR, MY_MINOR), 1);
  /* TODO 1: Initialize timer. */  timer_setup(&dev.tl, timer_handler, 0);
  return 0;}
static void deferred_exit(void){  struct mon_proc *p, *n;
  pr_info("[deferred_exit] Exit module\n" );
  cdev_del(&dev.cdev);  unregister_chrdev_region(MKDEV(MY_MAJOR, MY_MINOR), 1);
  /* TODO 1: Cleanup: make sure the timer is not running after exiting. */  del_timer_sync(&dev.tl);  /* TODO 3: Cleanup: make sure the work handler is not scheduled. */  cancel_work_sync(&dev.wk);
  /* TODO 4: Cleanup the monitered process list */    /* TODO 4: ... decrement task usage counter ... */    /* TODO 4: ... remove it from the list ... */    /* TODO 4: ... free the struct mon_proc */}
module_init(deferred_init);module_exit(deferred_exit);
没看懂为啥需要 undef 它,我觉得应该是用来控制是用 work 来跑 alloc_io 还是直接跑的?
case TIMER_TYPE_ALLOC: /* TODO 3: schedule work */ #ifdef ALLOC_IO_DIRECT alloc_io(); #else schedule_work(&dev.wk); #endif所以写成这样估计会比较好一些

6. 内核线程
实现一个简单的模块,创建一个显示当前进程标识符的内核线程。
生成名为 6-kthread 的任务骨架,并按照骨架中标有 TODO 的部分进行修改。
注解
创建和运行线程有两种选择:
- 使用
kthread_run()创建并运行线程 - 使用
kthread_create()创建一个挂起的线程,然后使用wake_up_process()启动它。
如果需要,请查阅 内核线程 部分。
:::info
将线程终止与模块卸载进行同步:
- 线程应在模块卸载时结束
- 在卸载之前,请等待内核线程退出
为了同步,使用两个等待队列和两个标志。
请查阅 waiting-queues 了解如何使用等待队列。
使用原子变量作为标志。请查阅 原子变量。
:::
这个一开始没理解,其实是这样的:我们创建两个等待队列,一个用于等待 module exit,另一个用于等待 thread exit。
所以 init 的时候我们就会运行 kthread,而在 exit 的时候就设置 flag,让 kthread 退出,此时 exit 又等待另一个 flag
我们就可以使用 wait_event_interruptible 来做这个等待的操作。它接受一个 wait_queue,以及一个 condition。如果不满足 condition,它就把当前线程休眠。信号来了它就遍历 wait_queue 去看是否满足某个 condition
具体可以看这篇Linux等待队列(Wait Queue) - huey_x - 博客园 (cnblogs.com)
因此我们从 init 来写。注意,我们可以先设置 flag,这样可以少判断一次。
static int __init kthread_init(void){  pr_info("[kthread_init] Init module\n");
  /* TODO: init the waitqueues and flags */  init_waitqueue_head(&wq_stop_thread);  init_waitqueue_head(&wq_thread_terminated);  atomic_set(&flag_stop_thread, 0);  atomic_set(&flag_thread_terminated, 0);  /* TODO: create and start the kernel thread */  kthread_run(my_thread_f, 0, "myHappyLittleThread");
  return 0;}
那么接下来就进到 my_thread_f 里。进入之后,它打印 pid,然后就要等待 module exit,因此我们等待 stop flag,等到之后,它就需要设置 terminated flag,并且 wakeup terminated queue,告诉 module 已经退了。
int my_thread_f(void *data){ pr_info("[my_thread_f] Current process id is %d (%s)\n", current->pid, current->comm); /* TODO: Wait for command to remove module on wq_stop_thread queue. */ wait_event_interruptible(wq_stop_thread, atomic_read(&flag_stop_thread) == 1); /* TODO: set flag to mark kernel thread termination */ atomic_set(&flag_thread_terminated, 1); /* TODO: notify the unload process that we have exited */ wake_up_interruptible(&wq_thread_terminated); pr_info("[my_thread_f] Exiting\n"); do_exit(0);}那么在 exit,也就类似,当它被调用的时候,设置 flag,wakeup queue,然后等待自己的 condition
static void __exit kthread_exit(void){ /* TODO: notify the kernel thread that its time to exit */ atomic_set(&flag_stop_thread, 1); wake_up_interruptible(&wq_stop_thread); /* TODO: wait for the kernel thread to exit */ wait_event_interruptible(wq_thread_terminated, atomic_read(&flag_thread_terminated) == 1); pr_info("[kthread_exit] Exit module\n");}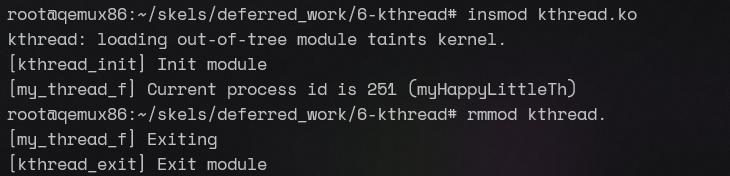
7. 定时器和进程之间共享的缓冲区[¶](https://linux-kernel-labs-zh.xyz/so2/lab5-deferred-work.html?highlight=waiting queue#section-13)
该任务的目的是在延迟操作(定时器)和进程上下文之间进行同步。设置一个周期性定时器,监视进程列表。如果其中一个进程终止,将打印一条消息。可以动态添加进程到列表中。请使用 3-4-5-deferred/kernel/ 骨架作为基础,并按照标有 TODO 4 的部分完成任务。
当接收到 MY_IOCTL_TIMER_MON 命令时,检查给定的进程是否存在,如果存在,则将其添加到监视的进程列表中,并在设置了类型后启用定时器。
:::info
使用 get_proc() 检查 pid,找到关联的 struct task_struct,并分配一个 struct mon_proc 项目,可以将其添加到列表中。请注意,该函数还会增加任务的引用计数,以便在任务终止时不会释放其内存。
使用自旋锁保护对列表的访问。请注意,由于我们与定时器处理程序共享数据,因此除了获取锁之外,还需要禁用底半部处理程序。请查阅 [锁定_](https://linux-kernel-labs-zh.xyz/so2/lab5-deferred-work.html?highlight=waiting queue#system-message-1) 部分。
每秒钟从定时器中收集信息。使用现有的定时器,并通过 TIMER_TYPE_ACCT 添加新的行为。要设置标志,请使用测试程序的 t 参数。
:::
在定时器处理程序中,遍历监视的进程列表,并检查它们是否已终止。如果是,则打印进程名称和 PID,然后从列表中删除该进程,递减任务使用计数器,以便可以释放其内存,最后释放 struct mon_proc 结构。
:::info
使用 struct task_struct() 的 state 字段。如果任务的状态为 TASK_DEAD,则表示任务已终止。
使用 put_task_struct() 递减任务使用计数器。
确保使用自旋锁保护列表访问。简单的变体就足够了。
确保使用安全迭代器遍历列表,因为我们可能需要从列表中删除项目。
:::
在检查完列表后,重新启用定时器。
复杂,需要用到锁,还需要用到引用计数。
我们也是首先来看 ioctl 的部分,首先在 TIMER_MON 分支里,我们获取 struct mon_proc,注意这里要判断这个 pid 是否存在,可以利用 ISERR 和 PTR_ERR 宏来做。
接着,由于我们要把 mon_proc 添加到列表里,所以得拿个 spinlock,由于此时 timer 也有可能运行,所以还得禁用 bh。最后,设置 flag
static struct my_device_data {  struct cdev cdev;  /* TODO 1: add timer */  struct timer_list tl;  /* TODO 2: add flag */  int flag;  /* TODO 3: add work */  struct work_struct wk;  /* TODO 4: add list for monitored processes */  struct list_head mon_list;  /* TODO 4: add spinlock to protect list */  spinlock_t mon_list_lock;} dev;static long deferred_ioctl(struct file *file, unsigned int cmd, unsigned long arg){  struct my_device_data *my_data = (struct my_device_data*) file->private_data;  unsigned long flags;
  pr_info("[deferred_ioctl] Command: %s\n", ioctl_command_to_string(cmd));
  switch (cmd) {    case MY_IOCTL_TIMER_SET:      /* TODO 2: set flag */      dev.flag = TIMER_TYPE_SET;      /* TODO 1: schedule timer */      mod_timer(&dev.tl, jiffies + HZ * arg);      break;    case MY_IOCTL_TIMER_CANCEL:      /* TODO 1: cancel timer */      del_timer(&dev.tl);      break;    case MY_IOCTL_TIMER_ALLOC:      /* TODO 2: set flag and schedule timer */      dev.flag = TIMER_TYPE_ALLOC;      mod_timer(&dev.tl, jiffies + HZ * arg);      break;    case MY_IOCTL_TIMER_MON:    {      /* TODO 4: use get_proc() and add task to list */      struct mon_proc *p = get_proc(arg);      if (IS_ERR(p))        return PTR_ERR(p);      /* TODO 4: protect access to list */      spin_lock_irqsave(&dev.mon_list_lock, flags);      list_add_tail(&p->list, &dev.mon_list);      spin_unlock_irqrestore(&dev.mon_list_lock, flags);      /* TODO 4: set flag and schedule timer */      dev.flag = TIMER_TYPE_ACCT;      mod_timer(&dev.tl, jiffies + HZ * 1);      break;    }    default:      return -ENOTTY;  }  return 0;}
使用现有的定时器,并通过 TIMER_TYPE_ACCT 添加新的行为。要设置标志,请使用测试程序的 t 参数。
这个我没看太懂,有必要用这个 TYPE 吗?
然后我们继续来看 timer。在分支里,我们遍历所有的 list。由于这里可能涉及到删除的操作,所以我们需要安全的遍历,记得拿锁。
static void timer_handler(struct timer_list *tl){ /* TODO 1: implement timer handler */ /* TODO 2: check flags: TIMER_TYPE_SET or TIMER_TYPE_ALLOC */ switch (dev.flag) { case TIMER_TYPE_SET: pr_info("PID: %d, name: %s\n", current->pid, current->comm); break; case TIMER_TYPE_ALLOC: /* TODO 3: schedule work */ #ifdef ALLOC_IO_DIRECT alloc_io(); #else schedule_work(&dev.wk); #endif break; case TIMER_TYPE_MON: { /* TODO 4: iterate the list and check the proccess state */ struct mon_proc *p, *n; spin_lock(&dev.mon_list_lock); list_for_each_entry_safe(p, n, &dev.mon_list, list) { /* TODO 4: if task is dead print info ... */ if (p->task->state == TASK_DEAD) { pr_info("Process %d (%s) is dead\n", p->task->pid, p->task->comm); /* TODO 4: ... decrement task usage counter ... */ /* TODO 4: ... remove it from the list ... */ /* TODO 4: ... free the struct mon_proc */ put_task_struct(p->task); list_del(&p->list); kfree(p); } } spin_unlock(&dev.mon_list_lock); if (list_empty(&dev.mon_list)) { dev.flag = TIMER_TYPE_NONE; del_timer(&dev.tl); } else { mod_timer(&dev.tl, jiffies + HZ * 1); } break; } }}再简单写一下 init
static int deferred_init(void){ int err;
pr_info("[deferred_init] Init module\n"); err = register_chrdev_region(MKDEV(MY_MAJOR, MY_MINOR), 1, MODULE_NAME); if (err) { pr_info("[deffered_init] register_chrdev_region: %d\n", err); return err; }
/* TODO 2: Initialize flag. */ dev.flag = TIMER_TYPE_NONE; /* TODO 3: Initialize work. */ INIT_WORK(&dev.wk, work_handler);
/* TODO 4: Initialize lock and list. */ spin_lock_init(&dev.mon_list_lock); INIT_LIST_HEAD(&dev.mon_list);
cdev_init(&dev.cdev, &my_fops); cdev_add(&dev.cdev, MKDEV(MY_MAJOR, MY_MINOR), 1);
/* TODO 1: Initialize timer. */ timer_setup(&dev.tl, timer_handler, 0);
return 0;}
static void deferred_exit(void){ struct mon_proc *p, *n; unsigned long flags;
pr_info("[deferred_exit] Exit module\n" );
cdev_del(&dev.cdev); unregister_chrdev_region(MKDEV(MY_MAJOR, MY_MINOR), 1);
/* TODO 1: Cleanup: make sure the timer is not running after exiting. */ del_timer_sync(&dev.tl); /* TODO 3: Cleanup: make sure the work handler is not scheduled. */ cancel_work_sync(&dev.wk);
/* TODO 4: Cleanup the monitered process list */ spin_lock_irqsave(&dev.mon_list_lock, flags); list_for_each_entry_safe(p, n, &dev.mon_list, list) { /* TODO 4: ... decrement task usage counter ... */ /* TODO 4: ... remove it from the list ... */ /* TODO 4: ... free the struct mon_proc */ put_task_struct(p->task); list_del(&p->list); kfree(p); } spin_unlock_irqrestore(&dev.mon_list_lock, flags);}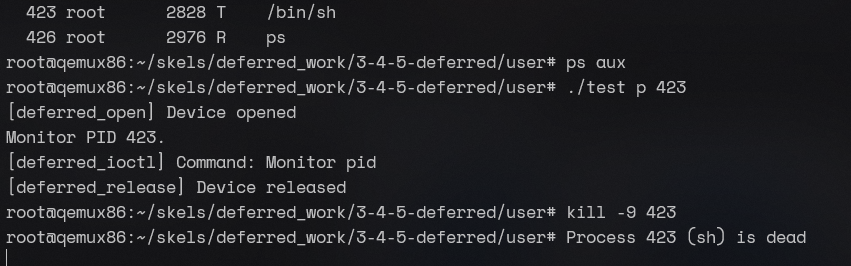 目测感觉没啥问题,但是不知道有没有锁之类乱七八糟的问题。
块设备驱动程序
0. 简介
使用 LXR 在 Linux 内核中查找以下符号的定义:
struct biostruct bio_vecbio_for_each_segmentstruct gendiskstruct block_device_operationsstruct request
struct bio
/* * main unit of I/O for the block layer and lower layers (ie drivers and * stacking drivers) */struct bio {  struct bio    *bi_next;  /* request queue link */  struct block_device  *bi_bdev;  blk_opf_t    bi_opf;    /* bottom bits REQ_OP, top bits             * req_flags.             */  unsigned short    bi_flags;  /* BIO_* below */  unsigned short    bi_ioprio;  enum rw_hint    bi_write_hint;  blk_status_t    bi_status;  atomic_t    __bi_remaining;
  struct bvec_iter  bi_iter;
  union {    /* for polled bios: */    blk_qc_t    bi_cookie;    /* for plugged zoned writes only: */    unsigned int    __bi_nr_segments;  };  bio_end_io_t    *bi_end_io;  void      *bi_private;#ifdef CONFIG_BLK_CGROUP  /*   * Represents the association of the css and request_queue for the bio.   * If a bio goes direct to device, it will not have a blkg as it will   * not have a request_queue associated with it.  The reference is put   * on release of the bio.   */  struct blkcg_gq    *bi_blkg;  struct bio_issue  bi_issue;#ifdef CONFIG_BLK_CGROUP_IOCOST  u64      bi_iocost_cost;#endif#endif
#ifdef CONFIG_BLK_INLINE_ENCRYPTION  struct bio_crypt_ctx  *bi_crypt_context;#endif
  union {#if defined(CONFIG_BLK_DEV_INTEGRITY)    struct bio_integrity_payload *bi_integrity; /* data integrity */#endif  };
  unsigned short    bi_vcnt;  /* how many bio_vec's */
  /*   * Everything starting with bi_max_vecs will be preserved by bio_reset()   */
  unsigned short    bi_max_vecs;  /* max bvl_vecs we can hold */
  atomic_t    __bi_cnt;  /* pin count */
  struct bio_vec    *bi_io_vec;  /* the actual vec list */
  struct bio_set    *bi_pool;
  /*   * We can inline a number of vecs at the end of the bio, to avoid   * double allocations for a small number of bio_vecs. This member   * MUST obviously be kept at the very end of the bio.   */  struct bio_vec    bi_inline_vecs[];};
struct bio_vec
/** * struct bio_vec - a contiguous range of physical memory addresses * @bv_page: First page associated with the address range. * @bv_len: Number of bytes in the address range. * @bv_offset: Start of the address range relative to the start of @bv_page. * * The following holds for a bvec if n * PAGE_SIZE < bv_offset + bv_len: * * nth_page(@bv_page, n) == @bv_page + n * * This holds because page_is_mergeable() checks the above property. */struct bio_vec { struct page *bv_page; unsigned int bv_len; unsigned int bv_offset;};bio_for_each_segment
#define __bio_for_each_segment(bvl, bio, iter, start)      \  for (iter = (start);            \       (iter).bi_size &&            \    ((bvl = bio_iter_iovec((bio), (iter))), 1);    \       bio_advance_iter_single((bio), &(iter), (bvl).bv_len))
#define bio_for_each_segment(bvl, bio, iter)        \  __bio_for_each_segment(bvl, bio, iter, (bio)->bi_iter)
struct gendisk
struct gendisk {  /*   * major/first_minor/minors should not be set by any new driver, the   * block core will take care of allocating them automatically.   */  int major;  int first_minor;  int minors;
  char disk_name[DISK_NAME_LEN];  /* name of major driver */
  unsigned short events;    /* supported events */  unsigned short event_flags;  /* flags related to event processing */
  struct xarray part_tbl;  struct block_device *part0;
  const struct block_device_operations *fops;  struct request_queue *queue;  void *private_data;
  struct bio_set bio_split;
  int flags;  unsigned long state;#define GD_NEED_PART_SCAN    0#define GD_READ_ONLY      1#define GD_DEAD        2#define GD_NATIVE_CAPACITY    3#define GD_ADDED      4#define GD_SUPPRESS_PART_SCAN    5#define GD_OWNS_QUEUE      6
  struct mutex open_mutex;  /* open/close mutex */  unsigned open_partitions;  /* number of open partitions */
  struct backing_dev_info  *bdi;  struct kobject queue_kobj;  /* the queue/ directory */  struct kobject *slave_dir;#ifdef CONFIG_BLOCK_HOLDER_DEPRECATED  struct list_head slave_bdevs;#endif  struct timer_rand_state *random;  atomic_t sync_io;    /* RAID */  struct disk_events *ev;
#ifdef CONFIG_BLK_DEV_ZONED  /*   * Zoned block device information. Reads of this information must be   * protected with blk_queue_enter() / blk_queue_exit(). Modifying this   * information is only allowed while no requests are being processed.   * See also blk_mq_freeze_queue() and blk_mq_unfreeze_queue().   */  unsigned int    nr_zones;  unsigned int    zone_capacity;  unsigned int    last_zone_capacity;  unsigned long    *conv_zones_bitmap;  unsigned int            zone_wplugs_hash_bits;  spinlock_t              zone_wplugs_lock;  struct mempool_s  *zone_wplugs_pool;  struct hlist_head       *zone_wplugs_hash;  struct list_head        zone_wplugs_err_list;  struct work_struct  zone_wplugs_work;  struct workqueue_struct *zone_wplugs_wq;#endif /* CONFIG_BLK_DEV_ZONED */
#if IS_ENABLED(CONFIG_CDROM)  struct cdrom_device_info *cdi;#endif  int node_id;  struct badblocks *bb;  struct lockdep_map lockdep_map;  u64 diskseq;  blk_mode_t open_mode;
  /*   * Independent sector access ranges. This is always NULL for   * devices that do not have multiple independent access ranges.   */  struct blk_independent_access_ranges *ia_ranges;};
struct block_device_operations
struct block_device_operations {  void (*submit_bio)(struct bio *bio);  int (*poll_bio)(struct bio *bio, struct io_comp_batch *iob,      unsigned int flags);  int (*open)(struct gendisk *disk, blk_mode_t mode);  void (*release)(struct gendisk *disk);  int (*ioctl)(struct block_device *bdev, blk_mode_t mode,      unsigned cmd, unsigned long arg);  int (*compat_ioctl)(struct block_device *bdev, blk_mode_t mode,      unsigned cmd, unsigned long arg);  unsigned int (*check_events) (struct gendisk *disk,              unsigned int clearing);  void (*unlock_native_capacity) (struct gendisk *);  int (*getgeo)(struct block_device *, struct hd_geometry *);  int (*set_read_only)(struct block_device *bdev, bool ro);  void (*free_disk)(struct gendisk *disk);  /* this callback is with swap_lock and sometimes page table lock held */  void (*swap_slot_free_notify) (struct block_device *, unsigned long);  int (*report_zones)(struct gendisk *, sector_t sector,      unsigned int nr_zones, report_zones_cb cb, void *data);  char *(*devnode)(struct gendisk *disk, umode_t *mode);  /* returns the length of the identifier or a negative errno: */  int (*get_unique_id)(struct gendisk *disk, u8 id[16],      enum blk_unique_id id_type);  struct module *owner;  const struct pr_ops *pr_ops;
  /*   * Special callback for probing GPT entry at a given sector.   * Needed by Android devices, used by GPT scanner and MMC blk   * driver.   */  int (*alternative_gpt_sector)(struct gendisk *disk, sector_t *sector);};
struct request
/* * Try to put the fields that are referenced together in the same cacheline. * * If you modify this structure, make sure to update blk_rq_init() and * especially blk_mq_rq_ctx_init() to take care of the added fields. */struct request {  struct request_queue *q;  struct blk_mq_ctx *mq_ctx;  struct blk_mq_hw_ctx *mq_hctx;
  blk_opf_t cmd_flags;    /* op and common flags */  req_flags_t rq_flags;
  int tag;  int internal_tag;
  unsigned int timeout;
  /* the following two fields are internal, NEVER access directly */  unsigned int __data_len;  /* total data len */  sector_t __sector;    /* sector cursor */
  struct bio *bio;  struct bio *biotail;
  union {    struct list_head queuelist;    struct request *rq_next;  };
  struct block_device *part;#ifdef CONFIG_BLK_RQ_ALLOC_TIME  /* Time that the first bio started allocating this request. */  u64 alloc_time_ns;#endif  /* Time that this request was allocated for this IO. */  u64 start_time_ns;  /* Time that I/O was submitted to the device. */  u64 io_start_time_ns;
#ifdef CONFIG_BLK_WBT  unsigned short wbt_flags;#endif  /*   * rq sectors used for blk stats. It has the same value   * with blk_rq_sectors(rq), except that it never be zeroed   * by completion.   */  unsigned short stats_sectors;
  /*   * Number of scatter-gather DMA addr+len pairs after   * physical address coalescing is performed.   */  unsigned short nr_phys_segments;
#ifdef CONFIG_BLK_DEV_INTEGRITY  unsigned short nr_integrity_segments;#endif
#ifdef CONFIG_BLK_INLINE_ENCRYPTION  struct bio_crypt_ctx *crypt_ctx;  struct blk_crypto_keyslot *crypt_keyslot;#endif
  enum rw_hint write_hint;  unsigned short ioprio;
  enum mq_rq_state state;  atomic_t ref;
  unsigned long deadline;
  /*   * The hash is used inside the scheduler, and killed once the   * request reaches the dispatch list. The ipi_list is only used   * to queue the request for softirq completion, which is long   * after the request has been unhashed (and even removed from   * the dispatch list).   */  union {    struct hlist_node hash;  /* merge hash */    struct llist_node ipi_list;  };
  /*   * The rb_node is only used inside the io scheduler, requests   * are pruned when moved to the dispatch queue. special_vec must   * only be used if RQF_SPECIAL_PAYLOAD is set, and those cannot be   * insert into an IO scheduler.   */  union {    struct rb_node rb_node;  /* sort/lookup */    struct bio_vec special_vec;  };
  /*   * Three pointers are available for the IO schedulers, if they need   * more they have to dynamically allocate it.   */  struct {    struct io_cq    *icq;    void      *priv[2];  } elv;
  struct {    unsigned int    seq;    rq_end_io_fn    *saved_end_io;  } flush;
  u64 fifo_time;
  /*   * completion callback.   */  rq_end_io_fn *end_io;  void *end_io_data;};
1. 块设备
创建一个内核模块,允许你注册或取消注册块设备。从实验骨架的 1-2-3-6-ram-disk/kernel 目录中的文件开始。
按照实验骨架中标记为 TODO 1 的注释进行操作。使用现有的宏定义 (MY_BLOCK_MAJOR, MY_BLKDEV_NAME)。检查注册函数返回的值,在出现错误的情况下返回错误代码。
编译模块,将其复制到虚拟机并插入内核。验证你的设备是否成功创建在 /proc/devices 内。你将看到一个主设备号为 240 的设备。
卸载内核模块,并检查设备是否已注销。
:::info
查看 注册块 I/O 设备 部分。
:::
将 MY_BLOCK_MAJOR 的值更改为 7。编译模块,将其复制到虚拟机并插入内核。注意到插入失败,因为已经有另一个驱动程序/设备在内核中注册了主设备号 7。
将 MY_BLOCK_MAJOR 宏的值恢复为 240。
没啥好说的
static int __init my_block_init(void){  int err = 0;
  /* TODO 1: register block device */  err = register_blkdev(MY_BLOCK_MAJOR, MY_BLKDEV_NAME);  if (err < 0) {    printk(KERN_ERR "Unable to register the blk device");    goto out;  }

  /* TODO 2: create block device using create_block_device */
  return 0;
out:  /* TODO 2: unregister block device in case of an error */  return err;}
static void __exit my_block_exit(void){  /* TODO 2: cleanup block device using delete_block_device */
  /* TODO 1: unregister block device */  unregister_blkdev(MY_BLOCK_MAJOR, MY_BLKDEV_NAME);}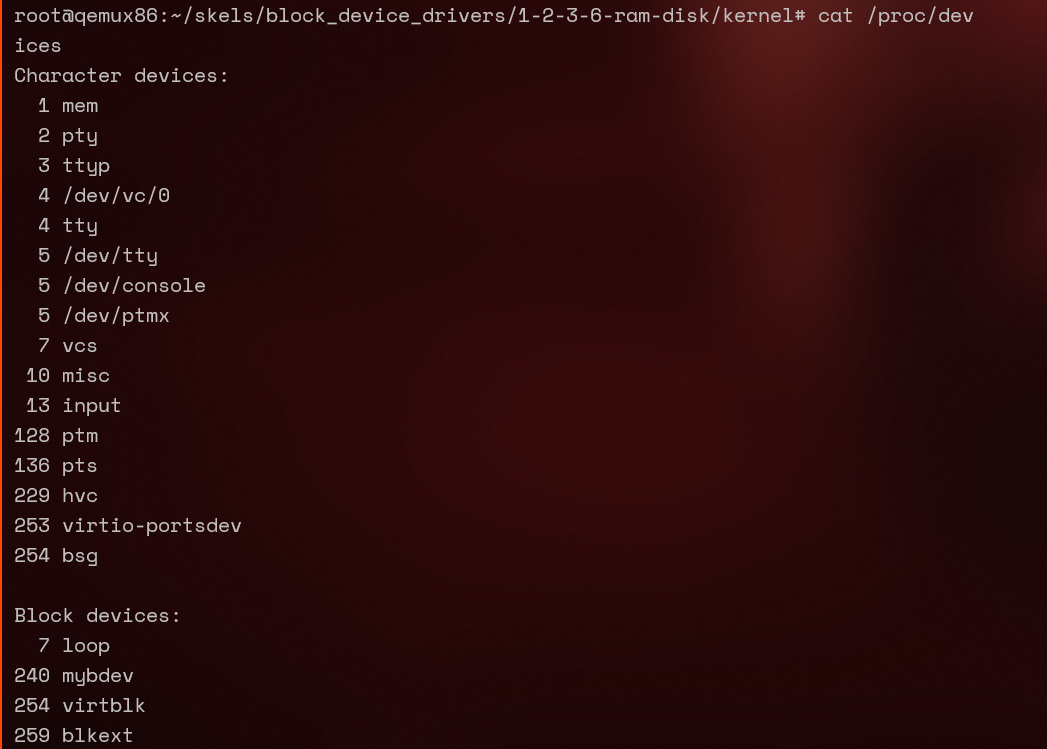
2. 磁盘注册
修改前面的模块以添加与驱动程序关联的磁盘。分析宏定义、my_block_dev 结构以及 ram-disk.c 文件中的现有函数。
按照标记为 TODO 2 的注释进行操作。使用 create_block_device() 和 delete_block_device() 函数。
:::info
:::
填充 my_block_request() 函数以处理请求,但实际上不处理你的请求:显示“request received”消息以及以下信息:来自当前 struct bio 结构的起始扇区、总大小、数据大小和方向。要验证请求类型,请使用 :c:func:[](https://linux-kernel-labs-zh.xyz/labs/block_device_drivers.html#system-message-1)blk_rq_is_passthrough(该函数在请求由文件系统生成的情况下返回 0)。
:::info
要找到所需的信息,查看 块设备的请求 部分。
:::
使用 blk_mq_end_request() 函数来完成请求的处理。
将模块插入内核,并检查模块打印的消息。当添加设备时,会向设备发送一个请求。检查 /dev/myblock 是否存在,如果不存在,使用以下命令创建设备:
mknod /dev/myblock b 240 0要生成写入请求,请使用以下命令:
echo "abc"> /dev/myblock注意,写入请求之前会有一个读取请求。该请求用于从磁盘中读取块并使用用户提供的数据“更新”其内容,而不会覆盖其他部分。在读取和更新之后,写入操作发生。
:::
注册磁盘是一个比较复杂的事情,但是这个已经给你包裹好了。我们还是简单来看一下他干了什么
static int create_block_device(struct my_block_dev *dev){  int err;
  dev->size = NR_SECTORS * KERNEL_SECTOR_SIZE;  dev->data = vmalloc(dev->size);  if (dev->data == NULL) {    printk(KERN_ERR "vmalloc: out of memory\n");    err = -ENOMEM;    goto out_vmalloc;  }
  /* Initialize tag set. */  dev->tag_set.ops = &my_queue_ops;  dev->tag_set.nr_hw_queues = 1;  dev->tag_set.queue_depth = 128;  dev->tag_set.numa_node = NUMA_NO_NODE;  dev->tag_set.cmd_size = 0;  dev->tag_set.flags = BLK_MQ_F_SHOULD_MERGE;  err = blk_mq_alloc_tag_set(&dev->tag_set);  if (err) {      printk(KERN_ERR "blk_mq_alloc_tag_set: can't allocate tag set\n");      goto out_alloc_tag_set;  }
  /* Allocate queue. */  dev->queue = blk_mq_init_queue(&dev->tag_set);  if (IS_ERR(dev->queue)) {    printk(KERN_ERR "blk_mq_init_queue: out of memory\n");    err = -ENOMEM;    goto out_blk_init;  }  blk_queue_logical_block_size(dev->queue, KERNEL_SECTOR_SIZE);  dev->queue->queuedata = dev;
  /* initialize the gendisk structure */  dev->gd = alloc_disk(MY_BLOCK_MINORS);  if (!dev->gd) {    printk(KERN_ERR "alloc_disk: failure\n");    err = -ENOMEM;    goto out_alloc_disk;  }
  dev->gd->major = MY_BLOCK_MAJOR;  dev->gd->first_minor = 0;  dev->gd->fops = &my_block_ops;  dev->gd->queue = dev->queue;  dev->gd->private_data = dev;  snprintf(dev->gd->disk_name, DISK_NAME_LEN, "myblock");  set_capacity(dev->gd, NR_SECTORS);
  add_disk(dev->gd);
  return 0;
out_alloc_disk:  blk_cleanup_queue(dev->queue);out_blk_init:  blk_mq_free_tag_set(&dev->tag_set);out_alloc_tag_set:  vfree(dev->data);out_vmalloc:  return err;}
首先给磁盘分配了空间,然后设置了 tag_set,接着去分配一个队列,最后形成 gendisk 结构体。
主要来看一下 request 怎么写,基本上对着他前面讲的一些东西,主要是一些宏不知道咋用,也不知道哪些宏可以做到。
static blk_status_t my_block_request(struct blk_mq_hw_ctx *hctx,             const struct blk_mq_queue_data *bd){  struct request *rq;  struct my_block_dev *dev = hctx->queue->queuedata;
  /* TODO 2: get pointer to request */  rq = bd->rq;
  /* TODO 2: start request processing. */  blk_mq_start_request(rq);

  /* TODO 2: check fs request. Return if passthrough. */  if (blk_rq_is_passthrough(rq)) {    printk(KERN_NOTICE "Passthrough request, ignoring...\n");    blk_mq_end_request(rq, BLK_STS_IOERR);    goto out;  }

  /* TODO 2: print request information */  printk(KERN_NOTICE "Request received\n");  // 来自当前 struct bio 结构的起始扇区、总大小、数据大小和方向。  printk(KERN_NOTICE "Start sector: %llu\n", blk_rq_pos(rq));  printk(KERN_NOTICE "Total size: %llu\n", blk_rq_bytes(rq));  printk(KERN_NOTICE "Data size: %llu\n", blk_rq_cur_bytes(rq));  printk(KERN_NOTICE "Direction: %s\n", rq_data_dir(rq) == READ ? "READ" : "WRITE");


#if USE_BIO_TRANSFER == 1  /* TODO 6: process the request by calling my_xfer_request */#else  /* TODO 3: process the request by calling my_block_transfer */#endif
  /* TODO 2: end request successfully */  blk_mq_end_request(rq, BLK_STS_OK);
out:  return BLK_STS_OK;}
static int __init my_block_init(void){ int err = 0;
/* TODO 1: register block device */ err = register_blkdev(MY_BLOCK_MAJOR, MY_BLKDEV_NAME); if (err < 0) { printk(KERN_ERR "Unable to register the blk device\n"); goto out; }
/* TODO 2: create block device using create_block_device */ err = create_block_device(&g_dev); if (err < 0) { printk(KERN_ERR "Unable to create block device\n"); goto blk_out; }
return 0;/* TODO 2: unregister block device in case of an error */blk_out: unregister_blkdev(MY_BLOCK_MAJOR, MY_BLKDEV_NAME);out: return err;}
static void __exit my_block_exit(void){ /* TODO 2: cleanup block device using delete_block_device */ delete_block_device(&g_dev);
/* TODO 1: unregister block device */ unregister_blkdev(MY_BLOCK_MAJOR, MY_BLKDEV_NAME);}3. RAM 磁盘
修改前面的模块以创建一个 RAM 磁盘:对设备的请求将导致在一个内存区域中进行读写操作。
内存区域 dev->data 已经在模块的源代码中使用 vmalloc() 进行了分配,并使用 vfree() 进行了释放。
:::info
查看 处理请求 部分。
:::
按照标记为 TODO 3 的注释完成 my_block_transfer() 函数,将请求信息写入内存区域/从内存区域中读取。该函数将在队列处理函数 my_block_request() 中为每个请求调用。要写入/读取内存区域,请使用 memcpy()。要确定写入/读取的信息,请使用 struct request 结构的字段。
:::info
要了解请求数据的大小,请使用 blk_rq_cur_bytes 宏。不要使用 blk_rq_bytes 宏。
要找到与请求相关联的缓冲区,请使用 bio_data(:c:data:rq->bio)。
有关有用的宏的描述,请参阅 块设备的请求 部分。
你可以在 Linux 设备驱动程序 的 块设备驱动程序示例 中找到有用的信息。
:::
为了进行测试,使用测试文件 user/ram-disk-test.c。测试程序在 make build 编译时会自动编译,之后使用 make copy 复制到虚拟机,可以在 QEMU 虚拟机上使用以下命令运行:
./ram-disk-test无需将模块插入内核,它将由 ram-disk-test 命令插入。
由于传输数据缺乏同步(刷新),一些测试可能会失败。
现在跟我说可以用这些宏?碗辣!
我们 request 就是一个宏的利用,不过根据 ldd3 来看,我们这个很有可能只能处理第一个 bio
static void my_block_transfer(struct my_block_dev *dev, sector_t sector,    unsigned long len, char *buffer, int dir){  unsigned long offset = sector * KERNEL_SECTOR_SIZE;
  /* check for read/write beyond end of block device */  if ((offset + len) > dev->size)    return;
  /* TODO 3: read/write to dev buffer depending on dir */  switch (dir) {    case READ:      memcpy(dev->data + offset, buffer, len);      break;    case WRITE:      memcpy(buffer, dev->data + offset, len);      break;  }}
static blk_status_t my_block_request(struct blk_mq_hw_ctx *hctx,             const struct blk_mq_queue_data *bd){  struct request *rq;  struct my_block_dev *dev = hctx->queue->queuedata;  blk_status_t ret;
  /* TODO 2: get pointer to request */  rq = bd->rq;
  /* TODO 2: start request processing. */  blk_mq_start_request(rq);

  /* TODO 2: check fs request. Return if passthrough. */  if (blk_rq_is_passthrough(rq)) {    printk(KERN_NOTICE "Passthrough request, ignoring...\n");    ret = BLK_STS_IOERR;    goto out;  }

  /* TODO 2: print request information */  printk(KERN_NOTICE "Request received\n");  // 来自当前 struct bio 结构的起始扇区、总大小、数据大小和方向。  printk(KERN_NOTICE "Start sector: %llu\n", blk_rq_pos(rq));  printk(KERN_NOTICE "Total size: %llu\n", blk_rq_bytes(rq));  printk(KERN_NOTICE "Data size: %llu\n", blk_rq_cur_bytes(rq));  printk(KERN_NOTICE "Direction: %s\n", rq_data_dir(rq) == READ ? "READ" : "WRITE");


#if USE_BIO_TRANSFER == 1  /* TODO 6: process the request by calling my_xfer_request */#else  /* TODO 3: process the request by calling my_block_transfer */  my_block_transfer(dev, blk_rq_pos(rq), blk_rq_cur_bytes(rq), bio_data(rq->bio), rq_data_dir(rq));#endif
  /* TODO 2: end request successfully */out:  blk_mq_end_request(rq, ret);  return ret;}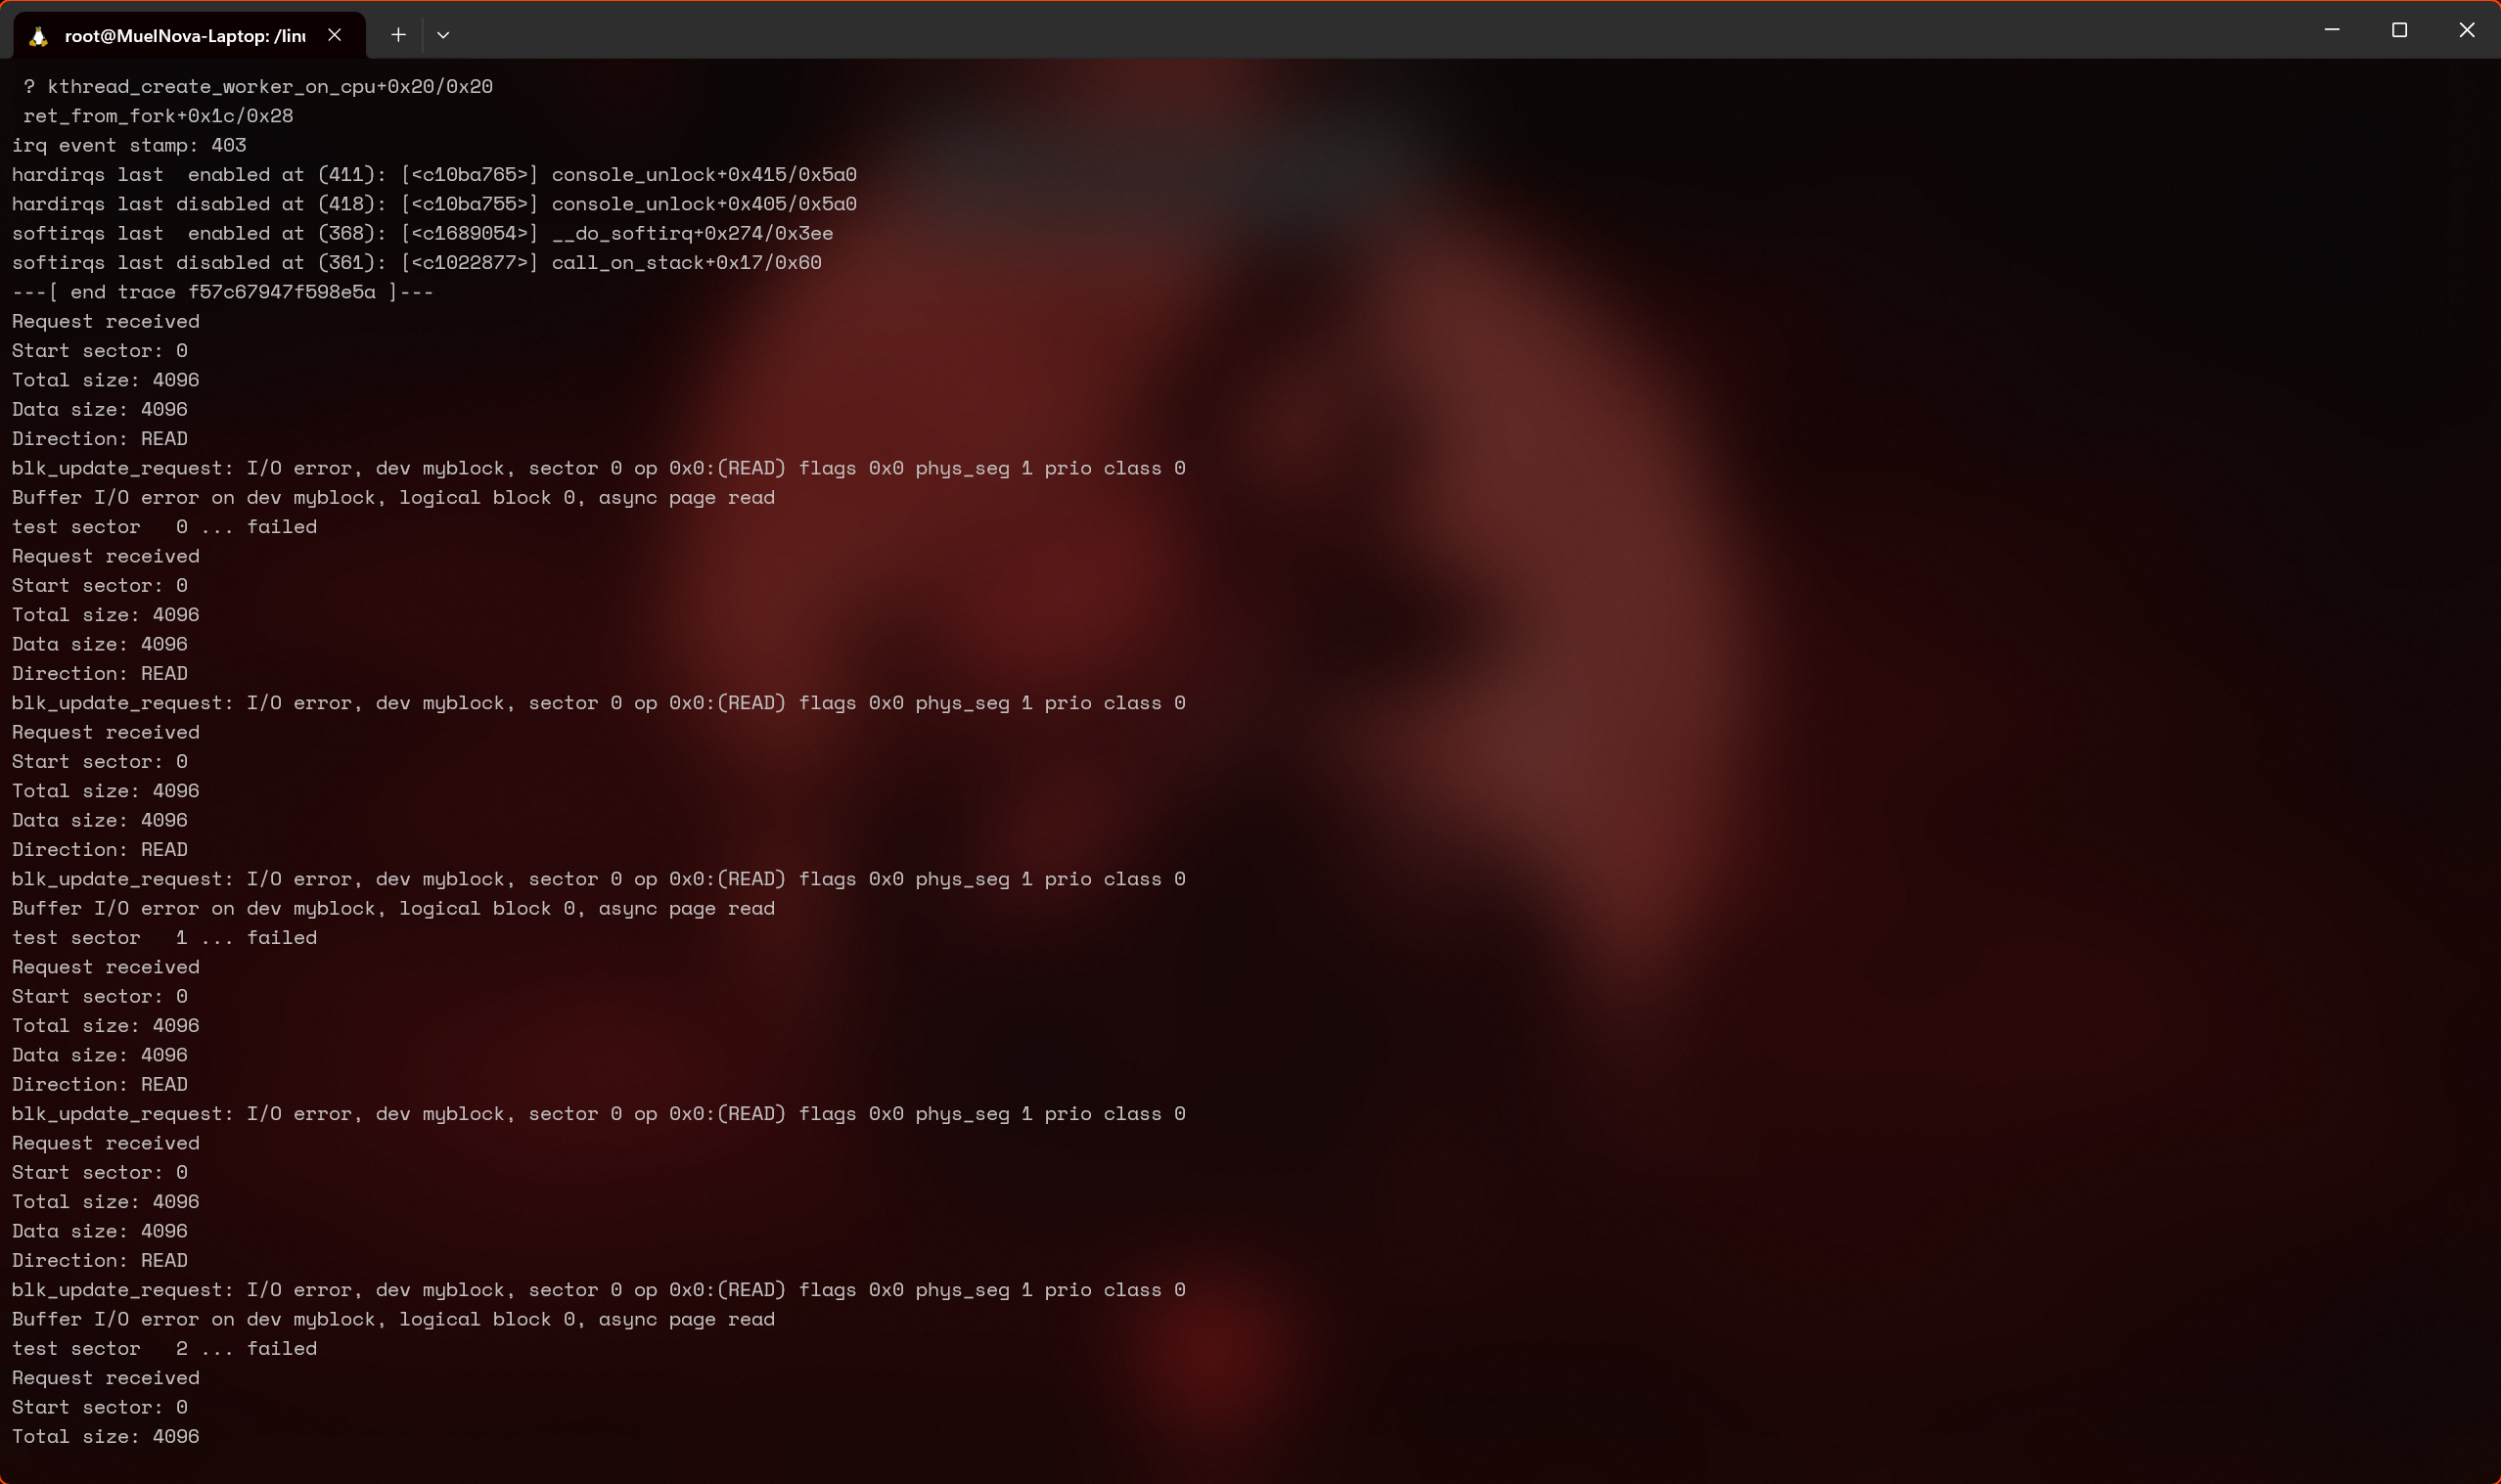
bro 一个样例没过,甚至还把 kernel 干 panic 了,也是顶尖了。
我们从每个 segment 来走看看
检查了一下,是因为 ret 没有设置,以及 transfer 里 READ 和 WRITE 写反了导致的。
static void my_block_transfer(struct my_block_dev *dev, sector_t sector,    unsigned long len, char *buffer, int dir){  unsigned long offset = sector * KERNEL_SECTOR_SIZE;
  /* check for read/write beyond end of block device */  if ((offset + len) > dev->size)    return;
  /* TODO 3: read/write to dev buffer depending on dir */  switch (dir) {    case READ:      memcpy(buffer, dev->data + offset, len);      break;    case WRITE:      memcpy(dev->data + offset, buffer, len);      break;  }}
static blk_status_t my_block_request(struct blk_mq_hw_ctx *hctx,             const struct blk_mq_queue_data *bd){  struct request *rq;  struct my_block_dev *dev = hctx->queue->queuedata;  blk_status_t ret;
  /* TODO 2: get pointer to request */  rq = bd->rq;
  /* TODO 2: start request processing. */  blk_mq_start_request(rq);  pos_sector = blk_rq_pos(rq);

  /* TODO 2: check fs request. Return if passthrough. */  if (blk_rq_is_passthrough(rq)) {    printk(KERN_NOTICE "Passthrough request, ignoring...\n");    ret = BLK_STS_IOERR;    goto out;  }

  /* TODO 2: print request information */  printk(KERN_NOTICE "Request received\n");  // 来自当前 struct bio 结构的起始扇区、总大小、数据大小和方向。  printk(KERN_NOTICE "Start sector: %llu\n", blk_rq_pos(rq));  printk(KERN_NOTICE "Total size: %llu\n", blk_rq_bytes(rq));  printk(KERN_NOTICE "Data size: %llu\n", blk_rq_cur_bytes(rq));  printk(KERN_NOTICE "Direction: %s\n", rq_data_dir(rq) == READ ? "READ" : "WRITE");
#if USE_BIO_TRANSFER == 1  /* TODO 6: process the request by calling my_xfer_request */#else  /* TODO 3: process the request by calling my_block_transfer */  my_block_transfer(dev, blk_rq_pos(rq), blk_rq_cur_bytes(rq), bio_data(rq->bio), rq_data_dir(rq));#endif
  /* TODO 2: end request successfully */  ret = BLK_STS_OK;out:  blk_mq_end_request(rq, ret);  return ret;}
4. 从磁盘读取数据
本练习的目的是从内核直接读取 PHYSICAL_DISK_NAME 磁盘(/dev/vdb)的数据。
:::info
在解决此练习之前,我们需要确保将磁盘添加到虚拟机中。
检查 qemu/Makefile 中的变量 QEMU_OPTS。应该已经使用 -drive ... 添加了两个额外的磁盘。
如果没有,请使用以下命令生成我们将用作磁盘镜像的文件:dd if=/dev/zero of=qemu/mydisk.img bs=1024 count=1 并将以下选项添加到 qemu/Makefile(在 :c:data:QEMU_OPTS 变量之中,root 盘之后): -drive file=qemu/mydisk.img,if=virtio,format=raw
:::
按照目录 4-5-relay/ 中标记为 TODO 4 的注释,实现 open_disk() 和 close_disk() 函数。使用 blkdev_get_by_path() 和 blkdev_put() 函数。设备必须以独占的读写模式打开 (FMODE_READ | FMODE_WRITE | FMODE_EXCL),并且当前模块必须作为 holder(THIS_MODULE)。
实现 send_test_bio() 函数。你将需要创建新的 struct bio 结构并填充它,然后提交它并等待它。读取磁盘的第一个扇区。要等待,请调用 submit_bio_wait() 函数。
:::info
磁盘的第一个扇区是索引为 0 的扇区。这个值必须用于初始化 struct bio 的 bi_iter.bi_sector 字段。
对于读操作,使用 REQ_OP_READ 宏来初始化 struct bio 的 bi_opf 字段。
:::
操作完成后,显示 struct bio 结构读取的前 3 个字节数据。使用 "% 02x" 格式作为 printk() 的参数来显示数据以及 kmap_atomic 和 kunmap_atomic 宏。
:::info
对于 kmap_atomic() 函数的实参,只需使用代码中分配的页面,即 page 变量。
请查看 如何使用 struct bio 结构的内容 和 等待 struct bio 结构的完成 部分。
:::
为了进行测试,使用 test-relay-disk 脚本,在运行 make copy 时会将其复制到虚拟机中。如果未复制,请确保该脚本可执行:
chmod +x test-relay-disk无需将模块加载到内核中,它将由 test-relay-disk 加载。
使用以下命令运行脚本:
./test-relay-disk脚本会将“abc”写入到 PHYSICAL_DISK_NAME 指定的磁盘的开头。运行后,模块将显示 61 62 63(字母“a”、“b”和“c”的十六进制值)。
我用的是 make console,直接有 vdb 这个磁盘。
对于 get 和 put,直接写即可
static struct block_device *open_disk(char *name){  struct block_device *bdev;
  /* TODO 4: get block device in exclusive mode */  bdev = blkdev_get_by_path(name, FMODE_READ | FMODE_WRITE | FMODE_EXCL, THIS_MODULE);    if (bdev == NULL) {    printk(KERN_ERR "[relay_init] No such device\n");    return NULL;  }
  return bdev;}
static void close_disk(struct block_device *bdev){  /* TODO 4: put block device */  blkdev_put(bdev, FMODE_READ | FMODE_WRITE | FMODE_EXCL);}
对于 sent 函数,稍微复杂一点,可以看它教程里样例的设置方法,也可以搜到一些宏。
static void send_test_bio(struct block_device *bdev, int dir){  struct bio *bio = bio_alloc(GFP_NOIO, 1);  struct page *page;  char *buf;
  /* TODO 4: fill bio (bdev, sector, direction) */  bio_set_dev(bio, bdev);  bio->bi_iter.bi_sector = 0;  bio_set_op_attrs(bio, dir, 0);
  page = alloc_page(GFP_NOIO);  bio_add_page(bio, page, KERNEL_SECTOR_SIZE, 0);
  /* TODO 5: write message to bio buffer if direction is write */
  /* TODO 4: submit bio and wait for completion */  submit_bio_wait(bio);
  /* TODO 4: read data (first 3 bytes) from bio buffer and print it */    page = bio_first_page_all(bio);  buf = kmap_atomic(page);  printk(KERN_INFO "Read data: % 02x % 02x % 02x\n", buf[0], buf[1], buf[2]);  kunmap_atomic(buf);
  bio_put(bio);  __free_page(page);}
5. 将数据写入磁盘
按照标有 TODO 5 的注释,在磁盘上写入消息(BIO_WRITE_MESSAGE)。
函数 send_test_bio() 接收操作类型(读取或写入)作为实参。在函数 relay_init() 中调用读取函数,在函数 relay_exit() 中调用写入函数。建议使用 REQ_OP_READ 和 REQ_OP_WRITE 宏。
在 send_test_bio() 函数中,如果操作是写入,使用消息 BIO_WRITE_MESSAGE 填充与 struct bio 结构相关联的缓冲区。使用 kmap_atomic 和 kunmap_atomic 宏来处理与 struct bio 结构相关联的缓冲区。
:::info
需要通过相应地设置 bi_opf 字段来更新与 struct bio 结构相关联的操作类型。
:::
为了测试,请使用以下命令运行 test-relay-disk 脚本:
./test-relay-disk该脚本将在标准输出中显示 "read from /dev/sdb: 64 65 66" 消息。
有点搞,写完之后发现 read from /dev/sdb 一直是 61 62 63。调了半天,看什么 sync 之类的都不行。重启了一下 qemu 可以了。乱七八糟改,不知道写哪里了,直接全部丢上去
/* * SO2 Lab - Block device drivers (#7) * Linux - Exercise #4, #5 (Relay disk - bio) */
#include "linux/blk_types.h"#include <linux/kernel.h>#include <linux/module.h>#include <linux/fs.h>#include <linux/wait.h>#include <linux/sched.h>#include <linux/genhd.h>#include <linux/blkdev.h>
MODULE_AUTHOR("SO2");MODULE_DESCRIPTION("Relay disk");MODULE_LICENSE("GPL");
#define KERN_LOG_LEVEL    KERN_ALERT
#define PHYSICAL_DISK_NAME  "/dev/vdb"#define KERNEL_SECTOR_SIZE  512
#define BIO_WRITE_MESSAGE  "def"

/* pointer to physical device structure */static struct block_device *phys_bdev;
static void send_test_bio(struct block_device *bdev, int dir){  struct bio *bio = bio_alloc(GFP_NOIO, 1);  struct page *page;  char *buf;  int err;
  bio_set_dev(bio, bdev);  bio->bi_iter.bi_sector = 0;  bio_set_op_attrs(bio, dir, 0);  printk(KERN_INFO "%d\n", bio->bi_opf);
  page = alloc_page(GFP_NOIO);  bio_add_page(bio, page, KERNEL_SECTOR_SIZE, 0);
  if (dir == REQ_OP_WRITE) {    buf = kmap_atomic(page);    printk(KERN_DEBUG "buf: %p\n", buf);    memcpy(buf, BIO_WRITE_MESSAGE, strlen(BIO_WRITE_MESSAGE));    kunmap_atomic(buf);  }
  /* TODO 4: submit bio and wait for completion */  err = submit_bio_wait(bio);  if (err) {    printk(KERN_ERR "[relay_init] submit_bio_wait failed\n");    return;  }
  /* TODO 4: read data (first 3 bytes) from bio buffer and print it */  page = bio_first_page_all(bio);  buf = kmap_atomic(page);  printk(KERN_DEBUG "buf: %p\n", buf);  printk(KERN_INFO "Read data: % 02x % 02x % 02x\n", buf[0], buf[1], buf[2]);  kunmap_atomic(buf);
  bio_put(bio);  __free_page(page);}
static struct block_device *open_disk(char *name){  struct block_device *bdev;
  /* TODO 4: get block device in exclusive mode */  bdev = blkdev_get_by_path(name, FMODE_READ | FMODE_WRITE | FMODE_EXCL, THIS_MODULE);  if (bdev == NULL) {    printk(KERN_ERR "[relay_init] No such device\n");    return NULL;  }  return bdev;}
static int __init relay_init(void){  phys_bdev = open_disk(PHYSICAL_DISK_NAME);  if (phys_bdev == NULL) {    printk(KERN_ERR "[relay_init] No such device\n");    return -EINVAL;  }
  send_test_bio(phys_bdev, REQ_OP_READ);
  return 0;}
static void close_disk(struct block_device *bdev){  /* TODO 4: put block device */  blkdev_put(bdev, FMODE_READ | FMODE_WRITE | FMODE_EXCL);}
static void __exit relay_exit(void){  /* TODO 5: send test write bio */  send_test_bio(phys_bdev, REQ_OP_WRITE);  close_disk(phys_bdev);}
module_init(relay_init);module_exit(relay_exit);
6. 在 struct bio 级别处理请求队列中的请求
在练习 3 的实现中,我们只处理了请求的当前 struct bio 的 struct bio_vec。我们希望处理来自请求队列中所有 struct bio 结构的所有 struct bio_vec 结构(也称为段)。
在 ramdisk 的实现(1-2-3-6-ram-disk/ 目录)中,添加一些支持,使得其可以在 struct bio 级别处理请求队列中的请求。按照标有 TODO 6 的注释进行操作。
将 USE_BIO_TRANSFER 宏设置为 1。
实现 my_xfer_request() 函数。使用 rq_for_each_segment 宏遍历请求中每个 struct bio 的 bio_vec 结构。
:::info
请查阅 如何使用 struct bio 结构的内容 部分中的指示和代码片段。
使用 struct bio 的段迭代器获取当前扇区(iter.iter.bi_sector)。
使用请求迭代器获取对当前 struct bio 的引用(iter.bio)。
使用 bio_data_dir 宏查找读取或写入的方向。
使用 kmap_atomic 或 kunmap_atomic 宏映射每个 struct bio 结构的页面并访问其关联的缓冲区。为了进行实际的传输,调用前面练习中实现的 my_block_transfer() 函数。
:::
为了进行测试,请使用 ram-disk-test.c 测试文件:
./ram-disk-test无需将模块插入到内核中,它将由 ram-disk-test 可执行文件插入。
某些测试可能会由于传输数据的缺乏同步(刷新)而崩溃。
这个其实之前已经写了。就是 for each,不过没贴上来。
/* to transfer data using bio structures enable USE_BIO_TRANFER */#if USE_BIO_TRANSFER == 1static void my_xfer_request(struct my_block_dev *dev, struct request *req){  struct bio_vec bvec;  struct req_iterator iter;  /* TODO 6: iterate segments */  rq_for_each_segment(bvec, req, iter) {    /* TODO 6: copy bio data to device buffer */        sector_t sector = iter.iter.bi_sector;    char *buffer = kmap_atomic(bvec.bv_page);    unsigned long offset = bvec.bv_offset;    size_t len = bvec.bv_len;    int dir = bio_data_dir(iter.bio);
    my_block_transfer(dev, sector, len, buffer + offset, dir);
    kunmap_atomic(buffer);  }
}
文件系统驱动程序(第一部分)
1. 注册和注销 myfs 文件系统
处理文件系统的第一步是注册和注销它。我们要为 myfs.c 中描述的文件系统执行此操作。查看文件内容并按照标记为 TODO 1 的指示进行操作。
在 RegisterUnregisterSection 部分描述了需要执行的步骤。使用字符串 "myfs" 作为文件系统名称。
:::info
在文件系统结构中,使用代码框架中的 myfs_mount 函数填充超级块(在挂载时完成)。在 myfs_mount 中调用专用于没有磁盘支持的文件系统的函数。作为特定挂载函数的参数,使用代码框架中定义的 fill_super 类型的函数。你可以查看 mount 和 kill_sb 函数 部分。
要销毁超级块(在卸载时完成),请使用 kill_litter_super,这也是特定于没有磁盘支持的文件系统的函数。该函数已经实现,你需要在 struct file_system_type 结构中填充它。
:::
完成标记为 TODO 1 的部分后,编译模块,将其复制到 QEMU 虚拟机中,并启动虚拟机。加载内核模块,然后检查 /proc/filesystems 文件中是否存在 myfs 文件系统。
目前,文件系统只是注册了,它没有暴露可以使用的操作。如果我们尝试挂载它,操作将失败。为了尝试挂载,我们创建挂载点 /mnt/myfs/。
# mkdir -p /mnt/myfs然后我们使用 mount 命令:
# mount -t myfs none /mnt/myfs我们得到的错误消息显示我们还没有实现在超级块上的操作。我们将需要实现超级块上的操作并初始化根索引节点。我们将在后续步骤中完成这些操作。
:::info
发送给 mount 命令的 none 实参表示我们没有要挂载的设备,因为文件系统是虚拟的。类似地,这也是 Linux 系统上挂载 procfs 或 sysfs 文件系统的方式。
:::
终于到文件系统辣。ToDo1 要做的比较简单。
static struct dentry *myfs_mount(struct file_system_type *fs_type,    int flags, const char *dev_name, void *data){  /* TODO 1: call superblock mount function */    // 注意这里,是 mount_nodev,某人将被这个地方折磨半天,哈哈。    // hightlight-next-line  return mount_bdev(fs_type, flags, dev_name, data, myfs_fill_super);}
/* TODO 1: define file_system_type structure */
static struct file_system_type myfs_fs_type = {  .name = "myfs",    .mount = myfs_mount,  .kill_sb = kill_litter_super};
static int __init myfs_init(void){  int err;
  /* TODO 1: register */  err = register_filesystem(&myfs_fs_type);  if (err) {    printk(LOG_LEVEL "register_filesystem failed\n");    return err;  }
  return 0;}
static void __exit myfs_exit(void){  /* TODO 1: unregister */  unregister_filesystem(&myfs_fs_type);}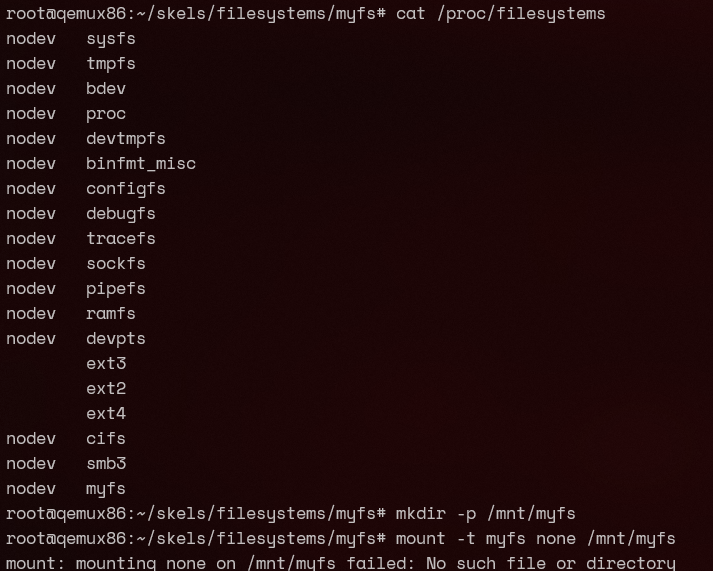
因为我们还没有实现 fill_super 的操作,所以现在其实只能在 /proc/filesystems 里看到它,而不能挂载。
:::warning
不能挂载是因为你用了 mount_bdev,哪来的 none 这个磁盘给你挂载啊()
修改为 mount_nodev 后才可以。
正确的应该是这样的?(大概)

:::
2. 完成 myfs 的超级块
为了能够挂载文件系统,我们需要填充其超级块的字段,即类型为 struct super_block 的通用 VFS 结构。我们将在 myfs_fill_super() 函数内填充该结构;超级块由作为函数实参传递的变量 sb 表示。请按照标记为 TODO 2 的提示进行操作。
:::info
要填充 myfs_fill_super 函数,你可以从 fill_super() 函数 部分中的示例开始。
对于超级块结构字段,请尽可能使用代码框架中定义的宏。
超级块结构中的 s_op 字段必须初始化为超级块操作结构(类型为 struct super_operations)。你需要定义这样的结构。
有关定义 struct super_operations 结构和填充超级块的信息,请参阅 超级块操作 部分。
初始化 struct super_operations 结构的 drop_inode 和 statfs 字段。
:::
尽管此时超级块将被正确初始化,但挂载操作仍将失败。为了成功完成挂载操作,还需要初始化根索引节点,这将在下一个练习中进行操作。
我们需要做的就是搞一个 super_operations 结构体,以及简单把 superblock 这个结构体填充一下。
/* TODO 2: define super_operations structure */static struct super_operations myfs_super_operations = {  .drop_inode = generic_delete_inode,};
static int myfs_fill_super(struct super_block *sb, void *data, int silent){  struct inode *root_inode;  struct dentry *root_dentry;
  /* TODO 2: fill super_block   *   - blocksize, blocksize_bits   *   - magic   *   - super operations   *   - maxbytes   */  sb->s_blocksize = MYFS_BLOCKSIZE;  sb->s_blocksize_bits = MYFS_BLOCKSIZE_BITS;  sb->s_magic = MYFS_MAGIC;  sb->s_op = &myfs_super_operations;  sb->s_maxbytes = MAX_LFS_FILESIZE;
  /* mode = directory & access rights (755) */  root_inode = myfs_get_inode(sb, NULL,      S_IFDIR | S_IRWXU | S_IRGRP |      S_IXGRP | S_IROTH | S_IXOTH);
  printk(LOG_LEVEL "root inode has %d link(s)\n", root_inode->i_nlink);
  if (!root_inode)    return -ENOMEM;
  root_dentry = d_make_root(root_inode);  if (!root_dentry)    goto out_no_root;  sb->s_root = root_dentry;
  return 0;
out_no_root:  iput(root_inode);  return -ENOMEM;}
3. 初始化 myfs 根索引节点
根索引节点是文件系统根目录(即 /)的索引节点。初始化是在文件系统挂载时完成的。在挂载时调用的 myfs_fill_super 函数会调用 myfs_get_inode 函数来创建并初始化索引节点。通常,所有索引节点都是由此函数创建和初始化;但是,在本练习中,我们只创建根索引节点。
inode 在 myfs_get_inode 函数内进行分配(调用 new_inode() 函数,将返回的结果分配给局部变量 inode)。
为了成功完成文件系统的挂载,你需要填充 myfs_get_inode 函数。按照标记为 TODO 3 的指示进行操作。可以参考 ramfs_get_inode 函数。
:::info
要初始化 uid, gid 和 mode,可以使用 inode_init_owner() 函数,就像在 ramfs_get_inode() 中那样。调用 inode_init_owner() 时,应将 NULL 作为第二个参数,因为创建的索引节点没有父目录。
将 VFS 索引节点的 i_atime, i_ctime 和 i_mtime 初始化为 current_time() 函数返回的值。
你需要为目录类型的索引节点初始化操作。执行以下步骤:
使用
S_ISDIR宏检查这是否是目录类型的索引节点。对于
和
字段,请使用已经实现的内核函数:
- 对于
i_op:使用simple_dir_inode_operations。- 对于
i_fop:使用simple_dir_operations。使用
inc_nlink()函数增加目录的链接数。
:::
fs 就是各种填结构体。但简单来说,我们就是按照这样一个结构:FS->SB->inode
注意,注解里说
要初始化
uid,gid和mode,可以使用inode_init_owner()函数,就像在ramfs_get_inode()中那样。调用inode_init_owner()时,应将NULL作为第二个参数,因为创建的索引节点没有父目录。
我看了一下 5.10.14 的 ramfs 代码,它其实也是用的 dir
struct inode *myfs_get_inode(struct super_block *sb, const struct inode *dir,    int mode){  struct inode *inode = new_inode(sb);
  if (!inode)    return NULL;
  /* TODO 3: fill inode structure   *     - mode   *     - uid   *     - gid   *     - atime,ctime,mtime   *     - ino   */   inode_init_owner(inode, dir, mode);   inode->i_atime = inode->i_mtime = inode->i_ctime = current_time(inode);   inode->i_ino = get_next_ino();  /* TODO 5: Init i_ino using get_next_ino */
  /* TODO 6: Initialize address space operations. */
  if (S_ISDIR(mode)) {    /* TODO 3: set inode operations for dir inodes. */    inode->i_op = &simple_dir_inode_operations;    inode->i_fop = &simple_dir_operations;
    /* TODO 5: use myfs_dir_inode_operations for inode     * operations (i_op).     */
    /* TODO 3: directory inodes start off with i_nlink == 2 (for "." entry).     * Directory link count should be incremented (use inc_nlink).     */    inc_nlink(inode);  }
  /* TODO 6: Set file inode and file operations for regular files   * (use the S_ISREG macro).   */
  return inode;}
4. 测试 myfs 的挂载和卸载
现在我们可以挂载文件系统了。按照上述步骤编译内核模块,将其复制到虚拟机中,启动虚拟机,然后插入内核模块,创建挂载点 /mnt/myfs/,并挂载文件系统。我们可以通过检查 /proc/mounts 文件来验证文件系统是否已挂载。
[](https://linux-kernel-labs-zh.xyz/labs/filesystems_part1.html#system-message-1)/mnt/myfs目录的索引节点号是多少?为什么?
:::info
要显示目录的索引节点号,请使用以下命令:
ls -di /path/to/directory其中 /path/to/directory/ 是要显示其索引节点号的目录的路径。
:::
我们使用以下命令检查 myfs 文件系统的统计信息:
stat -f /mnt/myfs我们想查看挂载点 /mnt/myfs 的内容以及是否可以创建文件。为此,我们运行以下命令:
# ls -la /mnt/myfs# touch /mnt/myfs/a.txt我们可以看到我们无法在文件系统上创建 a.txt 文件。这是因为我们尚未在 struct super_operations 结构中实现与索引节点相关的操作。我们将在下一个实验中实现这些操作。
使用以下命令卸载文件系统:
umount /mnt/myfs同时卸载对应的内核模块。
:::info
要测试整个功能,你可以使用 test-myfs.sh 脚本:
./test-myfs.sh该脚本将使用 make copy 将其复制到虚拟机,但前提是它具有可执行权限:
student@workstation:~/linux/tools/labs$ chmod +x skels/filesystems/myfs/test-myfs.sh显示的文件系统统计信息很简单,因为这些信息是由 simple_statfs 函数提供的。
:::
4711。这个数我问 gpt 和 claude 都说 “在许多 Linux 系统中,get_next_ino() 的起始值被设置为 4711。这个数字没有特殊的技术意义,它只是一个任意选择的起始值。
在计算机科学中,有时会使用这样的”魔术数字”作为起始值或标识符,部分是出于幽默,部分是因为它们容易记忆。”
但是我查源码都没看到这个,也没用搜索引擎收到相关内容。
root@MuelNova-Laptop:/linux/tools/labs# grep -r "4711" /linux/fs/Binary file /linux/fs/cifs/dir.o matches