将 arch-linux 安装到 USB 移动硬盘并且保留存储空间给 Windows 设备使用
title: Installing Arch Linux on USB External Hard Drive and Reserving Storage Space for Windows Devices authors: nova
Frustrated with syncing data across multiple platforms for years, I suddenly remembered that I still have a SanDisk 256G Gen3.1 USB flash drive I can use, so I decided to research how to install Arch Linux on a USB drive.
Preparation:
- VMWare Workstation
- Arch Linux image
- A fast and large capacity USB drive (recommended USB 3.0+, with a size of 50GB or more)
{/* truncate */}
Environment Setup
Virtual Machine
Add the Arch Linux image to a virtual machine with default settings. After starting the virtual machine, connect the USB.
Partitioning
Use the following command to view device partition information
fdisk -lYou can see that /dev/sdb corresponds to my USB drive, so you can use the following command to perform partitioning operations.
fdisk /dev/sdbYou can use m to view the meaning of each command. For brevity, details of each command are not explained here.
First, create a new GPT partition table by using g. Then, create new partitions for EFI, /, and reserved_for_usbdisk as follows:
# Create GPT partition tableCommand (m for help): g
# EFI partitionCommand (m for help): n  # Create new partition        # Partition number, default        # Starting sector, default+300M   # Size, 300MB for EFI partition
# Root partitionCommand (m for help): n  # Create new partition        # Partition number        # Starting sector, default+160G   # Size
# USB reserved partitionCommand (m for help): n  # Create new partition        # Partition number        # Starting sector, default        # Size, use default to fill the disk
Next, set the partition types, which can be viewed using t and L.
# EFICommand (m for help): t  # Change partition type1       # Partition number1       # MBR
# RootCommand (m for help): t  # Change partition type2       # Partition number23      # Linux Root
# USBDiskCommand (m for help): t  # Change partition type3       # Partition number11      # Microsoft base data
Use p to print the partition table, it should look like this:
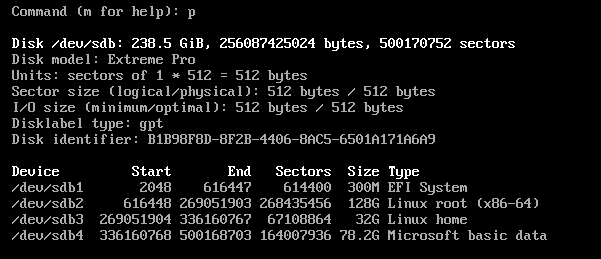
Save and exit with w.
Set Partition File System Type
mkfs.ext4 -O "^has_journal" /dev/sdb2 # rootmkfs.fat -F32 /dev/sdb1 # EFImkfs.fat -F32 /dev/sdb4 # USBDisk, we use FAT32 due to transferring between Windows devices.Installation
Mount the root directory to /mnt
mount /dev/sdb2 /mntmount /dev/sdb1 /mnt/boot/efi --mkdirInstall the necessary kernel and software packages
pacstrap /mnt base linux linux-firmware base-devel vim dhcpcd iwd intel-ucode amd-ucodeConfiguration
Generate fstab file
genfstab -U /mnt >> /mnt/etc/fstabCheck if the file content is correct.

Continue with password setup and new user configuration following other tutorials.
Configure Secure Boot
Difficult to configure. Cannot use sbctl for signing as we are using a removable device; hence we must use shim for signing.
First, install dependencies
pacman -Sy git sbsigntools(sudoer)$ git clone https://aur.archlinux.org/shim-signed && cd shim-signed && makepkg -siChange BOOTX64.EFI to grubx64.efi
mv /boot/efi/EFI/BOOT/{BOOTX64.EFI,grubx64.efi}Copy from shim-singed EFI files
cp /usr/share/shim-signed/shimx64.efi /boot/efi/EFI/BOOT/BOOTX64.EFIcp /usr/share/shim-signed/mmx64.efi /boot/efi/EFI/BOOT/Generate Mok key and sign
cd /boot/efiopenssl req -newkey rsa:4096 -nodes -keyout MOK.key -new -x509 -sha256 -subj "/CN=Machine Owner Key/" -out MOK.crtopenssl x509 -outform DER -in MOK.crt -out MOK.cSign both kernel and grub
sbsign --key MOK.key --cert MOK.crt --output /boot/vmlinuz-linux /boot/vmlinuz-linuxsbsign --key MOK.key --cert MOK.crt --output /boot/efi/EFI/BOOT/grubx64.efi /boot/efi/EFI/BOOT/grubx64.eficp ./MOK.cer /boot/efiConfigure Boot Loader
Install grub and efibootmgr
pacman -Sy grub efibootmgrSetup grub
grub-install --target=x86_64-efi --efi-directory=/boot --removable --modules="normal test efi_gop efi_uga search echo linux all_video gfxmenu gfxterm_background gfxterm_menu gfxterm loadenv configfile tpm" --sbat /usr/share/grub/sbat.csvGenerate grub configuration
grub-mkconfig -o /boot/grub/grub.cfgmkinitcpio post hook
vim /etc/initcpio/post/kernel-sbsign#!/usr/bin/env bash
kernel="$1"[[ -n "$kernel" ]] || exit 0
keypairs=(/boot/efi/MOK.key /boot/efi/MOK.crt)
for (( i=0; i<${#keypairs[@]}; i+=2 )); do key="${keypairs[$i]}" cert="${keypairs[(( i + 1 ))]}" if ! sbverify --cert "$cert" "$kernel" &>/dev/null; then sbsign --key "$key" --cert "$cert" --output "$kernel" "$kernel" fidonechmod +x /etc/initcpio/post/kernel-sbsignModify Locale Settings
Switch to /mnt for these operations (unless otherwise specified, the following steps take place in the file system after arch-chroot /mnt).
Set the timezone
ln -sf /usr/share/zoneinfo/Asia/Shanghai /etc/localtimeEdit locale settings by uncommenting en_SG.UTF-8
vim /etc/locale.gen# Uncomment the lines and savelocale-genSet local.conf to en_SG.UTF-8
echo "LANG=en_SG.UTF-8" > /etc/locale.confSet Hostname
echo "MuelNova-Arch" > etc/hostnameSet hosts
Add localhost mappings in hosts file
vim /etc/hosts
# Add the following two lines and save# 127.0.0.1        localhost# ::1            localhost
Configure initramfs
The default initramfs may have issues with different block devices and keyboard support.
To address this, move block and keyboard hooks before autodetect to ensure they are always loaded.
vim /etc/mkinitcpio.conf
# Modify HOOKS to the following, then save.# HOOKS=(base udev block keyboard autodetect modconf filesystems fsck)
mkinitcpio -P  # Regenerate initramfs
References
https://carbonateds.com/36.html
Arch Linux USB (Installation Article) | Zephyr’s Blog (zephyrheather.github.io)
{/* AI */}